As a service provided by FAE, the following informational posts cover a series of art related subjects, designed to demystify working with fine art, and tips on how best to use the FAE Website. The FAE Design Blog table of Contents has been divided into the following categories:
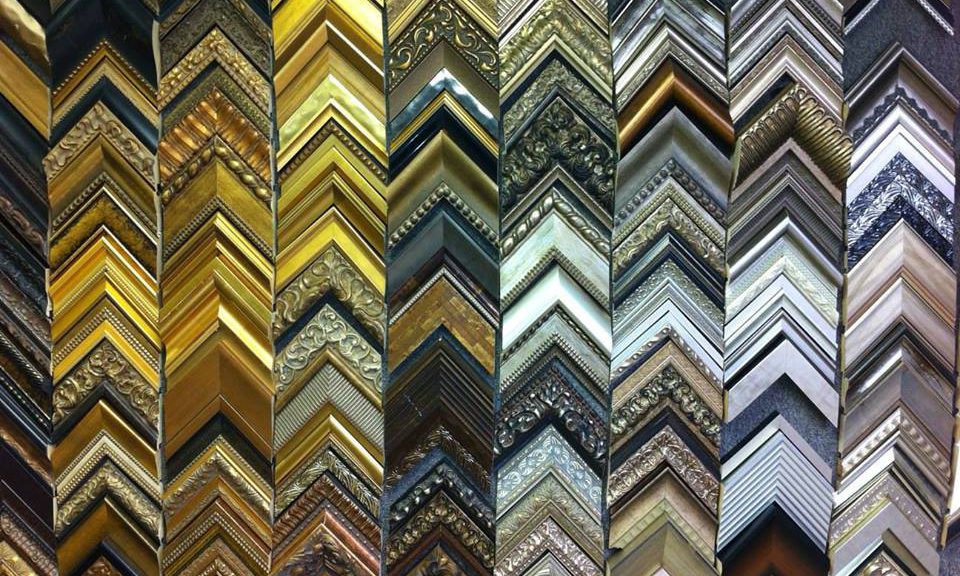
Please do not underestimate the importance of a proper frame for your painting or fine print. Framing is an important design decision that can either enhance or diminish your art viewing experience. The framing decisions you make will not only affect the look of the artwork and the environment into which it will be placed, but its long-term well being as well.
Without a frame to keep this image contained, the compositional elements that make up this image seem to fly out of the picture plane.This frame visually refocuses the viewer’s attention to the sunflowers, that make up the central part of the composition, making the painting feel far less chaotic.
How the artwork will be used can inform frame choice. If it is framed for a collection or museum – because it will most likely be moved from place to place over time – the most important consideration is that the frame compliments, enhances and protects the artwork. If it is to be installed in a commercial setting where it is most likely permanently placed, in addition to helping to enhance and protect the artwork, it needs to fit in with the overall design of the room.
Installation of Modernist paintings at the Philadelphia Museum. Because these works will be moved to different locations over time, each frame is designed to fit the painting rather than the specific space.These three paintings in a corporate collection are framed to fit the art as well as the space because they will not be moved like they would in a private or museum collection.
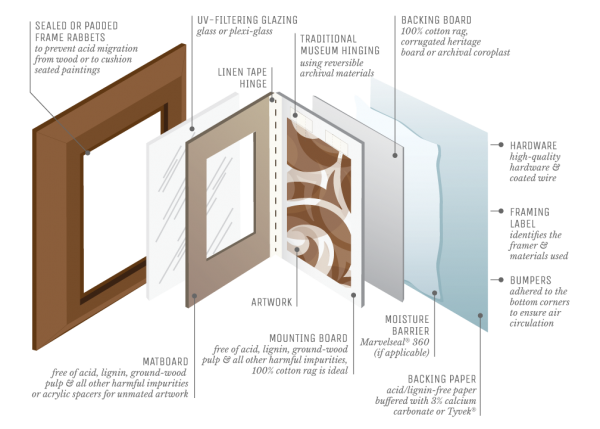
For your artwork to have the best chance of retaining its value, it is best to be sure that the frame shop you have chosen practices archival framing techniques. Essentially, Archival or Conservation framing means that anything used in the framing of an artwork will not damage the artwork over the long term and will, in most cases, help to protect it. This is most important with works on paper.
This Georgian Bay Art Conservation exploded view shows proper archival framing of an artwork on paper. This would be the standard suggested method of framing a cherished work on paper.
How to find a good Framer?
If you are working with a designer, they will most likely have several framers they regularly work with to recommend for your specific need. If you are not working with a designer, and you feel uncomfortable making this type of decision yourself, a good frame shop will normally have an experienced person on staff who can assist you in making good framing decisions.
One of the best ways to find a good framer is to contact several art galleries around your area that do not have framing departments and ask them who the best conservation framers are in the area. Although conservation framing is more expensive, the extra expense will pay off down the road.
You will not know if you have found a frame shop that uses archival materials unless you ask the right questions. The first question you ask should be, “Do you provide framing to the most current archival standards?”
How to help the framer help you get the most suitable frame?
For a framer to be most effective at suggesting proper frame designs for your artwork, it is best to not only take the artwork to the meeting, but to also take:
• Photos of the entire room in which the artwork will reside
• Measurements of the wall onto which the artwork is to be hung
• Information and visuals on how the artwork will be lit.
And if the artwork is to be hung over a sofa, a chest, or a fireplace mantle:
• Be sure to provide the height of the object the artwork is to be placed above
• Provide the height of the wall above the object to the ceiling molding above.
Following are a few things you may want to avoid or at least think about when choosing a frame for your artwork. I was going to call this section “Framing Don’ts” but as with just about every rule in this world, there are always exceptions.
Over-framing:
Over-framing can relate to the disproportionately large size of a frame to the artwork it surrounds, or the inappropriate ornateness or finish of the frame related to the period, style, and subject of the artwork. Sometimes, to make a small artwork appear more significant looking, a much larger frame (or mat-and-frame combination) is employed, sometimes to the point of totally overpowering the artwork. I have seen this technique used often on late impressions of Rembrandt etchings. To make them more important looking, a small etching is surrounded by a complex frame, often 10 to 20 times the size of the actual etching.
Although the frame above and below are both beautiful frames, both overpower and upstage the artworks themselves and I would consider both of these works to be over-framed. The one above might have worked if the gold had been toned down and not so shiny. The bright gold and frenetic ornamentation makes the artwork inside seem insignificant and hard to look at. The artwork below works well in coloration with the portrait within, but again, its design is so frenetic, the eye is drawn away from the painting. A frame should never take away from an artwork, it should only compliment it.
Here is the same portrait as above in an appropriate period frame. It beautifully compliments the painting and after seeing it, you can’t imagine another frame could be better for the painting.
Under-framing
Under-framing is when an artwork is not provided the frame it deserves. For financial and sometimes practical reasons, artists who paint in oil and acrylic on canvas will either not frame or put strip molding around the artwork to protect the artwork’s edges, assuming that the person who buys the painting will frame the work to their own specifications. Some galleries will not frame any of the work they have for sale of this type for that same reason.
The late Constructivist work, pictured above, would not look right on most walls without something around it to contain its chaotic line work. In this case, under-framed is no frame at all. Even a thin strip molding or a simple wood float, as seen below, will contain the line work and improve its overall appearance.
The 50/50 rule
This rule pertains to the width of two-part frame assemblies, that is, a liner to its frame or a mat to its frame. The rule states that both these elements should never be perceptively the same width. So, the mat width on a fine print should never be, or look, the same width as the frame that surrounds it. If the mat was there first and it is decided that it is to be kept, the width of the frame that is chosen for the work needs to be significantly smaller or larger to feel right.
This is a good example of why the 50/50 rule is important. Proportionally, the top and bottom relationship of the frame to the mat is on the verge of being to close but is still acceptable, where the left and right relationships appear the same and do not look right. The fact that the mat sizes of the top and the side are different might indicate that the frame was being reused. Normally the mat proportions would be the same all around or a little greater at the bottom. When there is more space at the bottom than the rest of the mat, it is said that the mat is “weighted at the bottom.”In this example, the artwork is floated on the frames back mat creating a visual empty space between the artwork and the frame. It shows a pleasing proportion between the artwork, the mat space, and the wide frame. Like above, this is an example of an artwork being used in a preexisting frame evidenced by the larger spaces at the top and bottom than at the left and right of the artwork.Here is the most common proper proportion for a matted work on paper. The frame is substantial enough to support the frame assembly and there is an amount of space between the artwork and the frame that makes the artwork look significant. If you doubled the amount of mat space all around, it would appear less significant and over-framed.
Formal/Informal
In most cases, like clothes, it is usually appropriate to dress an artwork to fit the room in which it is to be sited. This means the room will often dictate the type of frames that will be appropriate to choose for that space. It is normally inappropriate to put a driftwood frame above a Louis XV gilded commode in a period room.
If one is not a collector and the artworks are to remain in the room they are in for an extended period, the frames on the artworks should feel comfortable in the space. Above is a very formal living room and below is a very informal one. As you can see, the frames on the paintings would feel totally out of place if they were switched around.
Keep original frames
Frame styles change with the fashion and period in which the artwork was created. Sometimes the original frame on an artwork does not fit a contemporary space so it is decided that the frame needs to be changed. Separating a period frame from an older artwork can actually reduce the value of the artwork. If it is decided a change of frame is necessary, it is wise to store the original frame so it can be reused later.
There is a lady who owns a major American modernist painting for which the artist personally made and decorated the frame. She personally disliked the frame, so she had the painting re-framed to suit her home and the original is stored at a local art warehouse. The painting is loaned out to museum shows with great regularity and when it is, the art movers take the painting to the warehouse, change out the frame to the artist’s original frame, and send it out to the museum. When it returns, the process is reversed, and the painting is returned to her in the frame she prefers. If she had discarded the frame, she would have thrown away many thousands of dollars in value.
This is an example of a frame that the artist made specifically for this painting. Although it might not fit the taste of the person who owns the painting, it would be a costly mistake to re-frame the artwork and to not keep the original as it would actually devalue the artwork.
Artworks are often at their most vulnerable when they are in transit, especially if the person who is transporting them is inexperienced. So to ease the stress and anxiety of doing so, I though I would share some practical tips for safely transporting artwork in your own vehicle.
For this post, I thought it would be helpful to offer some suggestions as to how to safely transport a single two-dimensional artwork in a personal vehicle. As most people do not have professional packing supplies at home, I will focus on using household items such as blankets, large garbage bags and pillows to be used sensibly in protecting the artwork when it is placed in the automobile.
All the suggestions I have made below come from over 45 years of experience in packing artwork in just about every type of vehicle, and from seeing how artworks have been delivered to us by non-professionals. Every situation is different and none of the suggestions I am making will protect the artwork or you in a serious accident. These suggestions are just “guidelines.”
Will it Fit?
It may sound rudimentary, but whether you are taking an artwork from home to another location or heading out to pick up a new acquisition from a gallery, it is always a good idea to measure the artwork and the space in your vehicle where you are planning on securing it, to see if it will comfortably fit. Also, where it will be placed in the vehicle, the type of artwork, and how it is framed will all determine if it needs to be wrapped, and if so, what level of protection is required. Once that is determined, take that overall packed size into account when measuring.
If you are picking up an artwork, say from a gallery, remember that if it is framed, the size of the artwork documented on the bill of sale or in the catalog of the show is the actual artwork size, not its overall framed size. Call the galley and ask them to measure the overall size of the artwork before driving across town to find out that it will not fit in your vehicle. Also, it’s not a bad idea to let the preparator of the gallery know where you are planning to place the artwork in your vehicle, and where, so they can pack it accordingly and then provide you with its overall packed size before you leave to pick it up.
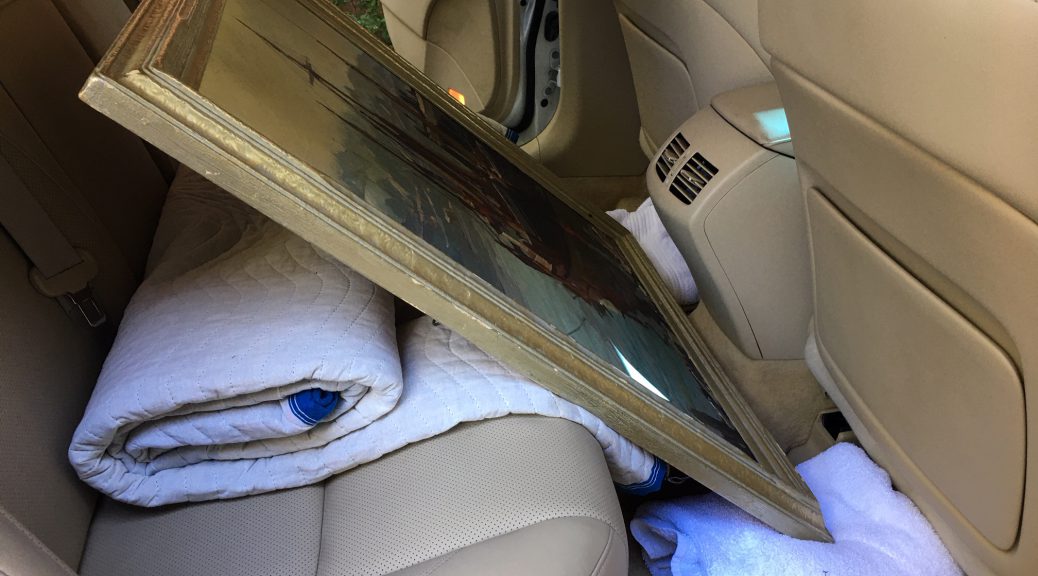
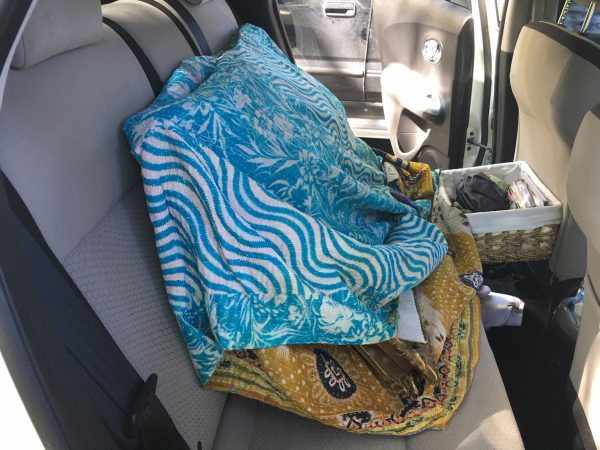
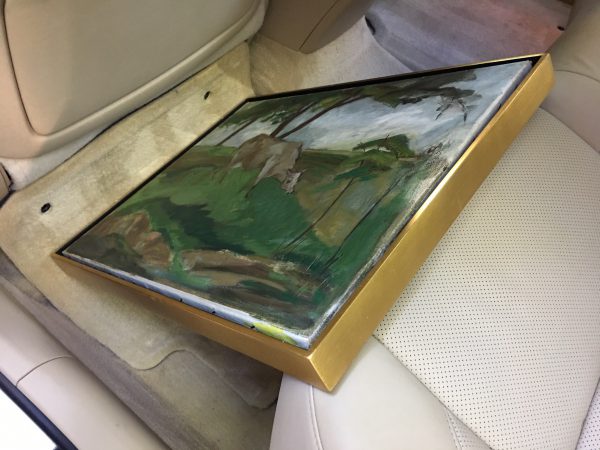
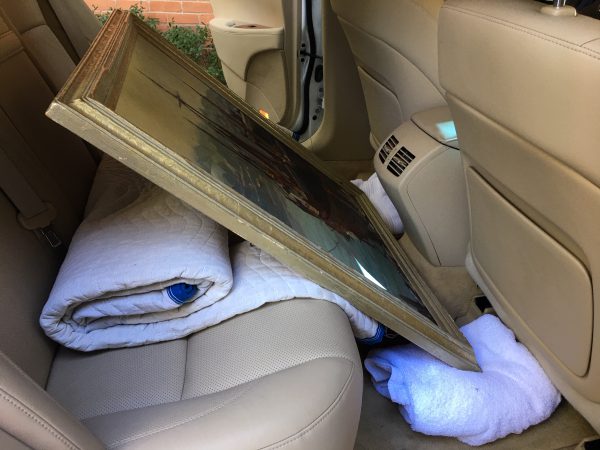
There are three things that would improve the way this artwork has been placed in the back seat of this automobile: ONE – It is difficult to tell from this photograph, because of the angle from which it was taken, that the artwork is an oil on canvas and painted in a vertical format. Because its orientation does not matter here, it would have been better to place the artwork sideways to lower its center of gravity. If it had been a hinged work on paper, it would have had to ride vertically so that the effects of gravity would not break a hinge. TWO – If I was packing this for a client at my gallery, since this is an unbacked oil on canvas, I would have not used the blanket behind the artwork, but instead, placed a piece of fluted cardboard, foam core, or 3/4 inch insulation foam, both behind, and in front of the artwork, that was larger than the outer dimension of the artwork’s frame. I did not use these here because most people do not have these materials readily available. THREE – Pillows should be placed between the artwork’s frame and the door of the automobile on both sides so the artwork will not shift sideways while the vehicle is turning.
Is it Safe?
Be sure to think about where the artwork is being placed in the vehicle and what will happen if you must maneuver quickly left or right, slam on the breaks, or worse, get hit by another vehicle. Is it packed and placed in the car in such a way that, if any of these things happen, you and others will be safe from its movement? Will the artwork sustain minimal damage because of how it is packed?
It is important to remove any loose objects from the space in which the artwork is to be placed for travel unless the object is being used as part of the bracing or packing process. We must often move tennis rackets, golf clubs, gym bags and other things from a client’s trunk or back seat before placing an artwork inside their vehicle.
It is best not to take a pet along with you when you transport art. If you must, be sure they are restrained or not able to get into the area where the artwork is placed. I have seen both cats and dogs happily prance across an unprotected canvas in the back of a vehicle. The attention you are paying to your driving will diminish greatly if “Fluffy” decides to take a walk across your newly purchased Monet waterlily painting while you are changing lanes on a freeway.
Preparing Artwork for Transport
I am assuming for this post that you are not planning to wrap the artwork with anything other a plastic trash bag. Most galleries are happy to wrap a work in bubble wrap or other appropriate material if they know you are coming. Most of the suggestions I offer here can be modified to take into account a wrapped work.
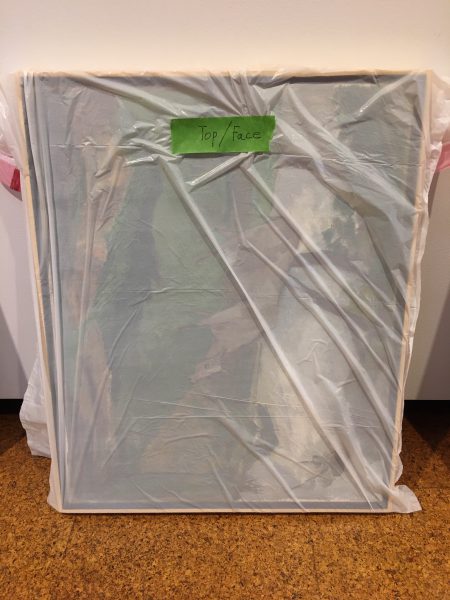
If an artwork on paper is wrapped in an opaque material, it needs to have something on the outside that tells you which side is up and which side is the face of the artwork. If it is carried or transported sideways, the weight of the paper can tear the hinges that are holding the artwork in place.
Be sure that if you wrap a framed and glazed artwork on paper in an opaque material so you are unable to tell which side of the artwork is up, that you mark it in some way to identify its face and top. A face drawn on the front of the package or a piece of painter’s tape with “TOP” written on it works well. Works on paper need to be carried with the hinges at the top so they do not tear or pull free because they were carried sideways. In the business, when a hinge pulls free separating the work on paper from where it was mounted, we say that the artwork “slipped its hinge.” A phrase every dealer hates to hear.
So, here are several common ways two-dimensional artworks are normally transported in a personal vehicle and my suggestions on the best way to protect them using household materials.
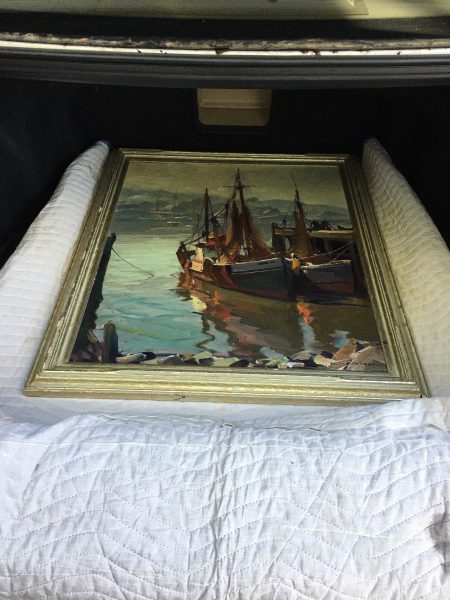
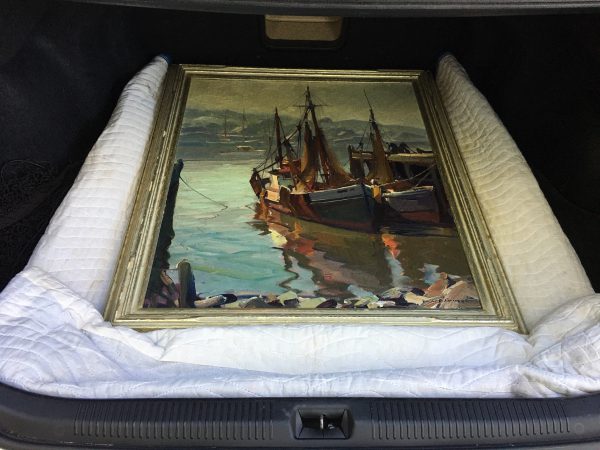
Transporting an Artwork in a Trunk
If your trunk is empty and your artwork comfortably fits; if your destination is not far and you are traveling without other stops; if it is not raining and the temperature is not too extreme; then the carpeted trunk of an automobile is the ideal place for an artwork to travel and you will probably not need to have it wrapped at all. Since it is separated from you and your passengers, it is also the safest way.
Unglazed Artwork:
If the artwork is not glazed and does not fit snugly, place an open blanket on the bottom of the trunk so the area where the artwork will sit is completely flat. Place the artwork on top of the flat area of the blanket and roll under the outer edges of the blanket like a jelly roll so they form a barrier around the artwork as illustrated below. Make sure the furthest edge of the artwork is resting against the far end of the trunk, closest to the back seat. This will pad all the artwork’s sides and keep it from quickly sliding forward and banging into the back of the trunk during a quick stop. It is my recommendation to never place a blanket over an unglazed work, especially if the artwork’s support is stretched canvas.
The artwork is placed on a flat blanket with its top resting against the front of the carpeted trunk. The sides of the blanket are rolled underneath on each side so it snugs against the frame on its left and right side.The part of the blanket that was sitting over the edge of the trunk has been rolled underneath in the same way the sides were rolled. It was then snugged down between the closest end of the artwork and the back of the trunk to keep the artwork from sliding backward.
Note: About one in every three people who bring artworks to the gallery cover or wrap them in a blanket thinking they are protecting their artwork and its frame if it has one. This is not much of an issue if the artwork is glazed and the glazing is intact. However, if it is an old unglazed oil on stretched canvas that is starting to flake, laying a heavy blanket on it can cause expensive-to-repair damage. For instance, the weight of the blanket can push down on the canvas causing it to become concave and stressed. The act of placing a blanket on the work and taking it off can cause any dry impasto or already damaged areas to flake off. It can also break off partially secured areas of a fragile frame.
This artwork arrived at the gallery with this blanket wrapped around it. To most people, this is a logical way to protect the artwork in transit. In actuality, it is a terrible idea as any loose paint can flake off as the blanket moves over the painting’s surface. It would be much safer to have nothing over it at all, or to have used the blanket to pad and block the bottom of the artwork from sliding forward on the seat.
Glazed Artwork:
If the artwork is glazed with glass, a blanket can be place beneath and around the artwork as previously described. If more protection is needed, a soft blanket can also be laid over the artwork and folded around it. If an over blanket is used, remove it before picking up the artwork to be sure it is carried upright.
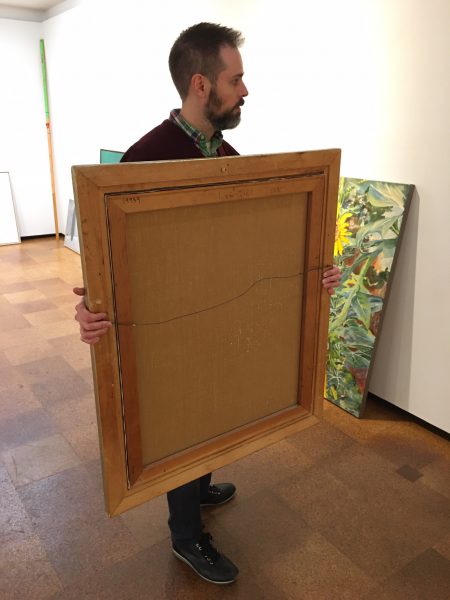
Note: Always carry an artwork upright facing you, holding it with two hands from both sides. It is not a good idea to carry it from the top of the frame, and it is best not to carry it around by its hanging wire if it has one. You are making a lot of assumptions by doing so and you have much less control over the artwork.
This is the proper way to carry most any small to medium sized two-dimensional work of art. It faces the man carrying the artwork and it is being held with two hands on each side of the painting keeping the artwork’s orientation up. Notice that it is being carried slightly to the side so it does not restrict the man from seeing where he is going. Also, if for any reason the artwork is dropped, the man will not fall into the painting.
If the artwork is glazed with plexiglass and you believe it needs to be covered with a blanket for extra protection, put a plastic bag over it first followed by the blanket, wrapping it around the edges of the frame. This will prevent the plexiglass from being scratched by the blanket. If it is raining, you might want to place the artwork in the plastic bag making sure to identify the front and top of the artwork by marking it somehow before taking it to your vehicle.
Transporting an Artwork in the Back Seat.
Transporting artworks in the back seat area of an automobile is not optimal for many reasons but sometimes, because of an artwork’s size and the circumstances, it is all that’s available. So, if it is the only option, here are my recommendations to transport the artwork as safely as possible. When doing so, please drive like you have a baby in the back seat.
All automobiles are a little different. You can measure to determine that an artwork will fit in between the front and back seats, but there are other factors to consider, and one of them is the artwork’s depth. The back door at its fully open position, window down, may not allow an artwork of your measured size to fit past the back seat, and the drivetrain hump in the middle of the back seat floorboard may be an issue. Remember, the designers of your automobile’s back doors thought only about people’s ability to get in and out, they did not care, nor even think about, your need to transport artwork.
Again, be sure that the back seat and floorboards are clear of any loose objects. It is not a good idea to have a loose bowling ball sitting on the back seat behind an artwork.
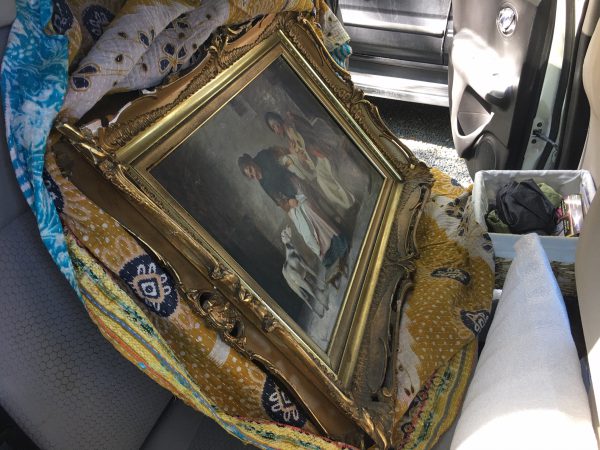
Transporting a Small Artwork in the Back Seat Area
A small work is best placed on the floorboard facing forward on either side of the drivetrain hump if the vehicle has one. It should be placed at an angle where the bottom of the frame touches the front seat back, and the artwork’s top back side leans against the front of the back seat. To protect the bottom of the frame from any hard surfaces behind the front seat, something needs to be used as a buffer. If the car has floor mats, push the mat forward and curl it up to protect the bottom of the frame where it sits against the back of the front seat. If it doesn’t, a rolled towel will do the trick.
A small work of art that fits between the drivetrain hump and the automobile’s back door can be leaned up against the front of the back seat. To protect the frame from rubbing against the front seat’s attachment points, I have flipped the carpeted floor mat around and pushed it forward while bending it up behind the front seat. This provides a carpeted area for the frame to rest behind the front seat. Since this is not a glazed work on paper, it can be placed sideways to fit the space.
I recommend that smaller works not be placed on the back seat itself, either upright or flat, unless there is something between the front and back seats that will keep the work from falling to the floorboard in a sudden stop. If there is something there that is about the same height of the seat, like a soft gym bag, then a medium size artwork can be placed flat on the rear seat extending over the built-up space between the front and back seats.
Transporting a Medium Sized Artwork in the Back Seat Area
Most often, a larger work will need to be placed between the front and back seats, facing forward. After you know that the artwork will fit, there are four contact points that need to be considered. Also, if the artwork is a hinged work on paper in a vertical format, for reasons we discussed earlier, do not turn it sideways to get it to fit.
Contact Point One: The Front Edge of the Back Seat
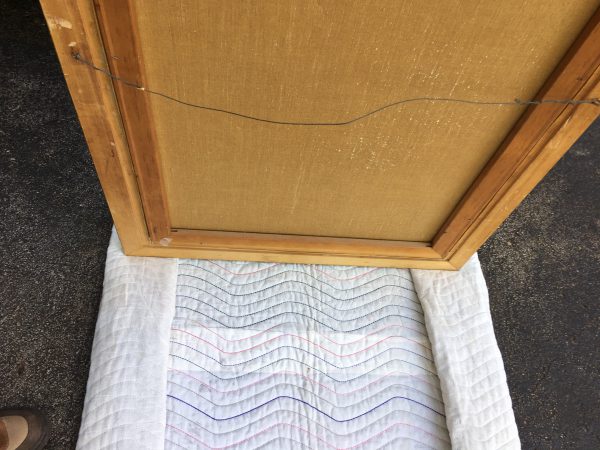
The metal wire could scratch your back seat upholstery. A bath towel laid over the back seat for the artwork to lean against would solve this problem.
Glazed works on paper are most often backed and therefore, a medium sized work on paper can ride with its back side against the back seat, so long as any exposed hardware will not potentially cause damage to your back seat upholstery. A blanket hanging over the glazed artwork can prevent this. (Remember to bag the piece if it is glazed with Plexiglas and mark its face and top before putting a blanket over it.)
The artwork on the left is at the greatest risk at having its canvas pushed forward by a protruding seat back. The center artwork has a support bar down the center of the canvas that will help protect it from a convex back seat front edge. The foam core backing on the third artwork will protect it completely from a convex or protruding back seat front edge.
A framed or unframed stretched canvas that does not have a backing may be at risk, depending on the design of your vehicle’s back seat. If the seat has a convex shape or has areas that protrude, it may push into the back of the canvas, stretching it out of shape. This is less likely if the canvas has a vertical stretcher brace down the middle that will rest against the seat, keeping the seat from touching the canvas. Without that brace, even if the artwork is packed in bubble wrap, it may be at greater risk from the convex back seat as it could push the bubble into the back of the canvas, placing even more pressure on it.
Here are three products that are often used to separate and protect artworks: fluted cardboard below, foam core in the middle and 3/4 inch foam insulation material on top. The foam core and insulation material will protect sensitive finishes like gold leaf frames. Fluted cardboard’s surface is not as smooth and it is better to have a plastic bag over a frame with a sensitive finish if it is used.
If no brace is present, there needs to be a flat support behind the artwork, or something else, protecting it from the front of the back seat. The support can be a piece or corrugated (fluted) cardboard, foam insulation, or other stiff material cut to the same size or a little larger than the overall artwork. If these materials are not available, a properly folded blanket can hold the artwork off the seat back to prevent damage to the canvas.
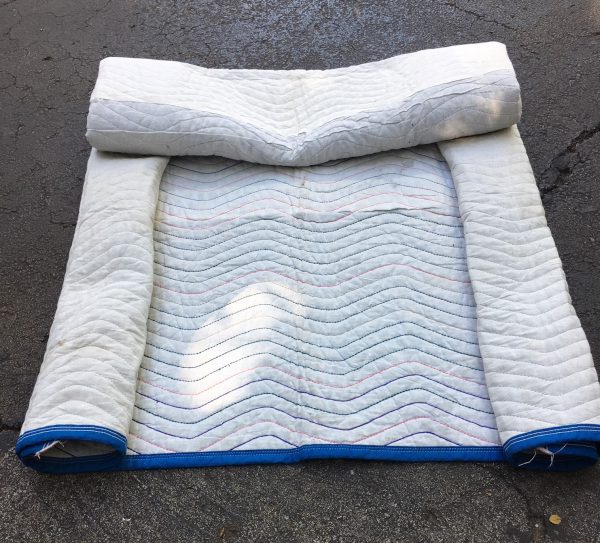
Place the blanket on the ground and roll both sides so the outer sides match the width of the paintings frame.Place the painting on the blanket to be sure the width of each roll is the size of both the stretcher and frame of the artwork.Roll one of the ends of the blanket until it is a little longer than the width of the back seat; at least long enough for it to hang over the front of the back seat about 6 inches with the rolled end against the back of the seat.
If no flat material is available, roll a blanket from two sides so the distance between the rolls matches the back of the stretcher and the artwork’s frame, and then hang the blanket over the edge of the back seat so it provides a buffer that will keep the canvas from touching the front edge of the back seat.
This image shows how the blanket should be situated behind the artwork with the side rolls under its stretcher and frame. If the blanket is touching the open canvas between the rolls anywhere, start over and roll the sides tighter to push the frame further forward. Note the bath towels supporting the frame corners on either side of the carpeted drivetrain hump.
Contact Point Two: The Floorboard, the Drivetrain Hump, and the Console
The next thing to think about is where the bottom front edge of the artwork meets the bottom of the front seat or the back of the console that divides the two front seats. A floor mat, a rolled-up towel or a piece of clothing can act as a protective buffer to hold the artwork in place and protect it from any metal or hard plastic parts under the front seat or the back of the console. If the artwork is now balancing on the drivetrain hump, you can roll towels or two strips of bubble wrap and place them under each corner to keep the artwork from listing over one way or the other while driving.
Contact Point Three: Protecting the Front of the Artwork.
In a sudden stop or head-on accident, the entire artwork will try to move forward. If it is wrapped in bubble and has a stiff sheet material in front of it like 3/4 inch foam insulation, corrugated cardboard, or foam core, it will sustain less damage than it would without it. If the artwork is glazed with glass, the bubble pack would help contain any broken glass shards. Since we are talking primarily about using household materials, if it is glazed with glass, a blanket over the entire work that is tucked in under the bottom of the frame near each bottom corner, to keep it from tilting back and forth on the hump, is a good idea.
Contact Point Four: Protecting the Sides of the Artwork
After the artwork has been placed safely into the back between the front and back seats, lower both back windows and close both back doors carefully to be sure they do not hit the artwork or its frame. If there is room, snug blankets or pillows on either side of the artwork and doors through the open windows so the artwork will not slide side to side while the vehicle is turning. Roll the windows up and you’re set to go.
Transporting a Large Artwork Flat in the Back of an SUV.
It is always a good idea to know the maximum usable rectangular dimension of the back of your SUV with the back seats down. So you will only have to measure that once, write these dimensions on the underside of the hatch door next to the auto close button if you have one, with an indelible marker.
The advantage of laying almost any two-dimensional artwork flat on its back is that, if the entire back of the artwork is touching a flat surface, the artwork and the entire frame assembly housing it are all experiencing the least amount of stress possible. Also, while in transit, you don’t have to worry which side is up on a hinged work on paper as it really doesn’t matter when it is in this position.
If the work is not packed, set the artwork face up so that the edge of the frame is touching the back of the driver and passenger seats. This way it will not slide forward and hit them in a sudden stop. Placing the artwork on a flat blanket and rolling the sides up to the frame will also protect the artwork’s edges if it slides. A folded blanket behind the artwork will help keep it from sliding back when accelerating. As discussed above, be sure there are no loose objects at the back of the SUV that might slide forward onto the artwork in a sudden stop.
If you want the artwork hidden, and it is a work on paper glazed with glass, a single layer of blanket can be placed over the artwork to hide it. If it is glazed with Plexiglas, it would be better not to use a blanket but instead, place a bed sheet over the work so it does not scratch. If it is an unglazed framed or unframed canvas and the paint is completely dry, a single layer of a light plastic opaque drop cloth is a good solution. Be sure that when it is removed, it is not dragged across the artworks surface but is carefully lifted off.
If you are concerned about moving an artwork yourself, get several quotes from professional art moving companies. Even though they are generally more expensive than furniture moving companies, they carry the proper packing and securing materials on their trucks. Every time we have had furniture movers pick up art at our gallery for various design projects, they have never brought large stiff sheets of foam core or corrugated cardboard to separate or pack artworks with them on their trucks. They only have blankets and stretch wrap. We have often had to loan them the proper materials and diplomatically explain how to use them. They are skilled at blanket wrapping almost any piece of furniture, but you don’t want your fragile unglazed Jackson Pollock to be blanket wrapped and then tied up to the side of a truck. You will be spending a lot of time and money with your conservator if you let that happen.
Properly siting sculpture outdoors is a process that requires many considerations. In this article titled, Siting Sculpture: Part Two, A Case Study, I will introduce 8 categories of issues that may, or may not affect the decision on where and how an artwork is to be placed. As most every artwork is different, each category will play a greater or lesser role in this process.
My stepmother Erika Farkac ran the Design Department of Lambert Landscape Company, once considered the finest landscaping company in Texas, for over 20 years and then worked independently for another 22. She once told me that in every garden design she created while at Lambert’s, she always included a space for a properly sited sculpture. She also said that only about one in a hundred design clients actually used that space for a sculpture, other than occasionally installing a fountain or something in concrete. So, when a client used the space she provided for a sculpture, to her, it was a small victory.
Lambert Landscaping Company at their Bachman Lake offices in North Dallas, circa 1950
As I did in Siting Sculpture, Part One, I have listed 8 categories to think about when deciding where to place a sculpture. Each can affect the viewer or the sculpture itself and all will affect every artwork installation in varying degrees. And by making sure that one of the categories is as good as it can be under the circumstances, this may necessitate paying more attention to the others. It is really about finding the best balance of the most important categories for each situation.
For example, a 5-inch-tall sculpture made of plastic that is sitting on a 40-inch stand against a wall may not be much of a safety risk in a home, but in a public place, it is a huge security risk. A 5-ton piece of steel with sharp edges and no barriers around it sitting in a retail mall hallway may not be a security risk, but it is a huge safety risk for those who may accidentally collide with it. Awareness and thinking through all the issues is what makes for a sculpture’s best overall placement.
Most Designers will be thinking primarily about the first three categories on the list as they deal mostly with aesthetics. The other categories are more practical in nature and the ask is: “By placing a sculpture here, what can, and what will happen to it over time.”
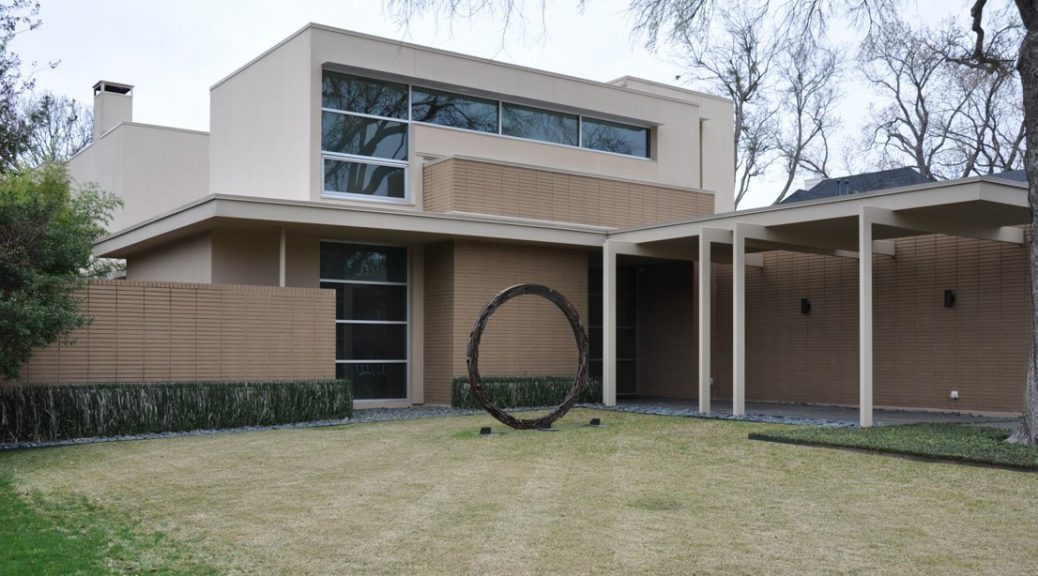
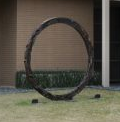
Bronze sculpture interestingly sited in front of a modernist house.
As an example, I will use an image from the first blog of an outdoor sculpture, sited in front of a modern house, to discuss how each of the categories apply or why they are not overly important in this circumstance.
First off, I have to say I really like the concept of putting a large round bronze sculpture in front of this modern home that is all about rectilinear form. Although it stands alone as a sculpture, it more importantly acts as a foil for the hard edges of the building behind while adding an appropriate shape to the building’s geometry.
Showing how the sculpture is sited in the front yard where it appears to be balancing on its edge.
Siting:
As you can see, the owners of this house decided to site the sculpture in the front yard. They lined it up with the front window of the house so it could be easily seen from inside, and the other side could be seen from the street with the house as a backdrop.
It was also installed to sit in the grass with its supporting base hidden below ground. By doing this, to an observer, the sculpture appears to be balancing miraculously on its edge. One of the best street views is where the photograph above is taken because of the square section of the house that serves as a background here.
The wall to the left of the large window is also a nice background. It would be seen behind the sculpture as a visitor walks down the portico to the front door. As the viewer heads towards the door, a kinetic illusion is created as the sculpture appears to roll away and get bigger in relation to the long wall behind it.
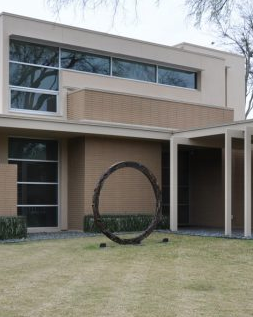
This unfortunate effort to light the sculpture not only interferes with the aesthetics of the sculpture’s placement, it will be a hindrance for those who want to see the sculpture through the widow at night.
Lighting:
Three lighting fixtures were arranged in a row to light the street side of the artwork. They were placed above ground and their color was chosen to blend in with the artwork. With this installation, I would have recommended that the lights be recessed into the ground and that there be three more lights on the backside so the work could be seen at night from the house.
Because the three existing fixtures were placed above ground and focused up and slightly back to illuminate the street side of the sculpture properly, anyone looking out the window at night will see nothing but shadow and glare from the lights on the street side of the sculpture. There would be no glare from any of the lights and the sculpture would be well lit if all the lights had been installed below ground level.
Surroundings:
The surroundings for this sculpture are very good. During the day, nothing is obstructing the view of the sculpture and it is easily visible from all directions. Because there are no paths to, or near the sculpture, the closest view is from the portico unless you venture off into the yard. The sculpture appears isolated, floating in the front yard’s sea of green grass. The only oddness is the three lights poking up, interrupting the space around the sculpture.
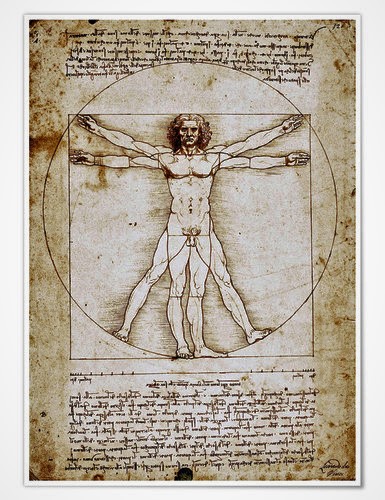
A perfect place to mimic Leonardo da Vinci’s “Vitruvian Man” for an Instagram post.
Since there are no barriers, it can be approached by animals looking for a place to mark or relieve themselves, or humans that want to get a closer look who will unintentionally wear paths in the grass. This type of sculpture, sited in a location like this, is what I call “Selfie Bait.” With no barriers for protection, it is an open invitation for people to climb inside the ring to mimic Leonardo da Vinci’s Vitruvian Man for an Instagram post.
Environment:
This artwork will be in full sun most of the day and will be exposed to all the elements the weather can throw at it. Over time, if it is a waxed bronze, left alone, its brown patina will slowly turn green.
Security:
Most people would be concerned that an artwork in such a public space would be stolen. This is always a possibility, but if it’s insured, I would not be overly concerned. The pleasure of living with it and sharing it with my neighbors would trump my concerns if it was mine. There is also the possibility of vandalism, or even neighborhood kids, flying drones through it or using it as a target for any number of ball games.
Safety:
Because of the hazards and inconsiderate people mentioned above, the connection between the base and the sculpture itself needs to be strong enough to have a 200 plus pound person climb and swing from it. The area of the base itself needs to be large and heavy enough to withstand this kind of abuse. You don’t want a child to get hurt because it fell on them. It is also a good idea to check that your liability insurance is paid up.
Wait till the weed whackers start to do a number on the sculpture’s patina and the lights.
Maintenance:
Most every sculpture, especially those placed outside, will need occasional maintenance. In this case, a bronze sculpture with this level of exposure to the elements would need to be washed off and waxed at least once a year to maintain its patination. As mentioned earlier, depending on the composition of the bronze used, it will start turning green fairly quickly when the wax has been worn off by the elements.
The idea of having the siting of this sculpture create the illusion that it is balanced on its edge is conceptually appealing. However, having it, or any artwork for that matter, sit directly on grass is a maintenance nightmare unless you have your own private gardener who is willing to hand clip the grass around it once a week during the growing season, or you are willing to do it yourself. In time, a maintenance crew, that may change from week to week, with weed whackers can do serious damage to both the artwork and the lights next to it.
I would have recommended that they skip the idea of balancing the work on the grass and set the work on a brick or concrete base that would accommodate the lights inside it. This way, it would be easy to keep the grass trimmed and the work would not be accidentally damaged by the landscaping crews in the process.
A less expensive option would have been to place the artwork in a bed of ground cover. This maintains a natural setting for the sculpture but protects it from most types of mechanical damage. And if the ground cover was cactus, it would keep unwanted intruders away, but unfortunately, make that yearly waxing a challenge.
Disaster:
The design of this sculpture, and where it is sited, make it immune to most types of natural or man-caused disasters. In its current location, high winds and lightning are its most likely issues but in Dallas, Texas, fire, earthquake, and flood are probably not going to be issues. Because this sculpture has very little surface area for its size, high winds are probably not going to be an issue outside of a direct hit by a F5 tornado and there would be a low risk of a lightning strike. It is actually more likely, that this sculpture will be hit by an out of control automobile than be damaged by any of these other issues, but it is a good idea to think through what could happen for each proposed location.
As it was with my stepmother, I am also pleased to see a house where sculpture has become part of the landscape plan, especially when a work is shared with the community by being placed in a front yard. This is a brave and possibly dangerous act, however. The neighbors probably don’t care about the house next door having a sculpture in their back yard where it is not on public view, but they may not like the fact that their neighbor has decided to impose their taste on them by placing a sculpture in their front yard, where it is visible to all who pass by. It is not a bad idea to keep the neighbors in the loop if you feel the sculpture you are planning to put in a publicly viewed space might be controversial.
If you are not comfortable placing sculpture yourself, be sure to enlist the help of a professional art installation company to work with you to site the piece properly. Many of these companies employ artists and they will be sensitive to your needs and the needs of the work. It is not a bad idea to run through the list of items above with installers to be sure that all the issues are considered before a placement is finalized.
I want my presentations to look like they were pulled from the pages of a design magazine.
Placing a Live View Target
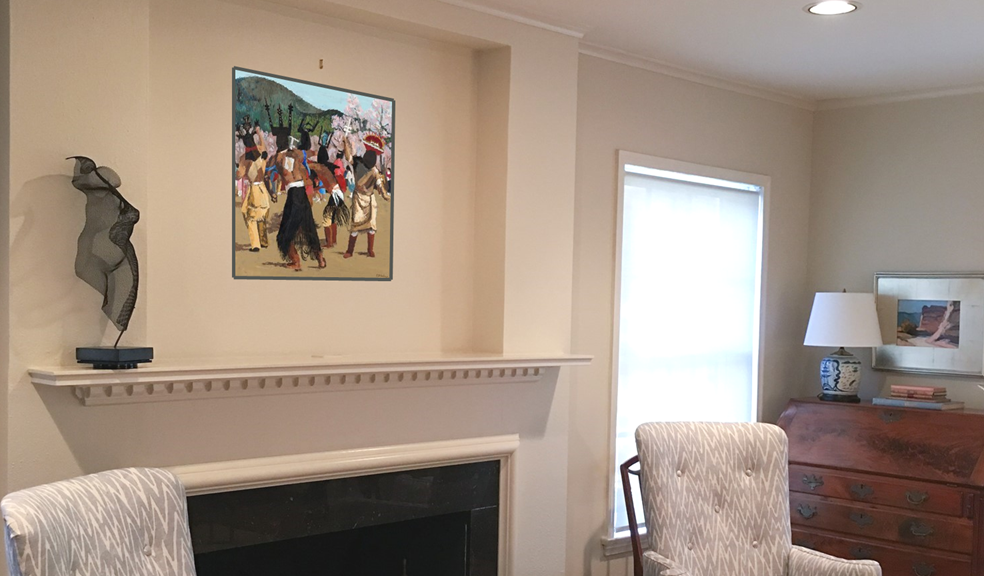
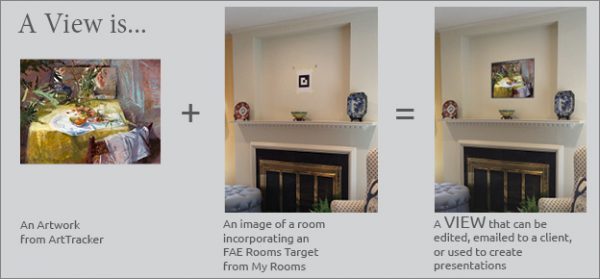
The fastest way to present an artwork from the FAE website is to place the FAE Live View target on the wall where an artwork is desired, select the artwork to be presented from ArtTracker (FAE’s favorites list), and then use the FAE Mobile App to show your client, using augmented reality, how the artwork fits the space. The App will allow you to capture the View, upload it and assign it to a Project in My Views and/or email it to another party.
Although the Mobile App is the quickest way to show an artwork in your client’s space, if they prefer to see presentations that look like they were torn from a design magazine, it is much better to use FAE’s Desktop App.
A View like this can be emailed or copied and pasted into presentationsRooms Target
To create a View with the desktop app, you will need to place a Rooms target on the wall where an artwork is needed as you did with the Live View Target described above. Then, following FAE’s suggestions “For Best Results,” located on the second page of the Rooms target printout, photograph the room from multiple angles so the Rooms target is visible in each image. The images can be uploaded to FAE through the Mobile App or from the file up-loader in My Rooms, depending on what device was used to capture the images.
Once the Images are uploaded to My Rooms and you have added the artworks you want to see into your ArtTracker, you can now easily create a magazine quality presentation View to show how the artwork will look in the room.
View creation is discussed in detail in the blog post Anatomy of a View and there is also a three minute video available that introduces the basics of process. To make the View presentation as elegant as possible FAE provides a thoughtful selection of tools that make the View edit process creative and fun. The FAE View creation tool box allows you to:
Place a rudimentary frame around the artwork image and select its color from the FAE color palette.
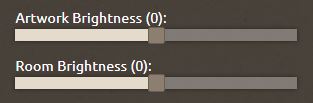
Balance the lighting between the artwork that was photographed under controlled lighting and the Room that most likely wasn’t.
Drag and drop the artwork image to a different location on the wall and then drag and drop the artwork’s corners to adjust its perspective to suit its new location. Keep in mind that the proportional height and width of the artwork is only correct when it is centered over the target’s original placement in the Room photo.
Name and assign the View you are creating to a Project.
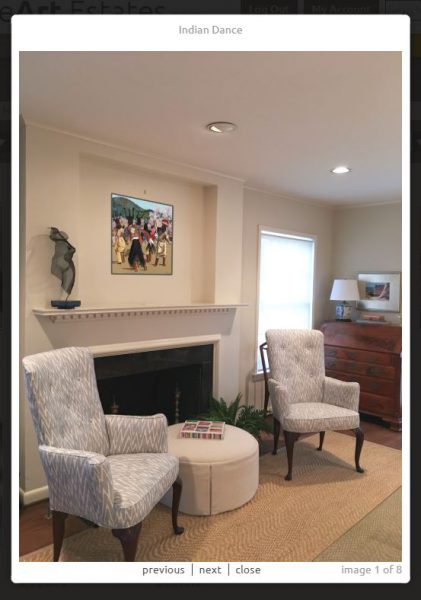
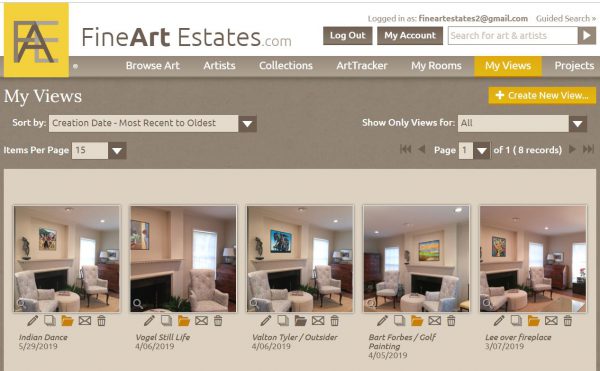
After each View is created, it appears in My Views:
Newly Created ViewThe My Views Page, with the “+ Create New View… ” button at upper right. Your newest View is always first in line
The View can then be emailed, printed out, or cut and pasted into a power Point Presentation. All the Views can be filtered by Project and reviewed by clicking on the stack icon under one of the View thumbnails.
A PowerPoint can be saved as a PDF if it is to be emailed or shown on a phone, tablet or desktop to your client, or it can be saved as a PowerPoint file so it can be displayed for a group presentation. Below is an example of a Power Point presentation showing several layout examples.
Everything You Ever Wanted to Know About Creating a View…
Simply Put, FAE describes a “View” as: An image of a room that incorporates an FAE target, over which an artwork image from ArtTracker, FAE’s favorites list, appears in proper scale and perspective.
Live View Target
As discussed in the previous blog post, Will It Work In My Space, the FAE iOS iPhone and iPad App using Augmented Reality technology can efficiently help determine if an artwork from the FAE website will physically and visually fit into a client’s space. This, along with its ability to be shared and saved in My Views makes it a powerful tool. However, the View that is created directly in the Mobile App will not be editable.
Rooms Target
Although FAE’s Mobile App has the ability to wow, it is FAE’s Desktop App that sets us apart from any other fine art sourcing website. Instead of using the Mobile App’s Live View Target, the Desktop App’s Rooms Target is different. Also, unlike the Mobile App that merges the artwork and room images within the iOS device before it is automatically uploaded to My Views on the FAE website, the Desktop version uploads a room image that incorporates a Rooms Target to My Rooms on the website where they can then be merged to create editable Views.
After you have uploaded the room images to My Rooms, they are available for use in creating Views using the View creation page. From there, you are able to drop artwork images from ArtTracker, that automatically maintain their appropriate scale and perspective, over the target in any chosen room.
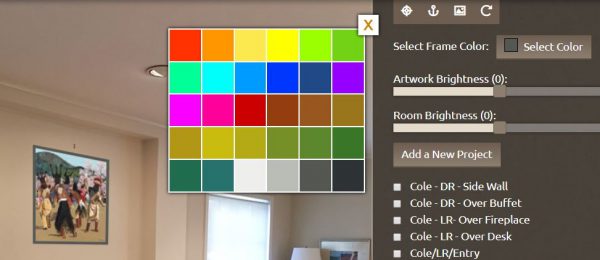
Once you have decided on an appropriate artwork for a chosen room, you will not only be able to drag the artwork off the Rooms target and drop it anywhere in the image, you will also be able to drag and drop each corner of the artwork separately to manually adjust its perspective to where it has been moved. The site also provides editing tools that enable you to add and change the color of a rudimentary frame, adjust the brightness of both the artwork and the Room, and create and/or attach the View to a Project/s.
The View you have created can be saved and emailed to a client or used to make stunning presentations which will be the subject of a future post.
In addition to a short video on how the Desktop App can help you show your clients exactly what an artwork from the FAE website will look like when it is installed on their wall, without incurring the associated expenses of trying the artwork out in person, below we have provided a detailed overview of the Edit View Page and how it works.
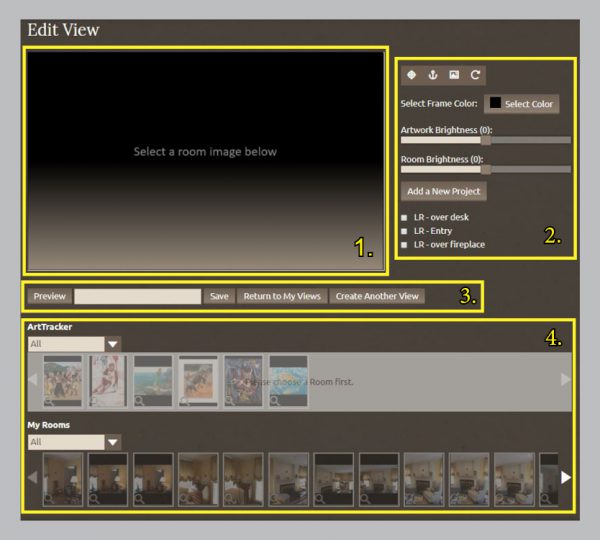
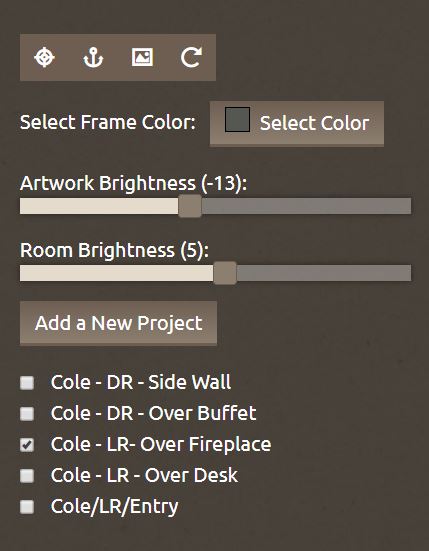
The Edit View page is divided into four sections:
1. View creation screen
2. The View edit and Project assignment console
3. View naming and command buttons
4. Project filtered film strips of Artworks and Rooms
No 1. The View Creation Screen
The FAE View Edit ScreenView Edit Screen with Room & Artwork Selected
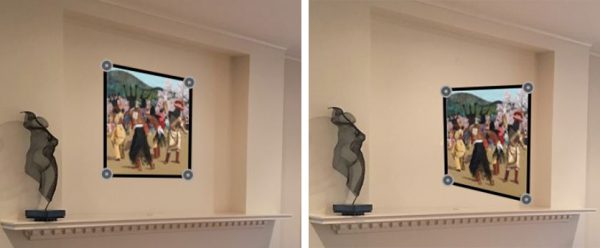
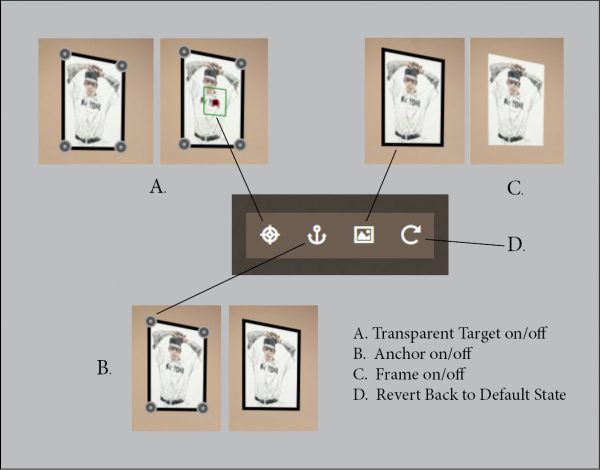
This is where images from My Rooms and artwork images from ArtTracker are merged. When an artwork and a room image are selected, the artwork image will appear over the target in the room image with a black frame around it and round anchors on each corner.
The image at right shows an artwork manually moved and its perspective changed.
The anchors can be removed using the Anchor button on the icon bar at the top of the View Edit console.
An artwork image can be dragged and dropped anywhere on the View Edit screen. (demonstrated in upper right image)
By grabbing an anchor on a corner of any artwork image or the corner of the image itself if the anchors are turned off, it can be dragged and dropped to manually adjust the artworks perspective in relation to the wall it is on if needed. (demonstrated in upper right image)
No 2. The View Edit and Project Assignment Console
This is where the artwork adjustments are made:
• The icon bar
A. Shows center of target through artwork image on/off button
B. Corner anchor off/on button
C. Removes the frame around image button off/on
D. Return console to default state
Shows frame color choice palette and artwork with dark gray frame color chosen
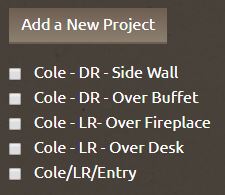
• Add a New Project Button
• Available Projects to assign or remove from this View.
No 3. View naming and command buttons
• Preview button will show a large image of the view that is being edited in a pop-up window
• White text box to name the View (Mandatory before save)
• Save this View button
• Return to My Views button will return user to the My Views page
• Create Another View will allow a user to create a new view after saving without returning to the My Views page first.
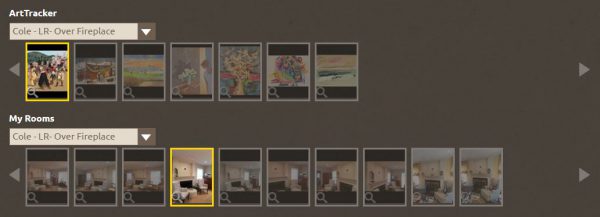
No 4. Project filtered film strips of Artworks from ArtTracker and Rooms from My Rooms
(User must first choose a room before artworks are available)
ArtTracker and My Rooms film strips with room and artwork chosen, both filters are active.
• ArtTracker film strip with all available images. Can be filtered by Project like in example above.
• My Rooms film strip with all available rooms. Can be filtered by Project like in example above.
After a View is saved, it can be found in My Views. Each newly created View thumbnail will look similar to the one below. You can add or remove the view from Projects by clicking on the file folder icon or email the view using the letter icon. Although artworks can be shared in many ways, for privacy reasons, Views can only be emailed.
By using augmented reality technology, the FAE iOS App makes it easy for you to answer that question:
There are many ways to determine if an artwork will physically and visually fit a specific space in a home or office. After determining if the work will physically fit the space by measuring, and for those who are more visual cutting out cardboard to size, the best way to determine if it will visually fit is to try it. This method often takes a lot of time and money. It may involve approval paperwork, shipping and installation expenses, and any additional steps to return the artwork after finding out that it does not suit you.
Knowing these issues and what it takes to physically try an artwork, FAE has developed an iOS app with tools that allow you to see an artwork from the FAE website virtually in your space, without cost.
1. Download the FAE iOS App on your iPhone or iPad.
3. Place the target on the wall where you want to see the artwork.
Place the Target where an Artwork is Desired
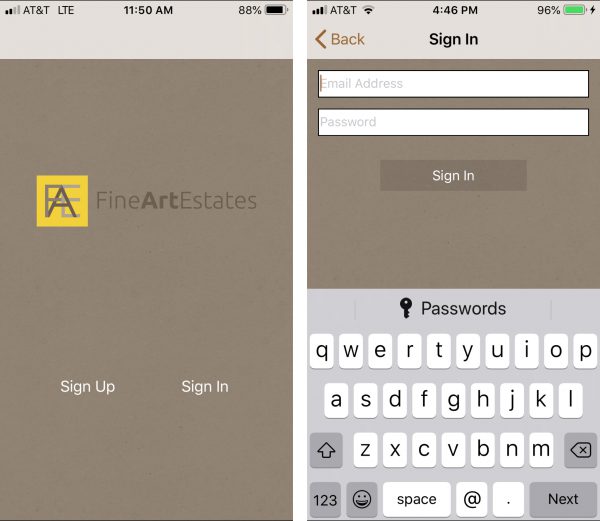
4. Open the FAE App and Sign In to your FAE account.
FAE App Sign In Pages
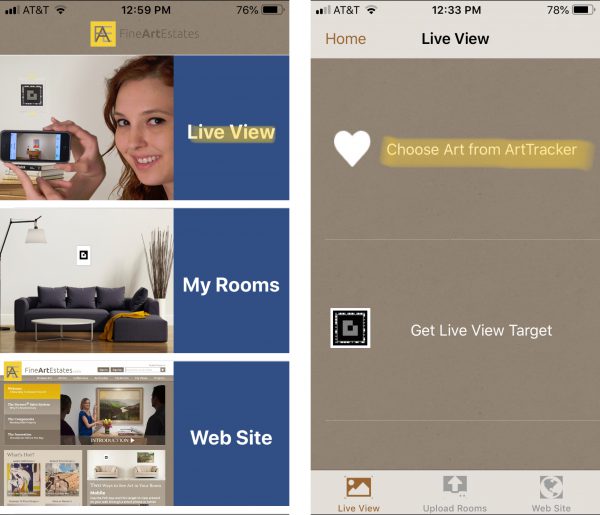
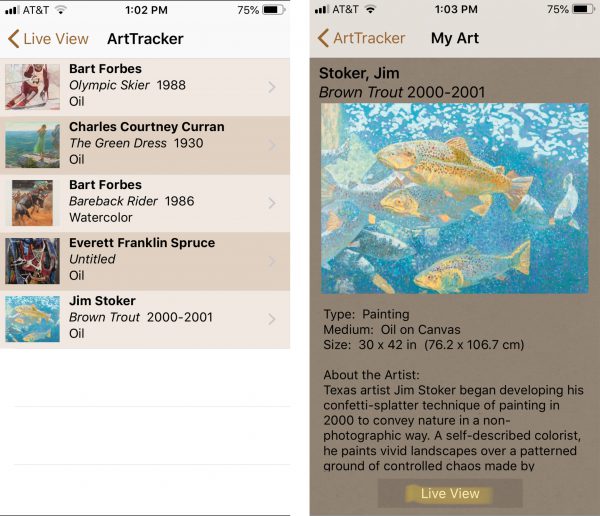
5. Choose Live View from the main menu and then select Choose Art from ArtTracker.
FAE App Main Menu FAE LIve View Options
6. Select an artwork you have placed in ArtTracker and then click the Live View button at the bottom of the My Art page.
Works in ArtTracker will be listed – Select one Review and Select Live View
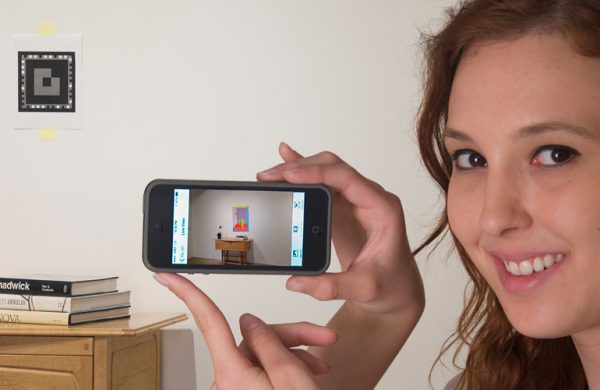
7. Hold up phone to see the target through the screen of your device.
Demonstration showing an artwork image in the view screen superimposed over the Mobile App Target.
View the target through the screen of your phone to see your chosen artwork image superimposed over it rendered to scale and in perspective. Capture the AR image you see to create a View, name it, and then FAE provides the option to either immediately upload it to My Views, or to create a new Project, assign it to the new View, and then upload it to the website. It also provides the option for you to either email the View you have created from the app, or later from the website, to your designer, consultant, or significant other.
If you would like to view a video demo of how the FAE Mobile App works, click here. Since the video was produced, the app has been enhanced to allow you to create and name a new Project during the View’s upload to the website.

 Painter/Printmakers
 Documenting Your Art Collection
 How Do I Get My Art Appraised?
 Practical Tips for Safely Transporting Artwork
 Temporarily Storing Artwork: A Case Study
 Four Artwork Storage Solutions
 Hanging and Framing FAQ’s
 Siting Sculpture, Part One: Overview
 Siting Sculpture: Part Two, A Case Study
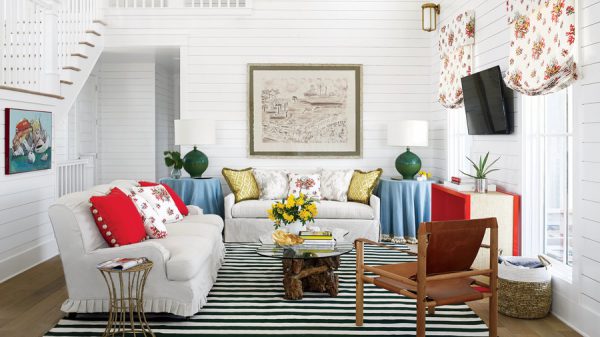
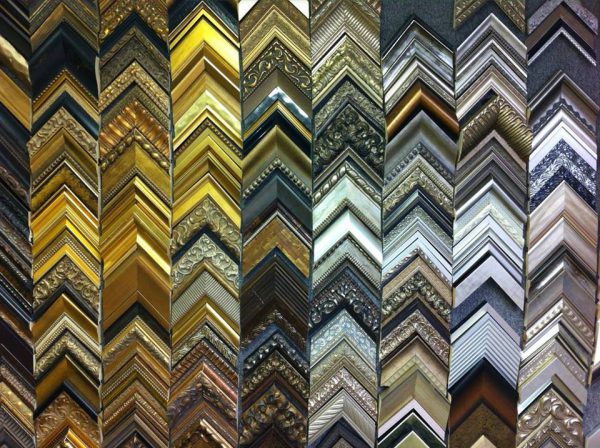 The Importance of a Proper Frame
 When to Use UV Control Glazing
 Reflection on the Problem of Reflections
 The Value in Fine and Reproductive Prints
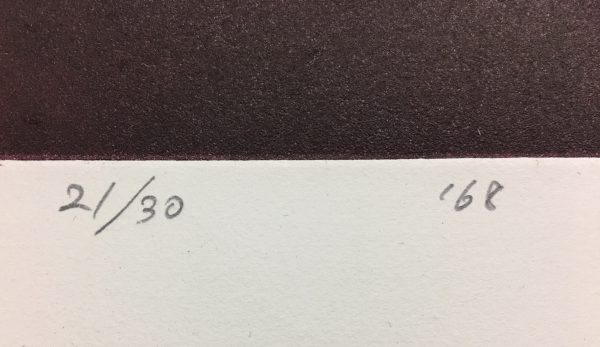 What Does That Fraction Mean on a Fine Print?
 Welcome to FAE!
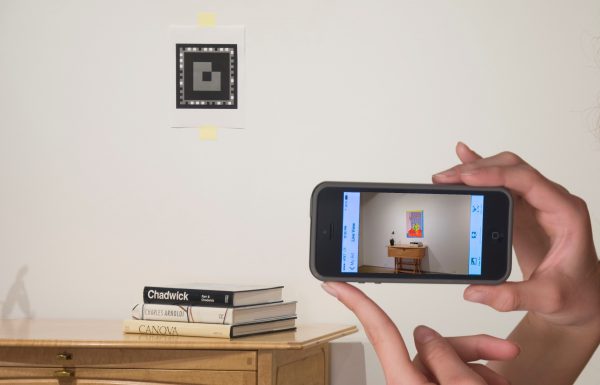 Announcing the FAE App, now available from iTunes!
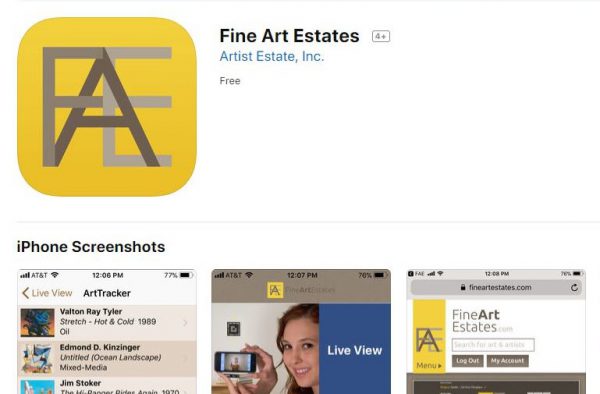 Will It Work in My Space?
 Anatomy of a View
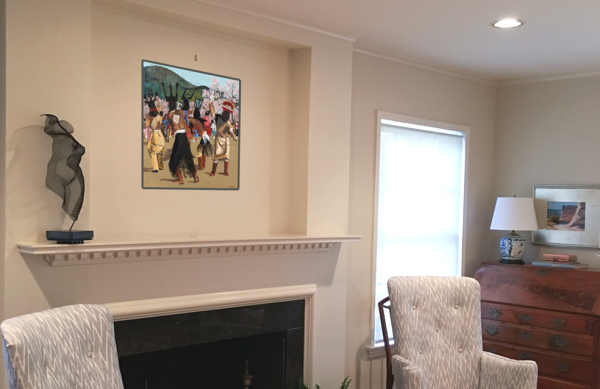 Creating Stunning Presentations with FAE