I am fascinated by artists whose main form of expression is through painting, but are drawn to try other art forms, like printmaking. Many artists who explore printmaking on their own, and who come from a background in painting, are often not concerned with the same conventions that apply to most printmakers. They approach creating prints in the same way they do their paintings. I call these artists: Painter/Printmakers.
James Whistler, Fruit Stall, 1879-80 Etching and Drypoint, both last state and both printed by Whistler Collection of the Art Institute of Chicago We know that Whistler printed both of these proofs because he left a tab on the bottom of each of these prints signed in pencil with his famous butterfly, followed with the letters “imp.” This means that Whistler impressed or printed the proof. You can see how selectively the artist wiped the ink off the plate before he printed the plate.
Historic Examples:
Through the history of printmaking, most artists who tried their hand at the medium were painters first. They were often supported by tradesmen who editioned prints for artists, made reproductions of paintings, or produced illustrations for books, and it was their job to try to make each print they produced look the same. But, when painters like Rembrandt Harmenszoon van Rijn, or James Abbott McNeill Whistler produced and proofed their own prints, especially when using an intaglio process, they were more interested in exploring the visual effects the medium had to offer than creating clones.
Over the last 125 years, many painters who wanted to explore the printmaking mediums started by making monotypes because it is more like painting, and some jump directly into one of the major printmaking categories of either Intaglio, Planographic, Relief, or Stencil. When they do make the leap, many will find a Fine Art Press or locate a printmaker who is willing to work with them. If they enlist a professional, after they have created a matrix followed by a final press proof known as the bon á tirer (good to print or pull), they decide how many prints they want to make up the edition and the number they want outside of the edition. Although it is impossible to make two hand-printed proofs look exactly the same, it is the job of the professional printer to make every proof look as close to the bon á tirer as they can.
If, instead of using a practitioner, a painter decides to try their hand at printing their own edition, they are often more interested in exploring the possibilities of the technique they have chosen than following convention. These are the artists I call painter/printmakers.
Here are six Intaglio prints by Hugh H. Breckenridge, This is an example of how an edition might look when printed by a painter/printmaker. These images show how Breckenridge selectively inked and wiped each proof to create different visual effects.
The Painter/Printmaker Hugh Henry Breckenridge:
A good example of this type of artist would be Hugh Henry Breckenridge (1870-1937). Breckenridge taught painting at the Pennsylvania Academy of Fine Art for 25 years and then took a teaching position as Director of the Department of Fine Art at the Maryland Institute in Baltimore. He explored both lithography and intaglio printmaking while at his summer school in Gloucester MA, but it was the latter that showed his disinterest in convention.
Although it appears that his etching technique was straightforward, his printing methods were those of the classic painter/printmaker. Since he was a painter at heart, the idea of printing image after image, duplicating what he had done before, would have been boring, and his disinterest in doing so becomes obvious when one is privileged to see many proofs of the same print together.
Evidence for my claim can be seen in his self-editioned etching, Across the Harbor, 8 x 7 inches, edition of 50, printed in 1923. As a painter, Breckenridge was interested in the effects of light and dark that could be achieved through the different ways he inked and wiped the plate before he printed each proof. He was exploring his ability to control the atmosphere of each print, depicting different times of day where shadows and light are used to emphasize or diminish an object’s importance.
This is the first image in the set of six above. The second is below. They show how the artist changed the lighting and atmosphere in each of these prints by how he inked and wiped the plate between proofs.
It is unusual that a painter/printmaker would have gotten so interested in exploring the inking possibilities of a single print that they would have created an edition of 50. I do not believe he had intended such a large edition when he started printing, I think he got so immersed in the painterly effects selective inking offered, he could not stop.
Breckenridge continued to be unconventional when he numbered the edition. Normally, after an edition is declared, any prints beyond that would have normally been designated as A/P’s or artist’ proofs. In this case, Breckenridge just continued numbering the prints after he reached the end of the edition. So instead of ending with 50/50, he numbered three more proofs 51-53/50 respectively. Although irregularities are sometimes found in the editions of professional printmakers, they are more commonly found in the work of Painter/Printmakers, who are by their nature, less encumbered by convention.
A Collectors Perspective:
If a collector only sees one impression of a print by an artist, they will probably not know whether the artist played with the inking of a print matrix during its editioning or not. This is only obvious by seeing multiple impressions of the same print. They would have to rely on a catalogue raisonné of the artists’ work, see other images of the same state in auction catalogues, or in Museum collections to know for sure.
For some collectors, acquiring a print that was pulled by the artist who created it is of more interest than a print pulled by a pressman who is hired to print an edition. This does not mean that professionally editioned prints by contemporary artists are not as good. A good pressman is trained to get everything the matrix has to offer and what their client says they want. Prints that are pulled by an inexperienced printmaker can be over or under inked. But by their very nature, the fact that the artist has placed their name on it and maybe given it an edition number means that they are personally satisfied with the result.
For a painter/printmaker, it is the exploration of a print matrix’s plasticity that fascinates them. They are drawn to take a process designed to create like artworks, and instead, see how many ways they can make each final print different, yet stand on its own. Rather than trying to duplicate a perceived perfection as is the goal of the professional printmaker, the painter/printmaker attempts to create a different state of perfection with each proof they print.
More Examples:
The following are images 3-6 of the 6 images seen together above. They show how proofs from the same plate can differ just by the way the plate is inked and wiped. This level of variation is strong evidence that they were printed by a painter/printmaker.
Three Insurance Experts Explain the Intricacies of Insuring Your Art Collection
I am often asked by clients if they should cover their art under their homeowner’s insurance (HO) or if they should investigate insuring their art with a separate fine art collectors’ policy. Since I am an art dealer and not an insurance agent, I thought it prudent to do a deep dive into the world of fine art insurance so I could properly advise my clients. As I started to research the subject, I was shocked to discover how little I knew about fine art collector’s insurance and how inadequately most HO policies cover collectibles like fine art. To help others better understand how their art is currently covered, or not covered, I have written this informational post titled, Fine Art Insurance 101.
To research this article, I looked at both homeowners’ and personal inland marine policies, and specialized policies written just for art collectors. I also interviewed an insurance agent who offers homeowners’ insurance, a fine art insurance specialist, and a fine art provider who underwrites fine art policies to learn what is covered, how is it covered, who will pay a claim, and how it will be handled.
To better understand each perspective, I have divided my post into three parts.
Part One:
Is Your Art Adequately Covered by Your Homeowner’s (HO) Insurance?
I called the agent who handles my HO insurance, Connie Butler. Connie is the Personal Lines Manager for Champion Commercial Insurance in Dallas, Texas. She was kind enough to visit with me about how fine art and other collectibles are covered by most HO policies, and ways to improve on the protection they offer. If you have actually read your HO policy front to back and have scheduled your fine art and other collectibles on an attached personal Inland Marine Policy, move on to part two, if you have not done both of these, don’t skip part one!
Part Two:
An Interview with a Fine Art Insurance Specialist
I emailed Houston, Texas based Adrienne Reid, Vice President of one of the largest fine art insurance specialty brokerages in the country, Huntington T. Block, and she was kind enough to answer my many questions about the when, how, and whys of fine art collector’s insurance. Early on in our conversation, Adrienne answered the “When” question by saying “If you can walk around your house and you determine that you have more than 5 artworks that exceed $10,000 each in value, you should consult an agent or firm that specializes in fine art insurance.”
Part Three:
An Interview with a Fine Art Insurance Provider
Most insurance is underwritten by an insurance provider. A provider evaluates the risk, provides a quote, issues coverage, and, in the event of a covered loss, pays the coverage set forth in the policy.
To learn more about the role played by a fine art insurance provider, I emailed Katja Zigerlig, Vice President of Art, Wine + Collectibles Advisory with Berkley One, a Berkley Company that specializes in providing insurance for fine art and collectibles, as well as high-end homes, autos, liability, and watercraft. She and her team were extremely helpful and most generous with their time.
Note: I am not promoting any specific agent or insurance company with this post. I am grateful to and crediting those who gave liberally of their time to advise me, and thankful for the education I received in the process. I hope you find what follows enlightening.
Part One:
Is Your Art Covered by Your HO Insurance?
My first inquiry focused on how a fine art loss was handled by a standard HO policy. To do this, I interviewed the agent who currently handles my HO insurance, Connie Butler. Connie is the Personal Lines Manager for Champion Commercial Insurance in Dallas, Texas.
Soon into the interview, I realized that certain types of personal property, primarily collectibles like fine art, are not normally handled the way I thought. I naively “assumed” that the word “All Risk” meant just that, and all my personal property was covered up to the amount stated on my policy’s declarations page. So, I thought that if I had a policy with a personal property limit of $500,000, and a $25,000 painting was stolen from my home, it would be completely covered, less the deductible of course. I was wrong. I now realize that HO insurance is designed to insure your home, not protect your art collection.
Forest Fire in Zion National Park – Image: National Park Service
Many of your possessions like clothes, furniture, and appliances are covered, in most cases, by a replacement value. In the event of theft however, other item categories like fine art, jewelry, and furs, have classification limits varying from $500 to $5,000 per category depending on the policy.
To provide more realistic and broader coverage to your valuable personal property items like fine art, your agent will normally offer you another type of policy called a personal Inland Marine Policy, sometimes called a “floater” or “endorsement.” In this type of policy, individual items and their value are listed; the coverage is broader; most claims are handled quicker; and the coverage is usually less expensive than blanket coverage. The following is a synopsis of my interview with Connie:
The most common types of HO policies and how they generally relate to a fine art collector.
Types of HO Policies:
The two types of insurance policies available to a homeowner are “Named Peril” and “All-Risk.” As its name implies, the “Named Peril” policy only covers the perils that are listed in the policy. Of the two, the “All-Risk” policy usually provides broader coverage for a homeowner.
What an All-Risk HO policy covers:
Within the stated dollar limits on a policy’s declarations page, an All-Risk HO insurance policy provides coverage from all risks or perils that could damage your home or its contents and personal property unless the risks are specifically excluded or limited by the policy.
How your personal property is covered by most HO polices:
What is covered:
Most All-Risk HO policies provide blanket coverage for most of your personal property. In the event of any covered loss, a deductible will be applied. How these claims are paid will depend on if your personal property is covered for “Replacement Cost” or by “Actual Cash Value.” In the event of a total loss of an insured item, “Replacement Cost” coverage will replace the item with a new one of equal or like quality, while “Actual Cash Value” coverage will provide the insured a cash payment equal to the item’s depreciated value at the time of the loss.
What is Partially Covered (Special Limits of Liability):
In most All-Risk HO policies, personal property items of a certain type or category are handled differently than the rest of your personal property when it comes to theft or mysterious disappearance. These categories are individually identified in the policy and often include collectibles such as fine art, currency, coins, stamps, and jewelry. The amount of money paid to the insured in the event of this type of loss is capped depending on the category. For instance, the amount of money paid the insured for the theft of one or more artworks that have a total combined value of $20,000 could be as little as $500 depending on the policy. These are items that the Insurance companies want you to schedule separately under an Inland Marine Policy.
Other Types of losses not covered in an HO policy:
Losses typically not covered include damage caused intentionally by the insured, damages caused by lack of proper maintenance, terrorism, nuclear war, damage by smog, bug infestations, rust, mold, general wear and tear, and any other exclusions listed in the policy contract. Also, most all policies will protect the insurance company if it is found that the insured intentionally provided false information to get insurance or while making a claim.
How your agent can provide better coverage for your personal property than your standard HO policy provides:
To protect an insured’s property that is not covered by the standard HO policy, companies normally offer another type of policy called a personal Inland Marine Policy. Attached to this policy is a list provided by the insured of all the property that exceeds the limits of their homeowner’s policy that they want insured and the value they want each item insured for. This type of policy will normally have fewer restrictions than a HO policy and provide more in-depth coverage. If an item on the schedule is lost to an unexcluded risk, the insured will receive the amount of money specified as the items listed value, unless a deductible applies. If the item is damaged and not a total loss, the policy will normally pay for its restoration up to its listed value.
Scheduled Personal Property Insurance is always an “All Risk” policy. This means that it will cover against “… all risk of physical loss or damage to your property described in the schedule of Personal Articles, unless an exclusion applies.” For each item covered, you would normally have to provide your agent with a photograph, a copy of the original purchase receipt, and sometimes an appraisal if you want to list the item for more than was originally paid.
I asked Connie when she thought an insured should add a personal Inland Marine Policy to their HO insurance. Without hesitation, she said that “if you have any personal property valued at $2,500 or more, you should list it separately on a Scheduled Personal Property Policy.” That is the best way of knowing that it is covered properly.
Summary:
Homeowners’ Policy:
Be sure your HO is an “All Risk” “Replacement Cost” policy. It will usually cost a little more but worth it if you have a tornado rip through your home.
To truly understand how your home and possessions are insured, read your entire homeowner’s policy, especially the attached “other coverages” and “endorsements” pages. The “other coverages” and “endorsements” have the power to change coverages in the basic HO policy.
If you have read something in your policy you did not expect or did not understand, call your agent, and get clarification. After a loss is not the time to find out you were not covered for a risk you assumed you were.
Tornado crossing a farm field. – NOAA image
According to my agent, it is important to photograph each room showing not only your art but all of your personal property that is visible in the room. (although this may not relate to art, open closets and drawers and photograph what is visible inside.) Categorize images by room and upload the files to the cloud and to several thumb drives that can be kept in a safe deposit box or with a relative. My agent said that if your house is hit with a tornado and your possessions are scattered over the county, you will have a hard time proving to the insurance company that you actually had the items in your claim without photographic evidence.
Inland Marine Policy:
Scheduled Inland Marine Policies are All-Risk and pay the insured the amount listed on the policy or repair the item if a loss occurs that isn’t excluded by the policy.
Any item you own that is kept in your home and is valued over $2,500 should be itemized on a scheduled personal Inland Marine Policy. You can update the value on any item if you can provide your agent with evidence of a greater value. (I recommend that if you do not have a separate policy covering your fine art, that any artwork you have paid over $1,000 for be listed on your Scheduled Personal Property Policy.)
Part Two:
An Interview with a Fine Art Specialist.
Insurance companies that specialize in HO and automobile insurance are rarely equipped to handle the specific needs of an “Art Collector.” The good news is that there are companies that write policies geared specifically for the fine art collector and agents who specialize in matching these policies with those who need them.
One of these agents is Houston-based Adrienne Reid, Vice President of Huntington T. Block. Adrienne has specialized in fine art insurance for over 15 years helping museums, galleries and collectors keep their art properly insured. Via email, Adrienne was kind enough to answer my many questions about the when, how, and whys of fine art collector insurance.
Here are her responses to my questions:
When should a person consider getting a separate policy for their artwork?
When you start growing your collection beyond just a couple of artworks, you should investigate insuring your art under a separate fine art policy. If you want broader and more specialized coverage for your art than what can be obtained from your homeowners insurance company, a fine art collectors’ policy is going to be a better option.
What are the advantages of having a separate fine art policy over listing your art on your scheduled personal property policy?
Generally speaking, a fine art policy includes coverage for breakage, flood, and mysterious disappearance – which are commonly excluded on a homeowner’s policy. The policy also typically extends to transit and other locations – which may not be the case on a homeowner’s policy. Make sure to read an actual issued policy to confirm what is covered. But by far the biggest advantage is having a specialized broker who is knowledgeable regarding fine art coverage and who will place the coverage with an insurer who uses fine art specialized adjusters in the event of a claim. A homeowner’s policy would send a general property adjuster, who may not know how best to handle a fine art loss or understand the implications of loss in value to artwork that can be restored.
What types of fine art policies are available?
For Huntington T. Block clients, both personal and corporate, we offer either a Scheduled (agreed value form) or a Blanket (current market value form) based on a client’s situation.
The Scheduled Form – The values on the schedule attached to the policy are the agreed values for coverage under the policy.
Pro: The amount insured is certain and does not go down if market prices fall
Con: If the value goes up, the insurer will only pay the scheduled amount. All new acquisitions and collection changes must be reported immediately and changed on the policy. Only the specific artworks scheduled on the policy are covered.
The Blanket Form – The policy limit is blanket over all locations. No schedule is attached to the policy, and no individual values are listed. Valuation is current market value.
Pro: Current market value can provide assurance in the event that artworks increase in value due to market conditions, for example, driven by popularity of an artist or genre, death of an artist, etc. All artworks owned by the collector are covered up to the policy limit with no per item maximum.
Con: If values go down, there is a possibility the insured will collect less than they paid for the item(s) because the valuation is based on current market values.
For both policies, collectors choose a deductible for their level of risk tolerance. A high deductible provides lower annual premium, but more out of pocket in the event of a loss. A low deductible has higher annual premium, but less out of pocket in the event of a loss.
Of the two types of policies, which is the most popular among your clients?
About 80% of our clients have chosen a Blanket Coverage policy.
Can you give an example of how you would determine which type of policy is best for a new client?
If a collector is actively acquiring and wants protection in case their artwork values go up prior to getting an updated appraisal – a blanket policy may suit them. If the collector is not actively acquiring and wants certainty in the value of the art insured on the policy – then a scheduled policy may suit them.
What types of questions do you ask a prospective client to determine if they need Fine Art insurance?
Do they have a collection of more than one or two artworks?
Do they plan to continue collecting?
What is the total value of the artwork?
Where is it located?
Do they intend to sell the collection in the near future (or is it part of an estate)?
When was the last appraisal done?
Do they have an inventory of the collection?
I know that most insurance is underwritten by third party companies. What do you need from a prospective client to get a premium quote?
When the collector determines that a separate fine art policy meets their circumstance, I send them an application. Once it is returned along with a copy of the most recent appraisal or collection inventory, I will send it on to several underwriters to get quotes.
Flooding in Farm country – NOAA image
How do you determine what underwriters to contact when looking for the best match for your client and what is the process of approaching the ones you feel would be the best fit for a quote?
This depends entirely on an insured’s location (are they in a catastrophic area?), the total value of the collection, and how quickly they need a quote turned around. Once I determine the underwriters, I submit to them the completed application, collection appraisal or inventory, and the quote specifications. As a broker, my role is to represent the client and identify underwriters for their coverage needs – and make sure that it is the most competitive premium available.
Hurricane Andrew devastation, Pinewoods Villa – NOAA image
How many companies are out there that do Fine Art collection underwriting?
There are about eight insurance companies that have specific fine art underwriters in the United States.
Is there an average number of underwriters you would approach per client?
Generally, no more than three – unless there are issues with the submission – like claims history or catastrophic area, etc. Typically, once we receive an application, we know which underwriters to approach.
I understand that in most cases, fine art collection insurance is less expensive than scheduling the artworks on a homeowner’s policy. Can you provide a range of a percentage cost per year that each type of fine arts policy covers?
That is a tough question – because so much depends on the size and location of the art collection and the client’s claim history. HTB writes over 1,000 art collectors in the United States. In general, premium rates go down as the collection total value goes up.
Once insured, what is the most important thing a collector can do to protect their collection?
A good digitally stored inventory, and quality digital photographs of each artwork is paramount. These should be stored offsite and/or in the cloud so that in the event of a catastrophic loss, an insured has documentation to provide to the adjuster.
As with any insurance claim, the more information and documentation that you are able to provide the adjuster, the better. An adjuster may have a difficult time settling the appropriate payout for a claim if the collector does not have detailed information about the artworks. Making sure that the collector has updated documentation (that is accessible after a loss) is one of the most important things they can do to be prepared.
My research shows that there are a lot of companies offering fine art collection insurance based in London. Many of them will offer a quote to ensure a single artwork online by asking only three questions; your name, email address, and the value of the artwork you want insured. Can you comment on these companies?
I am not sure that a company would be in a position to offer a binding quote based on such limited amount of information. It may be an attempt to gather information for another purpose.
Once you have your fine art policy in place, what actions should you take after a loss; say a picture falls off the wall or your artwork is lost in shipment?
Tips for these two scenarios:
Art Falls Off the Wall
Take several photographs before moving the artwork.
If safe to move, move artwork out of harm’s way.
Determine extent of damage. Depending on the damage, it may not be desirable to file a claim. But it is always best to notify your broker of the damage so they can notify the insurance company. It is better to err on the side of reporting damage; claims can always be withdrawn if it is decided to handle the expenses out of pocket.
Report to your insurance company
Artwork is Lost in Shipping
Notify the shipper and the insurance company.
The insurance company will work with the shipper to investigate the loss. If the artwork is later received, keep the insurance company updated.
Huntington T. Block Insurance Agency, Inc. collector policy losses by size from 2000 to 2020Huntington T. Block Insurance Agency, Inc. collector policy losses by count from 2000 to 2020
Summary:
I think Adrienne pretty much covered what is important to know about obtaining a fine art collectors’ policy. However, I did want to mention two things to think about while applying for, and after your insurance is in force.
If your agent provides quotes from several underwriters, in addition to reviewing the cost, limits, and deductibles of each policy, be sure to ask your agent about any differences in coverage each provider is offering. Also, after the fine art policy you have chosen is in effect, if you have any artwork already covered by your personal inland marine policy that is now also covered under your new fine art policy, don’t forget to call your HO agent and have those works removed. You do not want to pay for double coverage and then have the company who covers your fine art insurance feuding with the company that covers your HO insurance about who is responsible for paying a claim.
Part Three:
An Interview with a Fine Art Insurance Provider
When you have made the decision to insure your art on a separate fine art collectors’ policy, the organizations that your agent contacts to request coverage options and premium quotes are known as insurance providers. These are the entities that underwrite the insurance and are responsible for paying any covered claims.
To better understand the role of the provider regarding fine art insurance, I emailed Katja Zigerlig, Vice President of Art, Wine + Collectibles Advisory with Berkley One, a Berkley Company. Through the insurance company subsidiaries of W. R. Berkley Corporation, Berkley One specializes in underwriting insurance for fine art and collectibles, as well as for high-end homes, autos, liability, and watercraft. Katja and her team were kind enough to furnish answers to my questions about the role of a fine art insurance provider.
Following are the answers to my questions:
What is a provider’s business relationship with the insurance agent?
As an insurance provider, Berkley One works very closely with independent insurance brokers and agents, whose role is to work with a client directly and advise him or her on their insurance needs based on risk exposure. Independent agents and brokers typically work with multiple providers to offer clients a range of insurance solutions that fit their needs.
What is the provider’s business relationship with a prospective client?
When an applicant who is looking for coverage contacts an agent who specializes in insuring fine art, their agent will begin working with providers such as Berkley One to obtain an insurance quote. To get the information that we need to provide a proper quote, we would, along with the applicant and agent, work together to get correct information about the applicant—including things like home value, elevation certificates if the applicant lives in a flood zone, appropriate legal documents when necessary, and a full schedule of artworks to be insured—to help make sure we can offer a solution that fits their needs.
Sometimes we get inquiries from applicants directly. When this happens, we will find out more information about the applicant and risk, then connect them with an appropriate independent insurance agent who then becomes their source for insurance advice.
Once an applicant becomes a client, then the provider is “on risk” (the insurance contract is now in force).
When an agent sends a provider a prospective client’s application and a request for a quote, what steps does the provider take to determine if, and under what conditions, they will offer a policy to cover the collection?
Assessing a risk exposure is called underwriting and is an important part of the insurance process. For personal collections, some major risk factors that a provider can consider are the physical location where the collection is kept, the nature of the collection, and the type of collector. For example, a million-dollar collection of paintings in a condo in South Beach, Florida has different weather exposures than the same collection in a house in St. Louis, Missouri. A collection of glass sculptures has a higher probability of breaking than a collection of paintings. Often, these risks can be mitigated, so knowing the protections in place for a collection is also important.
How does a provider determine how a premium is calculated? Would you please provide examples?
Information about risk exposure goes into an algorithm that determines a rate depending on the exposure. In the example above, the development of rates for an art collection in coastal Florida will be different from the development of rates for the same collection in the Midwest, as the exposure to hurricanes and tornadoes differ by geography. Collectors will be encouraged to provide as much information as possible about how their collections are cared for, as providers often file rating credits or discounts for higher levels of protection.
What is the practical difference between Blanket and Scheduled coverage for collectibles?
Scheduled coverage separately describes individual collectibles to be insured, allowing them to be covered with a specified coverage amount at the time of policy issuance. At the time of loss, where description and coverage amount are pre-determined, the adjustment of the claim may not need to include further descriptions or a post-loss valuation.
Blanket coverage is based off a blanket value that covers multiple artworks and is often used to cover lower-priced valuables. While there can still be a maximum limit per item, each piece of artwork or collectible is not scheduled separately. A collector should also be aware that when an insured has blanket coverage, in the event of a loss, descriptions, and valuation will need to be established. That process could be complicated where the loss event also resulted in the loss of the documentation of the items’ descriptions and values, as insureds are usually required to demonstrate proof the item had been in their possession before the loss. An independent agent is a great resource for advice in whether scheduled or blanket coverage makes sense for a specific collection.
When a claim is made, how involved is the agent with that process or is it all handled by the provider?
Claims are typically handled by a claims adjuster employed or retained by the provider. Some agencies have a dedicated claims department and want to participate in the claims process or advocate for the client, while others prefer a lower-touch approach. Both approaches are fine, and in either scenario, communication between the agent and the provider’s claims staff is important.
Would you describe the process that occurs from when a claim is made to when the insured receives payment for the claim?
Here is a concise answer on a complicated question: The fact set of every claim is different, so a claim investigation will be designed using an individualized and collaborative approach based on the claim being made. There are certain components of every claim that must be completed. For instance, coverage needs to be analyzed and compared to the cause of loss to determine coverage, exclusions, and limits. Depending on the size and complexity of the claim, this may include obtaining documentation and/or sworn statements. The adjuster needs to evaluate the claim based on the facts, coverage, and documentation to ultimately resolve the claim. Having open communication and collaboration between all parties can expedite this process.
Is there anything else you think is important for a prospective client to know about fine art collectors’ insurance?
Purchase the right amount of insurance with a reputable, financially strong insurance provider that understands fine art insurance and the kinds of claims that typically occur.
Summary:
Bottom line, an insurance provider decides to bid on insuring your collection, or not, based on the algorithm they employ for assessing risk. The data used by these companies to determine acceptable exposure include factors such as where you live, how your collection is protected, what your collection consists of, and your claims history. If you are provided a bid, the premium is based on these factors. Different companies have different risk tolerances at any one time, which is why your agent may go to three providers to get a quote and only one will offer a policy.
A provider can reduce your premium by applying discounts. Two circumstances where these discounts can apply is if you choose a higher deductible or the collection is spread between multiple buildings or locations.
Epilogue:
The one thing stressed by each specialist I interviewed was the importance of good collection record keeping and having a digital copy of those records kept away from the collection itself, especially if you have determined a blanket policy is right for your circumstance. Connie Butler told me that when a series of powerful tornadoes struck Oklahoma City some years back, she literally sat down and cried with clients whose homes were destroyed and their personal possessions were scattered across the neighborhood. She had to explain that, because they had no proof via written inventory or photographs to document what they had in their homes, their insurance company was unable to cover a great deal of the personal property they lost.
After thoroughly researching this subject for over two months, the one thing I would stress to everyone is the importance of reading the insurance contract, front-to-back. Pay strict attention to the main section headings and subheadings of where you are in the contract as they qualify everything that follows. If you have questions about what you are reading, it is best to make notes on the areas of the policy you do not fully comprehend. Then, ask your insurance agent to explain each area of confusion until you do. If they are unable to enlighten you, it is probably time to start looking for a different agent. It is important, as with any legal document that could have such a powerful impact on your life, to fully understand it, and how it covers your possessions.
If you have read each part of this article, you probably noticed that I asked the same question to each specialist. When I did, I kept all versions because, although the answers were technically the same, each was approached differently adding interesting nuances.
To reiterate what I said at the beginning of this article, my goal in writing it was to gain a general understanding of how art collectors insurance works. Each section was reviewed multiple times for accuracy and to be sure that a layman, such as myself, would understand the basics. During the process, if I was unclear about a term or concept, I would ask questions until it was. If you now know whether you need to cover your art collection under a separate fine art collectors policy or just feel better informed about the subject, I have more than achieved what I set out to do.
I am often asked questions regarding the hanging and framing of 2-dimensional artworks. So, I have written a new post answering a few Hanging & Framing FAQ’s. As there are many easily accessible videos available on how to hang a work of art yourself, I thought it best to focus on things I have learned from experience that many of those videos do not cover. Although hanging a medium-sized work of art on a plasterboard wall at eye level is not difficult, I advise that for safety, any installation that requires a ladder be turned over to professional installers. I have included tips on what information to gather before you contact an installer that should save you time and money in the long run.
Although an interesting design idea, and maybe the only place the owner of this house had to hang this suite of works, it presents a very dangerous hanging problem that needed to be addressed by a professional fine art services company, not the furniture mover. This fellow is lucky he did not leave with a broken leg and trail of shattered frames and artwork.
Framing and hanging FAQ’s:
Why is there a paper or cardboard backing on many framed 2-D works?
Is it better to use mirror hangers (D rings) or wire to hang a work?
What type of hangers should be used to hang artworks on a sheetrock wall?
Is there a standard height for hanging 2-D artwork?
If I decide to use two hangers rather than one to affix a wired artwork because of weight, should I do anything different?
After establishing one hook in the wall and realizing that the hook needs to go up a quarter of an inch, what should I do?
Can a hook be reused, and if I have removed the hook for any reason, should I just put the same hook back into the hole it was removed from?
How should I prepare before contacting a professional installer?
1. Why is there a paper or cardboard backing on many framed 2-D works?
When you pick up a newly framed work from your frame shop, you will normally find that there is a backing of some kind on the verso of the artwork. For a framed work on paper, the backing will usually also be paper, and for a framed canvas the backing will likely be foam core or a fluted cardboard.
For a work on paper, the paper backing is there to keep dust and insects from getting into the back of the frame assembly. Most people will hang the newly framed work on the wall for the next 20 years and the backing will do its job. However, if you rotate art in your frames, having to remove the paper and the messy double stick tape residue that is left is a lot of work. If you are planning on reusing a frame regularly, it is best to ask your framer not to put the backing material on that frame. If brown Kraft paper is used to back an artwork, over many years, it will become brittle and actually break up rather than tear. When this starts to happen, it is probably time to have a framer check to see if the frame, and the artwork, need attention.
Foamcore on top and fluted cardboard below are the materials most used to protect the back of a painting on canvas.
For paintings on canvas, a backing material such as foamcore or brown fluted cardboard is normally used. These materials not only keep bugs and dust out, but they also protect the back of the canvas while the work is in transit. It helps to prevent a hit or poke to the canvas from behind, especially if the artwork will be moved around a lot. The best material for backing a stretched canvas is acid-free fluted cardboard which is often gray in color. Although foam core is often used, over time, the foam between the paper layers will start to degrade and it will not be as effective as it was when it was new. Brown fluted cardboard has a very high acid content and, over the long term, can adversely affect anything it is adjacent to.
The best material for backing a stretched canvas is acid-free fluted cardboard which is often gray in color.
2. Is it better to use mirror hangers (D rings) or wire to hang a work?
The answer is, it depends. Both types of hanging methods work but here are a few reasons why one would be preferred over the other.
Mirror hangers:
+ Best method for a long-term installation
+ Will keep the artwork level
+ In most cases, will hold the artwork closer to the wall
+ Automatically puts less stress on the hanger and frame
This is a selection of mirror hangers (also called “D” rings) showing their different sizes and shapes.
Wire:
+ Often better for short term installations or for works that will be moved frequently
+ Minimum impact on the wall as often one hanger can be used rather than two that are far apart.
+ Wire now comes plastic coated and will last longer
– Uncoated braided hanging wire can rust and break over time
– Wire is under constant tension and may break over time
– May not stay level requiring occasional adjustment
– keeps a constant inward strain on the frame
– If two hooks are used and not placed properly, a constant sideways torquing pressure could be exerted on each hook causing them to eventually fail.
Caution: Before you hang a work with wire, here is an easy way to be sure that the wire will safely hold the weight of the artwork.
Lift the artwork by its wire about an inch off the floor so you can feel the force that is needed to lift it.
Set the work back on the floor gently maintaining the same level of force on the wire it took to lift it.
Place your other hand on top of the picture holding it down to the floor.
Pull up on the wire with about 25% more force than it took to get it off the ground.
If the wire breaks or is pulled from either of the mirror hangers holding it in place, have your framer replace or reset the wire, or just remove the wire, reset the hangers so they are vertical, and hang it from the mirror hangers instead.
Since screw eyes are not normally used today, their use often indicates that the wire is older and needs to be replaced. When replacing the wire, mirror hangers should be retrofitted for the screw eyes because, especially in the case of older frames, as the wood dries and looses density the screw eye will lose its purchase and eventually fail.
This image illustrates a disaster waiting to happen. It combines old picture wire improperly attached to the screw eye and improperly twisted around itself. It would require very little force to either pull the wire out of the screw eye or pull the screw eye out of the wood frame.This is a proper wire attachment to a small mirror hanger.
Tips on How to carry artworks: Always carry an artwork upright facing you, holding it with two hands from both sides. It is not a good idea to carry it from the top of the frame, and it is best not to carry it around by its hanging wire if it has one. You are making a lot of assumptions by doing so and you have much less control over the artwork.
It is best to carry any artwork from the sides, not from the top. Holding it to one side when walking with it will allow better visibility and if you trip, a greater chance of not falling on top of the artwork.
3. What type of hangers should be used to hang artworks on a Sheetrock wall?
Although there are many hanging systems available on the market today for hanging 2-D artworks on a Sheetrock wall, for home use, most professional art installers use a floreat-style hanger. This type of hanger was designed to exert minimal impact on the structure of the Sheetrock, yet securely hold the weight each hook is rated for. Each thin nail is made of strong high-grade steel and after the hook is installed, the nail can be removed in most cases by twisting it while pulling it out with your fingertips. The design of the hook forces the nail to maintain an angle of 65 degrees as it goes into the sheetrock.
This image shows the cross section of a Floreat style hanger in a 1/2 inch thick piece of Sheetrock.
This angle is maintained so that most of the nail’s length is held in the structure of the rock. When a painting’s wire or mirror hanger is placed onto the hook, the weight of the artwork pulls the hanger down flat, clamping it against the wall. This combination makes for a strong hanging system.
This lineup of five Floreat hangers shows the size recommended for the weight of artwork. Starting from the left, they are 10, 20, 30, 50, and 75 pound hooks. I suggest choosing the next size up from the weight you believe the artwork to be. IE, If you think the weight of the artwork to be hung is 16 pounds, don’t use the 20 pound hook, use the 30 pound.
Floreat hangers come in five weight levels: 10, 20, and 30-pound hooks use one nail, 50-pound hooks use two nails and 75-pound hooks use three nails. As a rule of thumb, I always try to use a hook that is one weight level above what I think will hold the artwork. If the artwork weighs about 15 pounds, I will use a 30-pound hook, not a 20-pound hook etc.
4. Is there a standard height for hanging 2-D artwork?
Yes and No. If you ask a museum installer or gallery owner at what height they prefer to hang in their spaces, they will provide you with a number between 57 and 62 inches that they, or their institution prefers. This number refers to the height above the floor of the center line of each medium size artwork they hang. It is determined by the height of the wall, the size of the space, and the height that is most comfortable for the average person to view the work. (whatever average is)
Consistency is actually more important than the height that is chosen. That is, if you have determined a hanging height that is most comfortable for you to view artworks in your home, then use that height consistently throughout the room and preferably the entire house depending on each room’s ceiling height. Imagine how a line of medium-sized artworks would look in a museum if they hung each one at a different center line height.
The center line drawn across the four paintings above is 60 inches above the floor. Much larger artworks, depending on their scale, may need to be raised or lowered depending on the circumstance. The same goes for smaller works hung one above the other. The center line height is helpful when hanging a lot of works together, salon style, to be sure they will feel balanced on the wall.
These center line height numbers become irrelevant if a painting is too large to work with the center line height chosen for everything else, but the height at which a larger painting is hung needs to relate comfortably to what is around it. And of course, this number is not helpful if you are hanging over furniture or a fireplace.
Tip: Do not intentionally try to line up the top of larger artworks with the top of a door or window frame. If it happens to line up because you are following an established center line height it is fine, but the room will feel a bit odd if works are hung a little high or low just to have them match another architectural feature that will create a visual line around the room.
5. If I decide to use two hangers rather than one to hang a wired artwork because of weight, should I do anything different?
I recommend that when using two hooks, especially two or three nail hooks, they be canted inward so that the weight of the wire does not put stress on the nails and hook when hung. With one hook, because the wire forms a mountain shape, the weight vector is straight down.
A single hook makes a mountain shape with the wire and exerts an even downward force on the hook.
With two hooks the wire forms a mesa shape and the direction of the weight vector can be as much as 20 degrees off the vertical. If both hooks are nailed in vertically, as one would place a single hook. When the weight of the artwork is placed on it, it will have a constant sideways pull possibly causing an eventual failure.
When two hooks are used, the wire makes the shape of a mesa, not a mountain. Note that when using two hooks, they are nailed into the wall so they cant in towards one another. This is so the force on each hook is balanced and equally downward like when a single hook is used. Otherwise, if hung strait down like a single hook, the wire would create a constant inward force twisting the nail and eventually weakening its connection to the wall.
6. After establishing one hook in the wall and discovering that the hook needs to go up a quarter of an inch, what should I do?
You can move the hook ¼ inch to the left, to the right, or below, but do not move the hook ¼ inch up. Since a hole was created in the Sheetrock from pounding the nail in for the first time, placing a nail ¼ inch above that hole means that the structure of the Sheetrock beneath the hook is now compromised and can fail.
If hanging the artwork from mirror hangers (D rings), move the hanger on the opposite side down ¼ inch to compensate. If hanging the artwork from wire using one hook, remeasure, and use two hooks rather than one. That will not only keep the artwork from eventually shifting out of level, it will double the amount of weight that can be held by just one hook.
7. Can a hook be reused, and if I have removed the hook for any reason, should I just put the same hook back into the hole it was removed from?
The answer to the first part of the question is yes, if the nail is not bent or damaged in any way. The answer to the second part is more complicated. Using the same hole in the Sheetrock again can be tricky if one is not experienced in hanging or working with Sheetrock. If the hook fits snugly and the hook does not move around loosely in the hole, and the hook holds a lot more weight than the artwork that is to be rehung, you are probably fine. If you are concerned, use the hook in a slightly different location or replace a one-nail hook with a two nail, or a two-nail with a three.
8. How should I prepare before contacting a professional installer?
It is always best to use a professional art installer to hang your art. Most installers work by the hour and you can save money by telling them the size and approximate weight of each artwork you want hung, where it is to be placed, and the type of wall they will be hanging the artwork on. With this information, they can work up a more accurate estimate, bring the appropriate manpower, and the proper hanging equipment for the project. Photographs of the front and back of each artwork, including their frames, and area photographs of the rooms that include the walls where the artwork is to be installed will be helpful.
I hope you find some of these suggestions helpful. If you have any other questions regarding the hanging, framing artwork, or anything else related to the art world, send an inquiry to [email protected].
Please do not underestimate the importance of a proper frame for your painting or fine print. Framing is an important design decision that can either enhance or diminish your art viewing experience. The framing decisions you make will not only affect the look of the artwork and the environment into which it will be placed, but its long-term well being as well.
Without a frame to keep this image contained, the compositional elements that make up this image seem to fly out of the picture plane.This frame visually refocuses the viewer’s attention to the sunflowers, that make up the central part of the composition, making the painting feel far less chaotic.
How the artwork will be used can inform frame choice. If it is framed for a collection or museum – because it will most likely be moved from place to place over time – the most important consideration is that the frame compliments, enhances and protects the artwork. If it is to be installed in a commercial setting where it is most likely permanently placed, in addition to helping to enhance and protect the artwork, it needs to fit in with the overall design of the room.
Installation of Modernist paintings at the Philadelphia Museum. Because these works will be moved to different locations over time, each frame is designed to fit the painting rather than the specific space.These three paintings in a corporate collection are framed to fit the art as well as the space because they will not be moved like they would in a private or museum collection.
For your artwork to have the best chance of retaining its value, it is best to be sure that the frame shop you have chosen practices archival framing techniques. Essentially, Archival or Conservation framing means that anything used in the framing of an artwork will not damage the artwork over the long term and will, in most cases, help to protect it. This is most important with works on paper.
This Georgian Bay Art Conservation exploded view shows proper archival framing of an artwork on paper. This would be the standard suggested method of framing a cherished work on paper.
How to find a good Framer?
If you are working with a designer, they will most likely have several framers they regularly work with to recommend for your specific need. If you are not working with a designer, and you feel uncomfortable making this type of decision yourself, a good frame shop will normally have an experienced person on staff who can assist you in making good framing decisions.
One of the best ways to find a good framer is to contact several art galleries around your area that do not have framing departments and ask them who the best conservation framers are in the area. Although conservation framing is more expensive, the extra expense will pay off down the road.
You will not know if you have found a frame shop that uses archival materials unless you ask the right questions. The first question you ask should be, “Do you provide framing to the most current archival standards?”
How to help the framer help you get the most suitable frame?
For a framer to be most effective at suggesting proper frame designs for your artwork, it is best to not only take the artwork to the meeting, but to also take:
• Photos of the entire room in which the artwork will reside
• Measurements of the wall onto which the artwork is to be hung
• Information and visuals on how the artwork will be lit.
And if the artwork is to be hung over a sofa, a chest, or a fireplace mantle:
• Be sure to provide the height of the object the artwork is to be placed above
• Provide the height of the wall above the object to the ceiling molding above.
Following are a few things you may want to avoid or at least think about when choosing a frame for your artwork. I was going to call this section “Framing Don’ts” but as with just about every rule in this world, there are always exceptions.
Over-framing:
Over-framing can relate to the disproportionately large size of a frame to the artwork it surrounds, or the inappropriate ornateness or finish of the frame related to the period, style, and subject of the artwork. Sometimes, to make a small artwork appear more significant looking, a much larger frame (or mat-and-frame combination) is employed, sometimes to the point of totally overpowering the artwork. I have seen this technique used often on late impressions of Rembrandt etchings. To make them more important looking, a small etching is surrounded by a complex frame, often 10 to 20 times the size of the actual etching.
Although the frame above and below are both beautiful frames, both overpower and upstage the artworks themselves and I would consider both of these works to be over-framed. The one above might have worked if the gold had been toned down and not so shiny. The bright gold and frenetic ornamentation makes the artwork inside seem insignificant and hard to look at. The artwork below works well in coloration with the portrait within, but again, its design is so frenetic, the eye is drawn away from the painting. A frame should never take away from an artwork, it should only compliment it.
Here is the same portrait as above in an appropriate period frame. It beautifully compliments the painting and after seeing it, you can’t imagine another frame could be better for the painting.
Under-framing
Under-framing is when an artwork is not provided the frame it deserves. For financial and sometimes practical reasons, artists who paint in oil and acrylic on canvas will either not frame or put strip molding around the artwork to protect the artwork’s edges, assuming that the person who buys the painting will frame the work to their own specifications. Some galleries will not frame any of the work they have for sale of this type for that same reason.
The late Constructivist work, pictured above, would not look right on most walls without something around it to contain its chaotic line work. In this case, under-framed is no frame at all. Even a thin strip molding or a simple wood float, as seen below, will contain the line work and improve its overall appearance.
The 50/50 rule
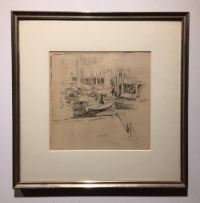
This rule pertains to the width of two-part frame assemblies, that is, a liner to its frame or a mat to its frame. The rule states that both these elements should never be perceptively the same width. So, the mat width on a fine print should never be, or look, the same width as the frame that surrounds it. If the mat was there first and it is decided that it is to be kept, the width of the frame that is chosen for the work needs to be significantly smaller or larger to feel right.
This is a good example of why the 50/50 rule is important. Proportionally, the top and bottom relationship of the frame to the mat is on the verge of being to close but is still acceptable, where the left and right relationships appear the same and do not look right. The fact that the mat sizes of the top and the side are different might indicate that the frame was being reused. Normally the mat proportions would be the same all around or a little greater at the bottom. When there is more space at the bottom than the rest of the mat, it is said that the mat is “weighted at the bottom.”In this example, the artwork is floated on the frames back mat creating a visual empty space between the artwork and the frame. It shows a pleasing proportion between the artwork, the mat space, and the wide frame. Like above, this is an example of an artwork being used in a preexisting frame evidenced by the larger spaces at the top and bottom than at the left and right of the artwork.Here is the most common proper proportion for a matted work on paper. The frame is substantial enough to support the frame assembly and there is an amount of space between the artwork and the frame that makes the artwork look significant. If you doubled the amount of mat space all around, it would appear less significant and over-framed.
Formal/Informal
In most cases, like clothes, it is usually appropriate to dress an artwork to fit the room in which it is to be sited. This means the room will often dictate the type of frames that will be appropriate to choose for that space. It is normally inappropriate to put a driftwood frame above a Louis XV gilded commode in a period room.
If one is not a collector and the artworks are to remain in the room they are in for an extended period, the frames on the artworks should feel comfortable in the space. Above is a very formal living room and below is a very informal one. As you can see, the frames on the paintings would feel totally out of place if they were switched around.
Keep original frames
Frame styles change with the fashion and period in which the artwork was created. Sometimes the original frame on an artwork does not fit a contemporary space so it is decided that the frame needs to be changed. Separating a period frame from an older artwork can actually reduce the value of the artwork. If it is decided a change of frame is necessary, it is wise to store the original frame so it can be reused later.
There is a lady who owns a major American modernist painting for which the artist personally made and decorated the frame. She personally disliked the frame, so she had the painting re-framed to suit her home and the original is stored at a local art warehouse. The painting is loaned out to museum shows with great regularity and when it is, the art movers take the painting to the warehouse, change out the frame to the artist’s original frame, and send it out to the museum. When it returns, the process is reversed, and the painting is returned to her in the frame she prefers. If she had discarded the frame, she would have thrown away many thousands of dollars in value.
This is an example of a frame that the artist made specifically for this painting. Although it might not fit the taste of the person who owns the painting, it would be a costly mistake to re-frame the artwork and to not keep the original as it would actually devalue the artwork.
So, you have decided to paint the living room. While the workers do their thing, you have determined that the furniture can be moved to the center of the room and be protected via drop cloth, but where and how should you temporarily store your art for the next two weeks while the paint dries? Temporarily Storing your Artwork, A Case Study will help you decide.
As with my post on transporting an artwork in your car, I will make suggestions on how to temporarily store artwork by safely stacking two-dimensional works against a wall using protective materials that would be found in your home or could be picked up at a local U-LINE, Lowes, or Home Depot. If you are lucky to live with museum quality works, you might want to call an art moving company to carefully pack and move them to a bonded climate-controlled storage facility and read no further. If your artworks are not of museum quality, carefully stacking them against a wall and providing protection at any points of contact can work just as well.
Deciding Where Your Artwork Should Be Stored
Choose a climate-controlled space to store your art. One of the best storage spaces might be a rarely used guest bedroom where the artworks are out of normal traffic patterns and the door can be shut to keep out roaming pets. A deadbolt lock installed on the door would also keep out wandering “guests.”
Since many homes these days have climate zoned spaces so you are not senselessly air conditioning rarely used areas, if the “guest bedroom” you are planning to use is not in a frequently used zone, be sure to adjust that zone’s temperature a day or two before you are planning to move the artwork. This will allow its temperature to normalize to the rest of the house and confirm that the HVAC equipment is working properly. Remember the main things to worry about are temperature, humidity, and airflow. The atmosphere of the storage space should be close to the living room they came out of.
LEFT: Since this is an oil on canvas, it can be stacked and carried in any orientation. RIGHT: This hinged and glazed work on paper should only be stacked in its upright orientation so the weight of the lithograph will not tear the hinges that hold it to the back mat.
Find a wall where the largest artwork you are storing will fit so its entire top frame edge is fully resting against it. If the artwork is not a work on paper and not hinged, it can be place in any orientation, so its smallest side should be leaning against the wall. If it is a glazed work on paper and/or hinged, it needs to always be kept upright. If you have many artworks, they can be divided into multiple stacks, especially if there is a lot of weight involved or a large size differential between artworks. It is often a good idea to group the works in general size categories, like large, medium, and small, and stack them accordingly.
The bed in a spare bedroom is a great place to temporarily store small artworks. If they are to be covered, to keep dust off them, only use a thin transparent plastic drop cloth so it is obvious that there is art on the bed. Be sure to keep pets out of the room.
If there is a bed in the room, place an old sheet over its bedspread and then lay the smaller works face up across the bed so they are not touching each other. The sheet will keep your bedspread from getting dirty from dusty frame backs. Although for the short term it is not necessary, if you are concerned about dust, cover the artworks loosely with a thin clear plastic drop cloth so anyone entering the room can see that there is artwork covering the bed.
Here are two 2×4 wood risers that will keep a stack of artworks off the floor. This should help protect your artwork from a possible water leak.
Since water leaks do happen, I highly recommend placing something on the floor to stack the artworks on. This could be a couple of 2 x 4 boards placed perpendicular to the wall and far enough apart so the artworks straddle them comfortably, or setting a folded fold-up table on the floor against the wall and placing a rubber backed bathmat on it so the artworks will not slide on the table top.
Do not stack the artwork over or in front of an HVAC register or return. It is alright to stack the works next to a return but not a vent that would blow hot or cold air directly onto the artwork. Be especially careful of large light canvases, as they can easily be blown over if a vent is blowing air behind a leaning work.
Note: As these artworks may have been hanging in your living room for a very long time, take the opportunity, as each is taken down, to dust the backside of their frames before moving them to where they will be stored.
Preparing and Properly Stacking Your Artworks
The type of artwork and how it is framed will determine how it should be stacked against a wall. In an ideal situation each artwork would be properly wrapped for its type and how it is framed, and then each would be boxed or at least separated by a sheet of fluted cardboard, foam core, sheet insulation or other type of light stiff separator. Since we are talking about stacking the artwork against a wall for a couple of weeks, following a few rules of thumb will achieve pretty much the same outcome without all the packing. So, here are a few thoughts and suggestions on how to prepare and stack your artworks.
Create a Working Inventory
Create an inventory of the works you will be moving to your designated storage space. Index cards work well here as they can be put in the order they will be moved and stacked. Be sure that along with the information that identifies each artwork, you include the artworks’ total framed dimensions, including their depth. Also note if any of the artworks’ supports are paper and are glazed as this will normally indicate that they must be stacked upright. You may want to circle the hinged artworks, showing you cannot change their orientation the way you can, in most cases, with an oil on canvas or panel. The cards should be sorted so that the largest work is on top and the smallest is on the bottom.
Note: As opposed to the way almost everything else in the universe is measured, artworks are measured using height before width, and then depth.
Take a tape measure to the space you are planning to store the works and make sure that the largest artwork will fit the available wall space considering its proper orientation.
This shows two strips of foam core placed on top of the 2×4 risers. If used, they will help protect fragile frame finishes from damage while in the stack.
Using Risers to Raise Artwork Above the Floor Level
To determine the length of the risers that will keep the artworks off the floor, let’s say they are 2 x 4 boards, add up all the depth measurements on the cards you anticipate will be in the largest stack and add 12 inches to account for the separators if you are planning to use them. Also consider the angle against the wall of the first artwork in the stack. It does not matter if the boards are a bit too long, you just don’t want them to be too short. The risers should be placed perpendicular to the wall and far enough apart so the smallest artwork in the stack will sit on top of them. If the frames are fragile, you may want to cut two 3.5-inch strips off one of your separators and place it on the 2 x 4 risers before you start stacking artworks.
General Rules for Stacking
Both of these diagrams show proper stacking technique. Each artwork is placed so it has at least two points of contact with the artwork that was stacked before it.If no dividers are used when stacking and there are no backings on the artworks themselves, then the last three artworks in the stack at left and the last artwork added to the stack at right are improperly placed and will be pushing into the back of the artwork in front of each.
As a general rule, artworks should be stacked in a graduated order with the largest against the wall and the smallest being the last work added. If the first work placed is facing the wall and it is backed or has stretcher braces, it may have a smaller work stacked against it.
LEFT: If an oil on canvas has stretcher supports, a smaller artwork can be stacked against it when separators are not available. RIGHT: This is also true if an oil on canvas is backed with a cardboard or foam core.
If the artwork is not backed or has stretcher braces, each new work that is added to the stack, whether using sheet separators or not, should either match or exceed its predecessor in either height or width, not both. This way, it will span an unprotected canvas and have at least two points of contact at the top, or upper sides of its frame.
Illustrated are three materials that will work as separators when stacking artworks. The top is 3/4 inch foam insulation board, the middle is foam core, and the bottom is fluted cardboard.
Using Separator Sheets to Protect Artworks
As mentioned above, it is always best to use separators between each artwork in a stack. I would recommend sheets of fluted cardboard, foam core, sheet insulation or other type of light stiff separator material. For each artwork added to the stack, place a separator sheet that is larger than the work it is placed in front of. That does not mean that it needs to be cut down to fit, it just means that the sheet should not be smaller.
This shows artworks stacked with separators between each work. This provides the most protection for each unwrapped artwork in the stack. Note that the third separator from the end of the stack is sideways to properly cover the artwork behind it.
Note: Do not use soft materials to cover or wrap artworks such as blankets or sheets unless they are all glazed and backed works. Cotton blankets would be preferred over wool, especially if the artworks are pastels. Pastels should never be stored with their faces at a forward angle or face down. It would be best to place a glazed pastel, face up, on a bed.
If you don’t have enough separators to put one between each artwork, you can stack the artworks front-to-front and back-to-back placing a separator between the artwork’s faces.
If you have more artworks than separator sheets, the face-to-face, back-to-back method of stacking may be appropriate. That means you should start your stack with a separator sheet against the wall and then place the first artwork, so it faces the wall and the top of its frame is in contact with the separator sheet and not with the wall. The second artwork should be placed, using the “at least two points of contact” rule, with its back to the first work. Then place a separator sheet against the face of the second work and repeat the process.
When separators are not available, artworks can be stacked front-to-front and back-to-back making sure that each artwork added has at least two points of contact with the artwork in front of it. Where two artworks touch in the face -to-face configuration, washcloths can be used to pad the frames at the points where the frames touch.
Stacking Without Separator Sheets
If you are planning on stacking without separator sheets, certainly not recommended by me, you have to be extra careful how and where each artwork makes contact with the artwork in front and behind it, and the “at least two points of contact rule” needs to be strictly adhered to. Also, if their weight and center of gravity is not a problem, they should, in most cases, be stacked face-to-face and back-to-back. When stacking, the artworks that are placed back-to-back should be touching all around. The works that are stacked face-to-face should not touch except at two upper points of contact. Where the frames touch, two folded washcloths can be used as protection by laying them over the frame where the contact is made.
Note: While works are stacked this way, they should remain undisturbed until they are unstacked to be reinstalled. Do not pull several works in the stack forward to show off a work, and under no circumstances pull a work from the center of the stack. If a work is needed, carefully unstack the works back to that artwork.
The Issue of Weight
Weight is a factor that may determine how many works should be in each stack. Large glazed works with heavy frames weigh a lot. You may not want to place any more than three or four works in a stack of artworks like this. Canvases with strip molding may not weigh a lot and therefore it might be realistic to stack more. Bottom line; you don’t want to stack so many artworks together that a single person could lose control of it if they were supporting it while another person was flipping through the artworks.
Determining an Artwork’s Center of Gravity
You will need to determine the center of gravity for the first artwork that starts a stack and ideally, each artwork that follows as they are placed. This can be determined by setting each artwork vertically on the floor in the orientation it will be stacked. It will normally want to fall forward or back depending on its center of gravity. (Whichever way it wants to fall, that is the side that should face the wall.) This means that if you are using separators between each artwork, they should be stacked in the direction that they would naturally fall. Works that do not easily fall one way or the other have a neutral center of gravity so they can be safely stacked either way.
Properly Setting the Angle of the First Artwork
The angle at which the first artwork is placed against the wall in a stack is very important! If the angle is too little, even if you have determined that its center of gravity will tend for it to naturally hug the wall, it sets up a situation where if other artworks are not stacked properly, it could allow the stack to fall. On the other hand, if the angle is too much, it will place undue stress on the stack because with every degree of extra angle added, the stack becomes progressively heavier with the first artwork that started the stack bearing the greatest weight. Also, instead of the possibility of the artworks that are stacked with too narrow an angle falling over, too much of an angle could cause the artworks at the end of the stack to start sliding out from the bottom. Also, the change of angle related to the height of the artwork also must be considered.
It is best to keep these issues in mind when determining how far the bottom of the first artwork should be away from the wall when setting the stack. Unfortunately, there is no formula that I know of that is a standard rule of thumb to determine the perfect angle, especially with all the unknown variables when you start. So, the best I can do is let you know how I do it:
I place the top of the first artwork so the side to which it naturally wants to fall is against the separator sheet that is leaning against the wall and its bottom is sitting on the riser about 4 inches away from the wall. I then pull the top of the artwork away from the wall about an inch to feel the weight of its resistance. If it seems too little, I will move the artwork’s bottom away from the wall another inch and try again until it feels right. If it seems like it is heavy or has too much resistance, I would move the artwork’s bottom toward the wall an inch and try again until the resistance feels right. Then I continue stacking other artworks between separators until I think stacking more would endanger the first artwork or make the stack unstable. I test the resistance of each added artwork as it is placed to be sure it is properly weighted towards the previously stacked work.
I focused on a guest bedroom as a good place to store artworks for this post because most guest bedrooms are properly climate controlled and rarely entered, making them an ideal location for storing artwork. Remember, because of change orders or unexpected issues that pop up during most any renovation project, they are rarely finished on time. For this reason, it is best to store your artworks where they will not be disturbed until they are ready to be put back on the wall. Having to unstack the artwork and move it to a safer location and then restack it will unnecessarily put the artwork in danger.
I hope you have found the information in this post helpful. Although I have mentioned a way to stack the artworks without using separators, I recommend using them. They will provide a higher level of protection to both the artwork and frames, especially if there is a situation where the stack falls over for some reason.
If your storage needs exceed the short term, you may have interest in reading my post, Four Artwork Storage Solutions. In the meantime, happy stacking.
Artworks are often at their most vulnerable when they are in transit, especially if the person who is transporting them is inexperienced. So to ease the stress and anxiety of doing so, I though I would share some practical tips for safely transporting artwork in your own vehicle.
For this post, I thought it would be helpful to offer some suggestions as to how to safely transport a single two-dimensional artwork in a personal vehicle. As most people do not have professional packing supplies at home, I will focus on using household items such as blankets, large garbage bags and pillows to be used sensibly in protecting the artwork when it is placed in the automobile.
All the suggestions I have made below come from over 45 years of experience in packing artwork in just about every type of vehicle, and from seeing how artworks have been delivered to us by non-professionals. Every situation is different and none of the suggestions I am making will protect the artwork or you in a serious accident. These suggestions are just “guidelines.”
Will it Fit?
It may sound rudimentary, but whether you are taking an artwork from home to another location or heading out to pick up a new acquisition from a gallery, it is always a good idea to measure the artwork and the space in your vehicle where you are planning on securing it, to see if it will comfortably fit. Also, where it will be placed in the vehicle, the type of artwork, and how it is framed will all determine if it needs to be wrapped, and if so, what level of protection is required. Once that is determined, take that overall packed size into account when measuring.
If you are picking up an artwork, say from a gallery, remember that if it is framed, the size of the artwork documented on the bill of sale or in the catalog of the show is the actual artwork size, not its overall framed size. Call the galley and ask them to measure the overall size of the artwork before driving across town to find out that it will not fit in your vehicle. Also, it’s not a bad idea to let the preparator of the gallery know where you are planning to place the artwork in your vehicle, and where, so they can pack it accordingly and then provide you with its overall packed size before you leave to pick it up.
There are three things that would improve the way this artwork has been placed in the back seat of this automobile: ONE – It is difficult to tell from this photograph, because of the angle from which it was taken, that the artwork is an oil on canvas and painted in a vertical format. Because its orientation does not matter here, it would have been better to place the artwork sideways to lower its center of gravity. If it had been a hinged work on paper, it would have had to ride vertically so that the effects of gravity would not break a hinge. TWO – If I was packing this for a client at my gallery, since this is an unbacked oil on canvas, I would have not used the blanket behind the artwork, but instead, placed a piece of fluted cardboard, foam core, or 3/4 inch insulation foam, both behind, and in front of the artwork, that was larger than the outer dimension of the artwork’s frame. I did not use these here because most people do not have these materials readily available. THREE – Pillows should be placed between the artwork’s frame and the door of the automobile on both sides so the artwork will not shift sideways while the vehicle is turning.
Is it Safe?
Be sure to think about where the artwork is being placed in the vehicle and what will happen if you must maneuver quickly left or right, slam on the breaks, or worse, get hit by another vehicle. Is it packed and placed in the car in such a way that, if any of these things happen, you and others will be safe from its movement? Will the artwork sustain minimal damage because of how it is packed?
It is important to remove any loose objects from the space in which the artwork is to be placed for travel unless the object is being used as part of the bracing or packing process. We must often move tennis rackets, golf clubs, gym bags and other things from a client’s trunk or back seat before placing an artwork inside their vehicle.
It is best not to take a pet along with you when you transport art. If you must, be sure they are restrained or not able to get into the area where the artwork is placed. I have seen both cats and dogs happily prance across an unprotected canvas in the back of a vehicle. The attention you are paying to your driving will diminish greatly if “Fluffy” decides to take a walk across your newly purchased Monet waterlily painting while you are changing lanes on a freeway.
Preparing Artwork for Transport
I am assuming for this post that you are not planning to wrap the artwork with anything other a plastic trash bag. Most galleries are happy to wrap a work in bubble wrap or other appropriate material if they know you are coming. Most of the suggestions I offer here can be modified to take into account a wrapped work.
If an artwork on paper is wrapped in an opaque material, it needs to have something on the outside that tells you which side is up and which side is the face of the artwork. If it is carried or transported sideways, the weight of the paper can tear the hinges that are holding the artwork in place.
Be sure that if you wrap a framed and glazed artwork on paper in an opaque material so you are unable to tell which side of the artwork is up, that you mark it in some way to identify its face and top. A face drawn on the front of the package or a piece of painter’s tape with “TOP” written on it works well. Works on paper need to be carried with the hinges at the top so they do not tear or pull free because they were carried sideways. In the business, when a hinge pulls free separating the work on paper from where it was mounted, we say that the artwork “slipped its hinge.” A phrase every dealer hates to hear.
So, here are several common ways two-dimensional artworks are normally transported in a personal vehicle and my suggestions on the best way to protect them using household materials.
Transporting an Artwork in a Trunk
If your trunk is empty and your artwork comfortably fits; if your destination is not far and you are traveling without other stops; if it is not raining and the temperature is not too extreme; then the carpeted trunk of an automobile is the ideal place for an artwork to travel and you will probably not need to have it wrapped at all. Since it is separated from you and your passengers, it is also the safest way.
Unglazed Artwork:
If the artwork is not glazed and does not fit snugly, place an open blanket on the bottom of the trunk so the area where the artwork will sit is completely flat. Place the artwork on top of the flat area of the blanket and roll under the outer edges of the blanket like a jelly roll so they form a barrier around the artwork as illustrated below. Make sure the furthest edge of the artwork is resting against the far end of the trunk, closest to the back seat. This will pad all the artwork’s sides and keep it from quickly sliding forward and banging into the back of the trunk during a quick stop. It is my recommendation to never place a blanket over an unglazed work, especially if the artwork’s support is stretched canvas.
The artwork is placed on a flat blanket with its top resting against the front of the carpeted trunk. The sides of the blanket are rolled underneath on each side so it snugs against the frame on its left and right side.The part of the blanket that was sitting over the edge of the trunk has been rolled underneath in the same way the sides were rolled. It was then snugged down between the closest end of the artwork and the back of the trunk to keep the artwork from sliding backward.
Note: About one in every three people who bring artworks to the gallery cover or wrap them in a blanket thinking they are protecting their artwork and its frame if it has one. This is not much of an issue if the artwork is glazed and the glazing is intact. However, if it is an old unglazed oil on stretched canvas that is starting to flake, laying a heavy blanket on it can cause expensive-to-repair damage. For instance, the weight of the blanket can push down on the canvas causing it to become concave and stressed. The act of placing a blanket on the work and taking it off can cause any dry impasto or already damaged areas to flake off. It can also break off partially secured areas of a fragile frame.
This artwork arrived at the gallery with this blanket wrapped around it. To most people, this is a logical way to protect the artwork in transit. In actuality, it is a terrible idea as any loose paint can flake off as the blanket moves over the painting’s surface. It would be much safer to have nothing over it at all, or to have used the blanket to pad and block the bottom of the artwork from sliding forward on the seat.
Glazed Artwork:
If the artwork is glazed with glass, a blanket can be place beneath and around the artwork as previously described. If more protection is needed, a soft blanket can also be laid over the artwork and folded around it. If an over blanket is used, remove it before picking up the artwork to be sure it is carried upright.
Note: Always carry an artwork upright facing you, holding it with two hands from both sides. It is not a good idea to carry it from the top of the frame, and it is best not to carry it around by its hanging wire if it has one. You are making a lot of assumptions by doing so and you have much less control over the artwork.
This is the proper way to carry most any small to medium sized two-dimensional work of art. It faces the man carrying the artwork and it is being held with two hands on each side of the painting keeping the artwork’s orientation up. Notice that it is being carried slightly to the side so it does not restrict the man from seeing where he is going. Also, if for any reason the artwork is dropped, the man will not fall into the painting.
If the artwork is glazed with plexiglass and you believe it needs to be covered with a blanket for extra protection, put a plastic bag over it first followed by the blanket, wrapping it around the edges of the frame. This will prevent the plexiglass from being scratched by the blanket. If it is raining, you might want to place the artwork in the plastic bag making sure to identify the front and top of the artwork by marking it somehow before taking it to your vehicle.
Transporting an Artwork in the Back Seat.
Transporting artworks in the back seat area of an automobile is not optimal for many reasons but sometimes, because of an artwork’s size and the circumstances, it is all that’s available. So, if it is the only option, here are my recommendations to transport the artwork as safely as possible. When doing so, please drive like you have a baby in the back seat.
All automobiles are a little different. You can measure to determine that an artwork will fit in between the front and back seats, but there are other factors to consider, and one of them is the artwork’s depth. The back door at its fully open position, window down, may not allow an artwork of your measured size to fit past the back seat, and the drivetrain hump in the middle of the back seat floorboard may be an issue. Remember, the designers of your automobile’s back doors thought only about people’s ability to get in and out, they did not care, nor even think about, your need to transport artwork.
Again, be sure that the back seat and floorboards are clear of any loose objects. It is not a good idea to have a loose bowling ball sitting on the back seat behind an artwork.
Transporting a Small Artwork in the Back Seat Area
A small work is best placed on the floorboard facing forward on either side of the drivetrain hump if the vehicle has one. It should be placed at an angle where the bottom of the frame touches the front seat back, and the artwork’s top back side leans against the front of the back seat. To protect the bottom of the frame from any hard surfaces behind the front seat, something needs to be used as a buffer. If the car has floor mats, push the mat forward and curl it up to protect the bottom of the frame where it sits against the back of the front seat. If it doesn’t, a rolled towel will do the trick.
A small work of art that fits between the drivetrain hump and the automobile’s back door can be leaned up against the front of the back seat. To protect the frame from rubbing against the front seat’s attachment points, I have flipped the carpeted floor mat around and pushed it forward while bending it up behind the front seat. This provides a carpeted area for the frame to rest behind the front seat. Since this is not a glazed work on paper, it can be placed sideways to fit the space.
I recommend that smaller works not be placed on the back seat itself, either upright or flat, unless there is something between the front and back seats that will keep the work from falling to the floorboard in a sudden stop. If there is something there that is about the same height of the seat, like a soft gym bag, then a medium size artwork can be placed flat on the rear seat extending over the built-up space between the front and back seats.
Transporting a Medium Sized Artwork in the Back Seat Area
Most often, a larger work will need to be placed between the front and back seats, facing forward. After you know that the artwork will fit, there are four contact points that need to be considered. Also, if the artwork is a hinged work on paper in a vertical format, for reasons we discussed earlier, do not turn it sideways to get it to fit.
Contact Point One: The Front Edge of the Back Seat
The metal wire could scratch your back seat upholstery. A bath towel laid over the back seat for the artwork to lean against would solve this problem.
Glazed works on paper are most often backed and therefore, a medium sized work on paper can ride with its back side against the back seat, so long as any exposed hardware will not potentially cause damage to your back seat upholstery. A blanket hanging over the glazed artwork can prevent this. (Remember to bag the piece if it is glazed with Plexiglas and mark its face and top before putting a blanket over it.)
The artwork on the left is at the greatest risk at having its canvas pushed forward by a protruding seat back. The center artwork has a support bar down the center of the canvas that will help protect it from a convex back seat front edge. The foam core backing on the third artwork will protect it completely from a convex or protruding back seat front edge.
A framed or unframed stretched canvas that does not have a backing may be at risk, depending on the design of your vehicle’s back seat. If the seat has a convex shape or has areas that protrude, it may push into the back of the canvas, stretching it out of shape. This is less likely if the canvas has a vertical stretcher brace down the middle that will rest against the seat, keeping the seat from touching the canvas. Without that brace, even if the artwork is packed in bubble wrap, it may be at greater risk from the convex back seat as it could push the bubble into the back of the canvas, placing even more pressure on it.
Here are three products that are often used to separate and protect artworks: fluted cardboard below, foam core in the middle and 3/4 inch foam insulation material on top. The foam core and insulation material will protect sensitive finishes like gold leaf frames. Fluted cardboard’s surface is not as smooth and it is better to have a plastic bag over a frame with a sensitive finish if it is used.
If no brace is present, there needs to be a flat support behind the artwork, or something else, protecting it from the front of the back seat. The support can be a piece or corrugated (fluted) cardboard, foam insulation, or other stiff material cut to the same size or a little larger than the overall artwork. If these materials are not available, a properly folded blanket can hold the artwork off the seat back to prevent damage to the canvas.
Place the blanket on the ground and roll both sides so the outer sides match the width of the paintings frame.Place the painting on the blanket to be sure the width of each roll is the size of both the stretcher and frame of the artwork.Roll one of the ends of the blanket until it is a little longer than the width of the back seat; at least long enough for it to hang over the front of the back seat about 6 inches with the rolled end against the back of the seat.
If no flat material is available, roll a blanket from two sides so the distance between the rolls matches the back of the stretcher and the artwork’s frame, and then hang the blanket over the edge of the back seat so it provides a buffer that will keep the canvas from touching the front edge of the back seat.
This image shows how the blanket should be situated behind the artwork with the side rolls under its stretcher and frame. If the blanket is touching the open canvas between the rolls anywhere, start over and roll the sides tighter to push the frame further forward. Note the bath towels supporting the frame corners on either side of the carpeted drivetrain hump.
Contact Point Two: The Floorboard, the Drivetrain Hump, and the Console
The next thing to think about is where the bottom front edge of the artwork meets the bottom of the front seat or the back of the console that divides the two front seats. A floor mat, a rolled-up towel or a piece of clothing can act as a protective buffer to hold the artwork in place and protect it from any metal or hard plastic parts under the front seat or the back of the console. If the artwork is now balancing on the drivetrain hump, you can roll towels or two strips of bubble wrap and place them under each corner to keep the artwork from listing over one way or the other while driving.
Contact Point Three: Protecting the Front of the Artwork.
In a sudden stop or head-on accident, the entire artwork will try to move forward. If it is wrapped in bubble and has a stiff sheet material in front of it like 3/4 inch foam insulation, corrugated cardboard, or foam core, it will sustain less damage than it would without it. If the artwork is glazed with glass, the bubble pack would help contain any broken glass shards. Since we are talking primarily about using household materials, if it is glazed with glass, a blanket over the entire work that is tucked in under the bottom of the frame near each bottom corner, to keep it from tilting back and forth on the hump, is a good idea.
Contact Point Four: Protecting the Sides of the Artwork
After the artwork has been placed safely into the back between the front and back seats, lower both back windows and close both back doors carefully to be sure they do not hit the artwork or its frame. If there is room, snug blankets or pillows on either side of the artwork and doors through the open windows so the artwork will not slide side to side while the vehicle is turning. Roll the windows up and you’re set to go.
Transporting a Large Artwork Flat in the Back of an SUV.
It is always a good idea to know the maximum usable rectangular dimension of the back of your SUV with the back seats down. So you will only have to measure that once, write these dimensions on the underside of the hatch door next to the auto close button if you have one, with an indelible marker.
The advantage of laying almost any two-dimensional artwork flat on its back is that, if the entire back of the artwork is touching a flat surface, the artwork and the entire frame assembly housing it are all experiencing the least amount of stress possible. Also, while in transit, you don’t have to worry which side is up on a hinged work on paper as it really doesn’t matter when it is in this position.
If the work is not packed, set the artwork face up so that the edge of the frame is touching the back of the driver and passenger seats. This way it will not slide forward and hit them in a sudden stop. Placing the artwork on a flat blanket and rolling the sides up to the frame will also protect the artwork’s edges if it slides. A folded blanket behind the artwork will help keep it from sliding back when accelerating. As discussed above, be sure there are no loose objects at the back of the SUV that might slide forward onto the artwork in a sudden stop.
If you want the artwork hidden, and it is a work on paper glazed with glass, a single layer of blanket can be placed over the artwork to hide it. If it is glazed with Plexiglas, it would be better not to use a blanket but instead, place a bed sheet over the work so it does not scratch. If it is an unglazed framed or unframed canvas and the paint is completely dry, a single layer of a light plastic opaque drop cloth is a good solution. Be sure that when it is removed, it is not dragged across the artworks surface but is carefully lifted off.
If you are concerned about moving an artwork yourself, get several quotes from professional art moving companies. Even though they are generally more expensive than furniture moving companies, they carry the proper packing and securing materials on their trucks. Every time we have had furniture movers pick up art at our gallery for various design projects, they have never brought large stiff sheets of foam core or corrugated cardboard to separate or pack artworks with them on their trucks. They only have blankets and stretch wrap. We have often had to loan them the proper materials and diplomatically explain how to use them. They are skilled at blanket wrapping almost any piece of furniture, but you don’t want your fragile unglazed Jackson Pollock to be blanket wrapped and then tied up to the side of a truck. You will be spending a lot of time and money with your conservator if you let that happen.
Properly siting sculpture outdoors is a process that requires many considerations. In this article titled, Siting Sculpture: Part Two, A Case Study, I will introduce 8 categories of issues that may, or may not affect the decision on where and how an artwork is to be placed. As most every artwork is different, each category will play a greater or lesser role in this process.
My stepmother Erika Farkac ran the Design Department of Lambert Landscape Company, once considered the finest landscaping company in Texas, for over 20 years and then worked independently for another 22. She once told me that in every garden design she created while at Lambert’s, she always included a space for a properly sited sculpture. She also said that only about one in a hundred design clients actually used that space for a sculpture, other than occasionally installing a fountain or something in concrete. So, when a client used the space she provided for a sculpture, to her, it was a small victory.
Lambert Landscaping Company at their Bachman Lake offices in North Dallas, circa 1950
As I did in Siting Sculpture, Part One, I have listed 8 categories to think about when deciding where to place a sculpture. Each can affect the viewer or the sculpture itself and all will affect every artwork installation in varying degrees. And by making sure that one of the categories is as good as it can be under the circumstances, this may necessitate paying more attention to the others. It is really about finding the best balance of the most important categories for each situation.
For example, a 5-inch-tall sculpture made of plastic that is sitting on a 40-inch stand against a wall may not be much of a safety risk in a home, but in a public place, it is a huge security risk. A 5-ton piece of steel with sharp edges and no barriers around it sitting in a retail mall hallway may not be a security risk, but it is a huge safety risk for those who may accidentally collide with it. Awareness and thinking through all the issues is what makes for a sculpture’s best overall placement.
Most Designers will be thinking primarily about the first three categories on the list as they deal mostly with aesthetics. The other categories are more practical in nature and the ask is: “By placing a sculpture here, what can, and what will happen to it over time.”
Bronze sculpture interestingly sited in front of a modernist house.
As an example, I will use an image from the first blog of an outdoor sculpture, sited in front of a modern house, to discuss how each of the categories apply or why they are not overly important in this circumstance.
First off, I have to say I really like the concept of putting a large round bronze sculpture in front of this modern home that is all about rectilinear form. Although it stands alone as a sculpture, it more importantly acts as a foil for the hard edges of the building behind while adding an appropriate shape to the building’s geometry.
Showing how the sculpture is sited in the front yard where it appears to be balancing on its edge.
Siting:
As you can see, the owners of this house decided to site the sculpture in the front yard. They lined it up with the front window of the house so it could be easily seen from inside, and the other side could be seen from the street with the house as a backdrop.
It was also installed to sit in the grass with its supporting base hidden below ground. By doing this, to an observer, the sculpture appears to be balancing miraculously on its edge. One of the best street views is where the photograph above is taken because of the square section of the house that serves as a background here.
The wall to the left of the large window is also a nice background. It would be seen behind the sculpture as a visitor walks down the portico to the front door. As the viewer heads towards the door, a kinetic illusion is created as the sculpture appears to roll away and get bigger in relation to the long wall behind it.
This unfortunate effort to light the sculpture not only interferes with the aesthetics of the sculpture’s placement, it will be a hindrance for those who want to see the sculpture through the widow at night.
Lighting:
Three lighting fixtures were arranged in a row to light the street side of the artwork. They were placed above ground and their color was chosen to blend in with the artwork. With this installation, I would have recommended that the lights be recessed into the ground and that there be three more lights on the backside so the work could be seen at night from the house.
Because the three existing fixtures were placed above ground and focused up and slightly back to illuminate the street side of the sculpture properly, anyone looking out the window at night will see nothing but shadow and glare from the lights on the street side of the sculpture. There would be no glare from any of the lights and the sculpture would be well lit if all the lights had been installed below ground level.
Surroundings:
The surroundings for this sculpture are very good. During the day, nothing is obstructing the view of the sculpture and it is easily visible from all directions. Because there are no paths to, or near the sculpture, the closest view is from the portico unless you venture off into the yard. The sculpture appears isolated, floating in the front yard’s sea of green grass. The only oddness is the three lights poking up, interrupting the space around the sculpture.
A perfect place to mimic Leonardo da Vinci’s “Vitruvian Man” for an Instagram post.
Since there are no barriers, it can be approached by animals looking for a place to mark or relieve themselves, or humans that want to get a closer look who will unintentionally wear paths in the grass. This type of sculpture, sited in a location like this, is what I call “Selfie Bait.” With no barriers for protection, it is an open invitation for people to climb inside the ring to mimic Leonardo da Vinci’s Vitruvian Man for an Instagram post.
Environment:
This artwork will be in full sun most of the day and will be exposed to all the elements the weather can throw at it. Over time, if it is a waxed bronze, left alone, its brown patina will slowly turn green.
Security:
Most people would be concerned that an artwork in such a public space would be stolen. This is always a possibility, but if it’s insured, I would not be overly concerned. The pleasure of living with it and sharing it with my neighbors would trump my concerns if it was mine. There is also the possibility of vandalism, or even neighborhood kids, flying drones through it or using it as a target for any number of ball games.
Safety:
Because of the hazards and inconsiderate people mentioned above, the connection between the base and the sculpture itself needs to be strong enough to have a 200 plus pound person climb and swing from it. The area of the base itself needs to be large and heavy enough to withstand this kind of abuse. You don’t want a child to get hurt because it fell on them. It is also a good idea to check that your liability insurance is paid up.
Wait till the weed whackers start to do a number on the sculpture’s patina and the lights.
Maintenance:
Most every sculpture, especially those placed outside, will need occasional maintenance. In this case, a bronze sculpture with this level of exposure to the elements would need to be washed off and waxed at least once a year to maintain its patination. As mentioned earlier, depending on the composition of the bronze used, it will start turning green fairly quickly when the wax has been worn off by the elements.
The idea of having the siting of this sculpture create the illusion that it is balanced on its edge is conceptually appealing. However, having it, or any artwork for that matter, sit directly on grass is a maintenance nightmare unless you have your own private gardener who is willing to hand clip the grass around it once a week during the growing season, or you are willing to do it yourself. In time, a maintenance crew, that may change from week to week, with weed whackers can do serious damage to both the artwork and the lights next to it.
I would have recommended that they skip the idea of balancing the work on the grass and set the work on a brick or concrete base that would accommodate the lights inside it. This way, it would be easy to keep the grass trimmed and the work would not be accidentally damaged by the landscaping crews in the process.
A less expensive option would have been to place the artwork in a bed of ground cover. This maintains a natural setting for the sculpture but protects it from most types of mechanical damage. And if the ground cover was cactus, it would keep unwanted intruders away, but unfortunately, make that yearly waxing a challenge.
Disaster:
The design of this sculpture, and where it is sited, make it immune to most types of natural or man-caused disasters. In its current location, high winds and lightning are its most likely issues but in Dallas, Texas, fire, earthquake, and flood are probably not going to be issues. Because this sculpture has very little surface area for its size, high winds are probably not going to be an issue outside of a direct hit by a F5 tornado and there would be a low risk of a lightning strike. It is actually more likely, that this sculpture will be hit by an out of control automobile than be damaged by any of these other issues, but it is a good idea to think through what could happen for each proposed location.
As it was with my stepmother, I am also pleased to see a house where sculpture has become part of the landscape plan, especially when a work is shared with the community by being placed in a front yard. This is a brave and possibly dangerous act, however. The neighbors probably don’t care about the house next door having a sculpture in their back yard where it is not on public view, but they may not like the fact that their neighbor has decided to impose their taste on them by placing a sculpture in their front yard, where it is visible to all who pass by. It is not a bad idea to keep the neighbors in the loop if you feel the sculpture you are planning to put in a publicly viewed space might be controversial.
If you are not comfortable placing sculpture yourself, be sure to enlist the help of a professional art installation company to work with you to site the piece properly. Many of these companies employ artists and they will be sensitive to your needs and the needs of the work. It is not a bad idea to run through the list of items above with installers to be sure that all the issues are considered before a placement is finalized.
I have been an art dealer now for over 45 years who has been privileged to live and work in a 4-acre sculpture garden, envisioned by my parents, Donald and Margaret Vogel in 1959. As most of the artwork in the garden is consigned by artists and is for sale, it changes with some regularity. As new work arrives decisions must be made as to each sculpture’s siting, presentation, and other important considerations. To share some ideas about what I have discovered about this subject, I have written two posts. The first is titled: Siting Sculpture, Part One: Overview.
Entrance to the Valley House Gallery Sculpture Garden
The garden is modern and informal with winding paths, a large pond, and is normally accessible to the public when the gallery is open. Exhibitions of sculpture in the gallery often extend out into the garden. Although for sale, sculptures in the garden are not labeled or priced, and are intentionally installed to look like they were placed permanently.
Sculpture in ground cover or flower beds requires less maintenance than sculpture surrounded by grass that must be mowed and edged regularly.
I am betting that for your residential clients you are rarely asked to help with sculpture placement indoors, and almost never outdoors. Unless it is already owned, sculpture is not normally thought of until all the two-dimensional works have been placed on the walls of a home or office.
Among other posts, I will be writing a series of articles related to sculpture placement both inside and outside the home and office, covering tips and ideas that might be useful to you when helping your clients place sculpture. Although some issues are unique to location, many considerations are the same and can be applied accordingly. Below are a few of the things to consider when placing sculpture.
Accessibility:
After determining a likely location for a sculpture, look for any unacceptable physical barriers or impeded sight-lines that obstruct access to the artwork.
This sculpture is used as a focal point at the end of a long hallway. It is placed outside the home in front of a brick wall and framed by a large picture window at the hallway’s end. Although its placement does not allow the work to be viewed from any other angle but the front, it is given an exceptionally prominent spot where it can be viewed by anyone moving about the first floor of the home.
Siting:
This category encompasses the sculptures physical placement in a space and how it relates to everything around it.
Lighting:
This category involves every aspect of how the sculpture is either mechanically and/or naturally lit, 24/7.
Surroundings:
After determining a likely location for a sculpture, this category involves considering everything around the sculpture, both physical and visual, and how it might affect all the other categories now and in the future.
This sculpture is in the front privacy courtyard and is protected from view by a privacy wall and entrance gate. It can not only be seen by every visitor as they come and go, but also from the windows of the living room and the master bath bathtub window seen at the far back. It very nicely serves as a foil to the linear aspects of the rest of the entrance.
Security:
After determining a probable location for a sculpture, what is the perceived risk it will be stolen, vandalized, or toppled over by some force of nature?
Although I am a big fan of people sharing their art by placing it in their front yards where everyone passing by can see it, today, this work is an open invitation for people to climb inside to mimic Leonardo da Vinci’s “Vitruvian Man” for an Instagram posting. There are lighting, maintenance, and liability issues with this installation I will explore in another post.
Safety:
After determining a probable location for a sculpture, is there anything about its location or stability that could cause harm to someone?
Although these plastic ice cubes floating in a swimming pool is a wonderful novel idea for a wild party, as a long term installation, it is a nightmare.
Maintenance:
After determining a probable location for a sculpture, beyond what would normally be needed to maintain the sculpture in general, it is important to determine if there are any additional maintenance issues created by siting the work in that location.
Disaster:
For any location a sculpture is sited, it is wise to take a moment and think about the area and what types of geophysical or weather related worse-case scenarios might affect the sculpture. If there is a potential problem, planning ahead for an event can minimize possible damage if one is forewarned.
Environmental:
For any location a sculpture is sited, are there any environmental issues such as direct sunlight, excessive moisture, extreme variations in temperature, or acid rain that needs to be considered?
In this series of articles, each of the above topics will be addressed regarding the proper placement of sculpture in both indoor and outdoor settings. I hope that forwarding my experiences with all types of sculpture installation will help you to more easily handle the issues faced when a design client wants to add sculpture to their art collection.
I am always available to discuss questions that may arise with sculpture placement. Just send an email with images attached of the sculpture and where you would like to place the work along with your phone number and I will get back to you as soon as I can. I may not always have a solution, but I bet I will be able to help you ask good questions.
Back when our gallery had a frame shop, the only option to reduce reflection on artworks that needed glazing was to ask for Non-Glare glass. Although this was a poor solution, it was the only solution at the time. Non-Glare glass had one side sandblasted so any reflected light would be dispersed, making the reflection look like a blob of light on the surface of the glass rather than returning a harsh reflection. We refused to use this glass because to actually see the artwork properly. You had to place the glass directly on the artwork, otherwise it would appear like you were looking at it through fog, and it is never a good idea to have glass sitting directly on an artwork in a frame assembly. (1.) So to understand what products are available today and how they work, and sometimes don’t, following are some reflections on the problem of reflections as they relate to glazed artworks.
Today, the best way to handle the problem of reflection is to use a glazing material onto which an AR (anti-reflective) coating has been applied. This is a similar coating that is now used on eye glass lenses that allows you to actually see a person’s eyes and it all but eliminates glare from oncoming car headlights at night.
The AR coating is designed to disrupt the energy contained in light waves causing them to flow out of sync. Under most conditions, AR glass helps reduce reflections to the point that they are not much of a problem, but it does not eliminate all reflection issues. From my personal experience, the coating’s effectiveness is related to how well lit the artwork is and the direction of the light source.
Diagram of rooms described below. Primary reflection problem was solved by changing glazing material to AR coated glass, turning on the living room lights, and the lamp beside the artwork.
This became evident to me when a client said she had a problem with reflection on an artwork in her living room. I suggested using AR coated glass thinking that that would most likely solve her reflection problem. I had the glass switched out and she called to let me know that the glass was still acting like a mirror. When I arrived to see what the problem might be, I discovered that, to my surprise, the artwork’s AR coated glass presented the exact same problem with reflection that the uncoated glass did. I noticed the room where the artwork was hanging and the dining room, across from the artwork, were both kept dark. At the opposite end of the dining room was a large picture window that was allowing a lot of light into the dining room. There was a door between the kitchen and the dining room she frequently used and as she walked through the two dark rooms, all she saw when she looked at the artwork was the reflection of the picture window at the far end of the dining room. I suggested that we turn on a lamp next to the artwork and discovered that the reflection issue was greatly reduced.
The takeaway of this story is that if an artwork has AR glazing and is well lit compared to its surrounding area, most reflection sources will be minimized and may not be noticed at all, especially if a viewer is focused on the artwork itself and not on the reflection source. In fact, I have often looked at artworks that have AR glazing and wondered why they weren’t glazed, only to discover on close examination that they were. If an artwork is underlit compared to its surrounding area and there is a lot of reflection, don’t be disappointed, it is just how the AR coating works. The solution is to either put more light on the artwork or reduce the amount of light in the surrounding area compared to what is already on the artwork.
Light source and highly reflective areas will be visible in the glazing if the artwork itself is not properly lighted.
Overhead lighting also helps to reduce reflections compared to lighting with lamps that are at the same height as the viewer. If you are standing beside an AR glazed artwork and there is a lamp on the opposite side of the artwork at the same angle and distance away from the artwork you are, you will see the lamp reflected in its glazing. With overhead lighting, the viewer would have to be looking up from the floor to see the reflection of the light above. AR glazing does have its limitations, but considering its old alternative, Non-Glare, it is a panacea.
Reflection is all about the light sources surrounding a glazed artwork and their relation to the viewer. The best lighting method for glazed works on paper is from above unless an artwork is hung high on a wall.
As I mentioned in our last blogpost, When to use UV control glazing, the folks at Tru Vue have a good helpdesk and their technical department can answer most any glazing related framing or installation question. Their help desk number is 708-854-2700 and their email is [email protected].
I know of no circumstance where it is good for a glazing material to be in contact with an artwork on paper. If there is no other framing choice than to have the glazing material in contact with the artwork, it is better to use Plexiglas rather than glass. Quick changes in temperature and humidity can cause glass to fog over, even on the inside of a frame assembly. If this happens with a work on paper, especially if the glass is in contact with the artwork, the paper can absorb the moisture creating a perfect environment for mold to grow, the paper to be stained, pigments to react adversely, or wrinkling; none of which are going to be good for the artwork.
Have you ever had a framer tell you that you can protect a work on paper from fading just by putting UV (Ultraviolet) protective glass or Plexiglas on the artwork? Even though your framer is normally the one that suggests when to use UV control glazing, what they tell you may be truthful without being accurate regarding its effectiveness in your situation. So, here are some suggestions on when to use uv control glazing to prevent artwork fading.
What your framer should have said is that depending on where a work on paper is hung, UV protective glass and Plexiglass can help protect it from fading. Ultraviolet light is the most damaging part of the light spectrum to fugitive pigments on paper and other materials that are prone to fading, like fabrics and furniture. High end UV protective glazing material is rated to block up to 99% of the Ultraviolet rays hitting an artwork’s surface. Just remember that UV may be the worst part of the spectrum, but it is only a small part of the spectrum that can cause damage. A greater issue is the overall amount of visible light that is hitting the artwork and the amount of time it is getting hit. Think of it as slow or fast fading.
• Little light over an extended period of time = slow fading
• A lot of light over a short time = fast fading
Ultraviolet light, the most damaging part of the light spectrum to works on paper, is in the sweet spot between visible light and x-rays. This means that UV is in the part of the spectrum that is higher energy than visible light but the rays do not go through the artwork like x-rays will. The UV rays penetrate the surface and are absorbed by the paper like a sunburn on skin. Because UV light is not visible to humans, removing it from the spectrum by using UV control glazing does not have much effect on the fidelity of an artwork.
If a work on paper was to be hung in a lightless closet, with properly controlled temperature and humidity that is never opened, it does not matter if it has UV protective glazing or not as it will not fade, at least not from light exposure.
If a work on paper is hung in a bright living room with big curtain-less picture windows looking out over a lake that reflects light into the room, even with UV glazing and protective windows the artwork will fade over time and the paper will darken. In the trade, when referring to the darkening of paper by excessive light, an art dealer would say that the artwork has been “light struck.”
Left image is unfaded and right image is a composite image showing faded work on the left side and unfaded work on the right.
For most light sensitive materials, light damage is cumulative and irreversible. So, what are the best ways of minimizing the effects of light damage to an artwork on paper?
Museums have different regiments they follow regarding the amount of light exposure each work on paper can have. Each work is normally evaluated to determine how sensitive it is. It is then assigned an allowable exposure schedule, amount of time it can be on view, and a maximum allowable light level for the duration of that time. For example, a sturdy work might be allowed to be on exhibit for 4 months at a specific light level and then rest for two years, or for 6 months at that light level and rest for three years. A more fragile work may require lower light and less time on view.
Don’t Panic! The Museum protocol I have just described is designed to meet the museum’s charge to protect what they have collected or are exhibiting. Your clients want something they can hang on the wall and enjoy for the next 20 years. So, to accomplish this goal I suggest the following:
• For works on paper that you or your client consider valuable and want to last as long as possible, definitely use UV protective glazing as it greatly reduces the most damaging aspect of the light spectrum.
• Hang in rooms with minimal light during the day like hallways or bedrooms that are not in continuous use and are normally kept dark.
• Keep lights off when rooms are not in use.
• If an artwork is hung in a room that has windows that allow a lot of light into the room during the day, add blackout curtains to the window that can be closed when no one is using the room. Codes for new buildings in most areas require that windows block a lot of the light coming in for reasons of energy conservation. This can greatly extend the life of curtains, rugs, and furniture as well as the art by reducing the amount and intensity of light entering a room and therefore slow fading.
• Have blackout fabric covers made for the artwork in rooms that window curtains are not an option or skylights let light in that cannot be blocked. They can incorporate a weighted rod at the top that can be draped over the top of the frame with the fabric hanging over the front of the artwork. This will allow quick access to works when you want to view them and they can remain hung indefinably without overexposure to light.
• Keep these works out of often used bedroom bathrooms and kitchens. These rooms often are subject to high humidity and temperatures, and other issues with that I will address in a future post. They are also rooms that would normally be well lit and where you would not normally want artwork that needs protective covers to keep them from fading.
• Place UV tube covers over your fluorescent lights. Of the three main light sources in homes and offices used today – Fluorescent, Incandescent, and LED – Florescent light, for the same amount of lumens output, is the most damaging because it produces the most UV light.
• If LED lights are producing the same number of lumens as your incandescent bulbs do, they are causing an equal level of fading to your works on paper.
One of the main manufacturers of conservation-grade UV protection glazing is Tru Vue. They have an excellent highly informed and well-educated customer support staff. If you need clarification, again no pun intended, as to whether UV protective glass and Plexi will work in a specific application, give them a call.
Tru Vue help line: Phone: 708-854-2700
Email: [email protected]
Note: Not that it is my field but I was informed by the folks at Tru Vue that one of the most frequent calls they get is from signature collectors who have used their products and have had their valuable signatures fade from being out on display in rooms that have too much light. Their glass was doing what it was supposed to but many framers are often not aware that UV glass alone will not stop fading, it only helps to slow it down. The recommendations I have made above should help with this issue. Another interesting thing they said is that often, ink signatures seem to fade very quickly to a certain point and then the fading process seems to slow. So the maximum amount of damage happens in the earliest part of their exposure.

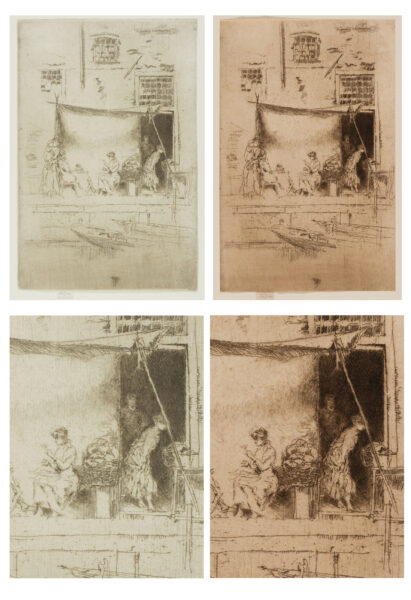

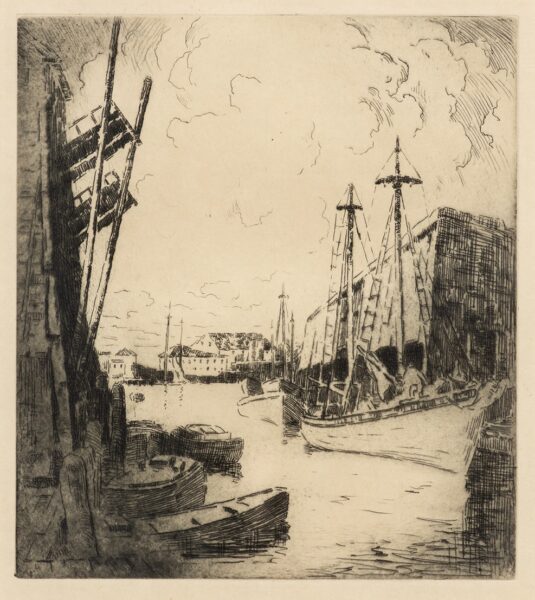
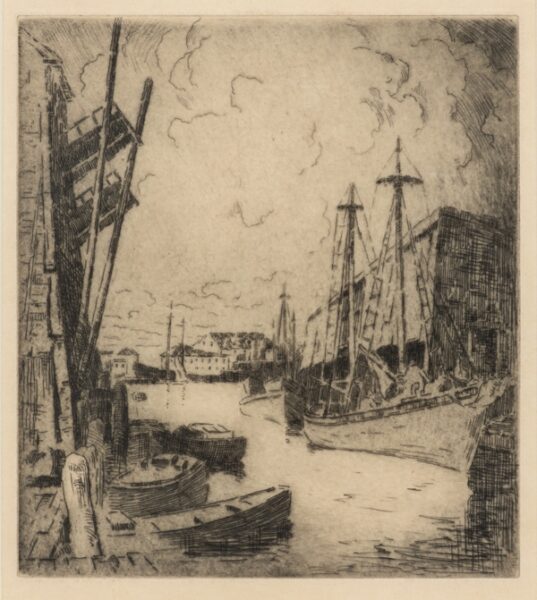
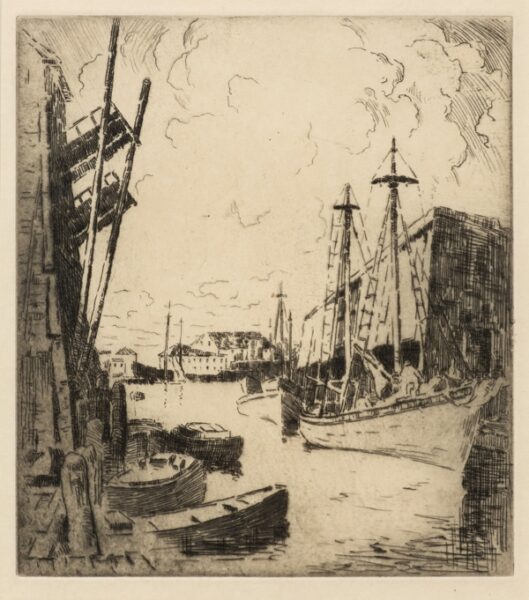

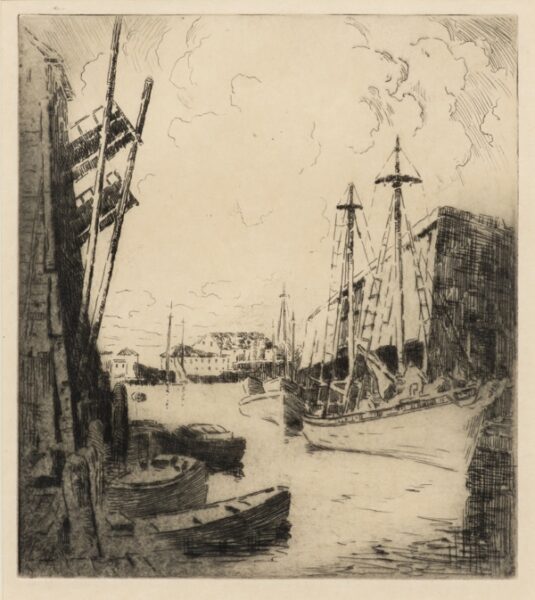
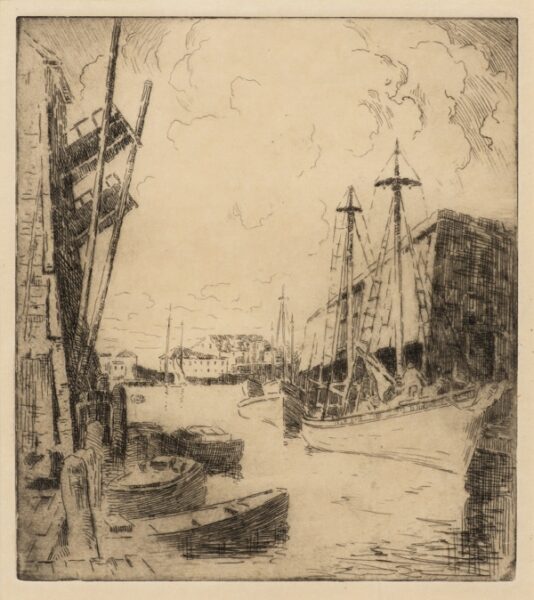
 Documenting Your Art Collection
 How Do I Get My Art Appraised?
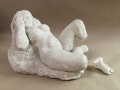
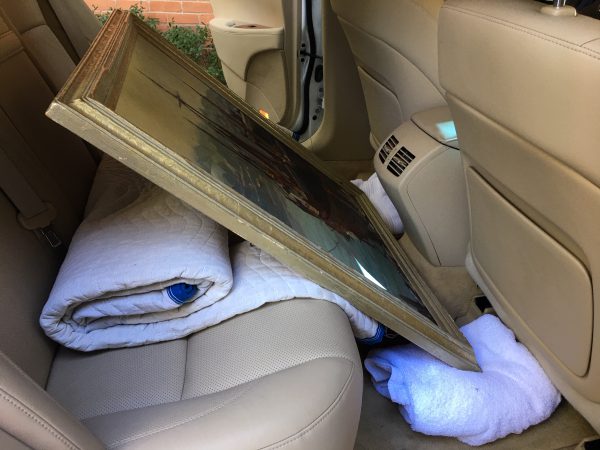 Practical Tips for Safely Transporting Artwork
 Temporarily Storing Artwork: A Case Study
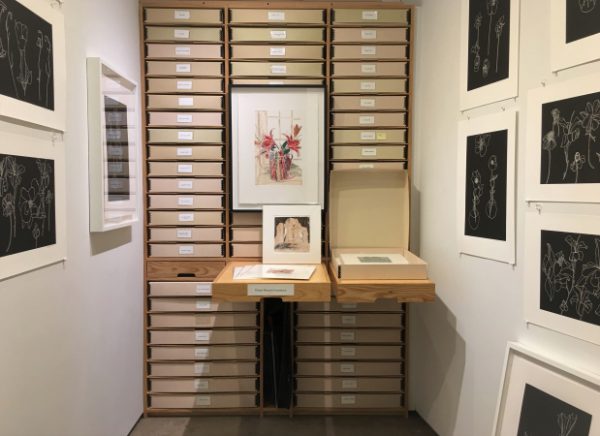 Four Artwork Storage Solutions
 Hanging and Framing FAQ’s
 Siting Sculpture, Part One: Overview
 Siting Sculpture: Part Two, A Case Study
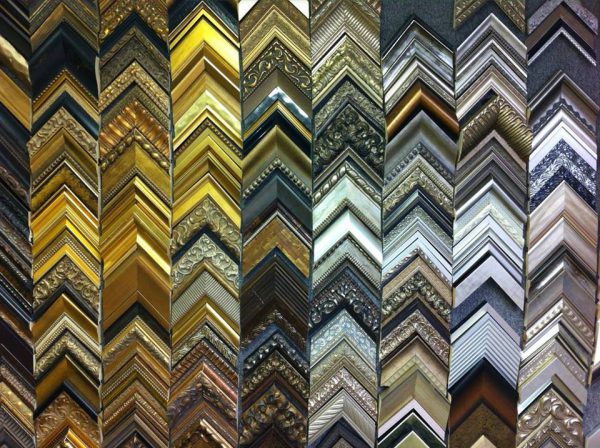 The Importance of a Proper Frame
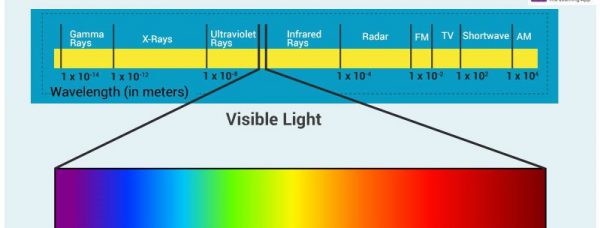 When to Use UV Control Glazing
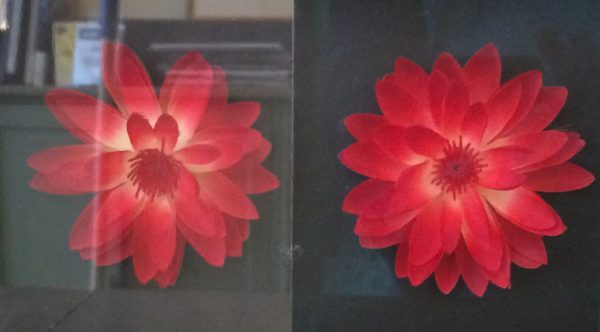 Reflection on the Problem of Reflections
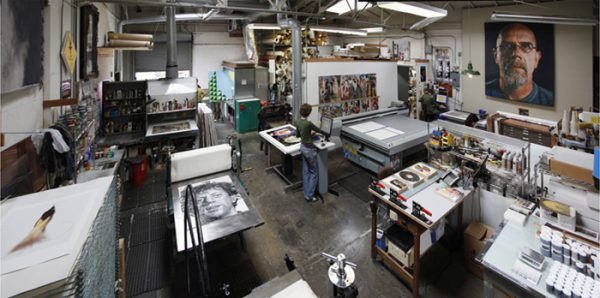 The Value in Fine and Reproductive Prints
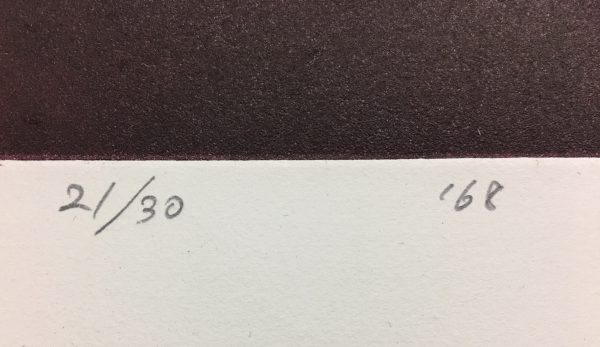 What Does That Fraction Mean on a Fine Print?


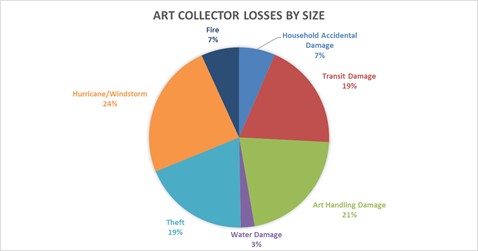
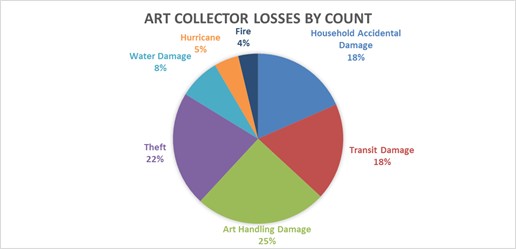
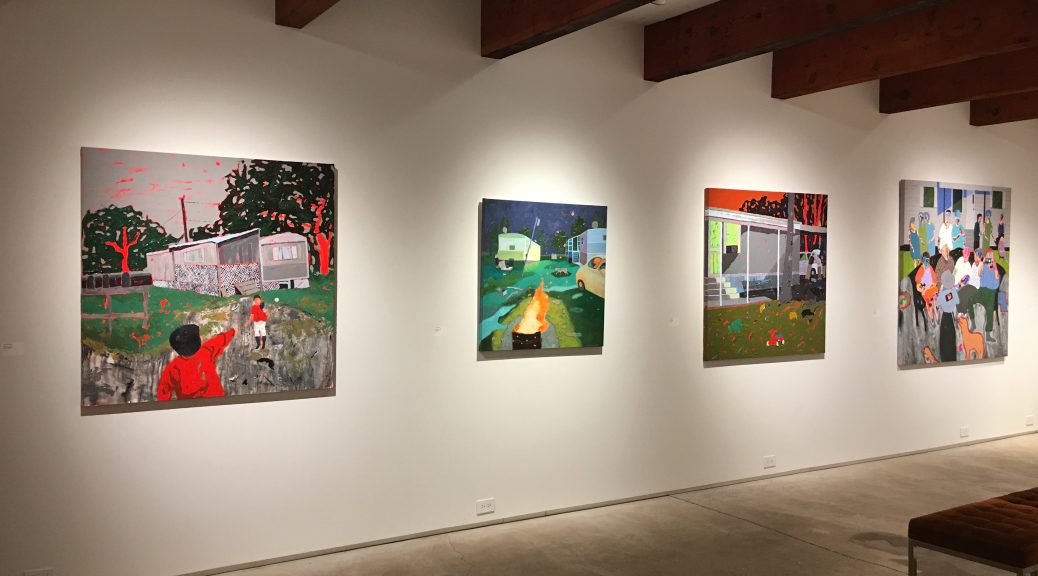
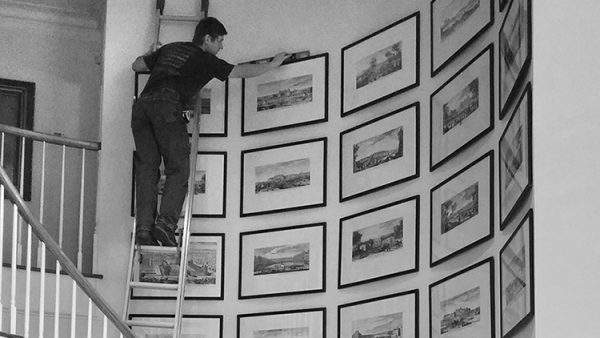

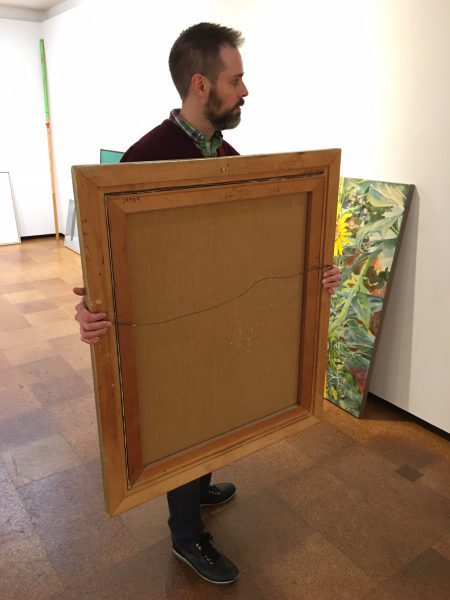

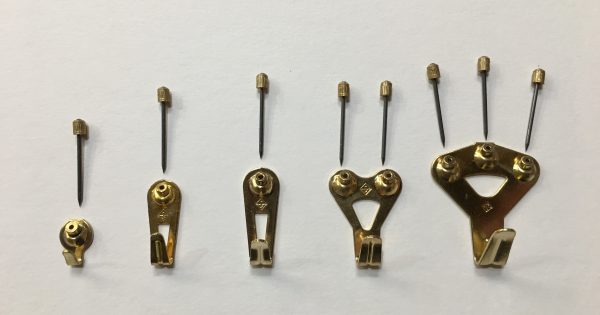
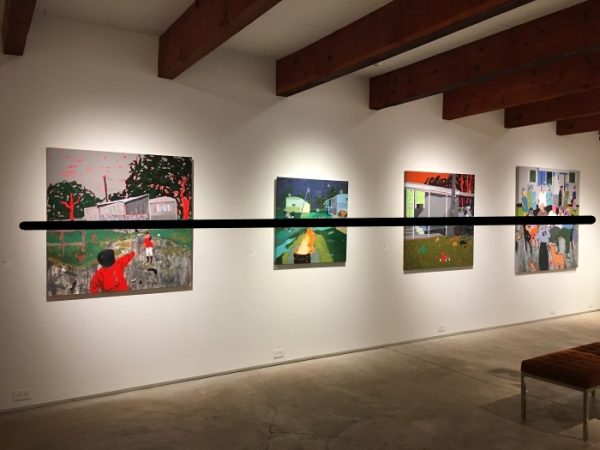
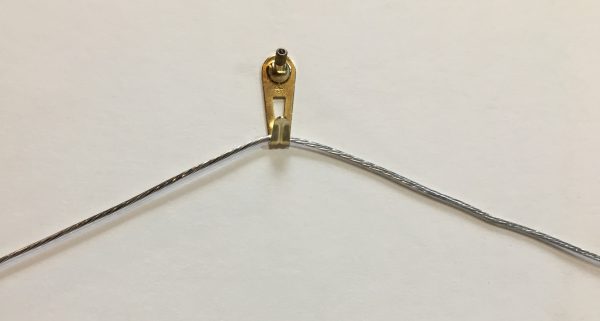
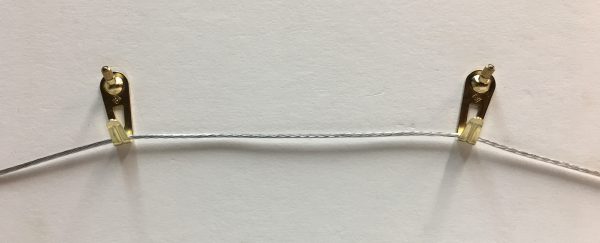
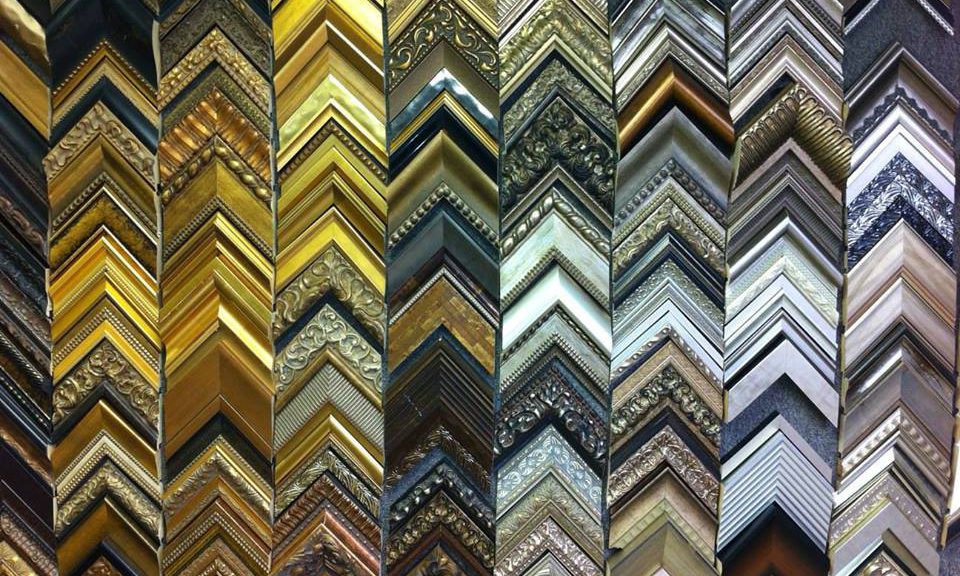


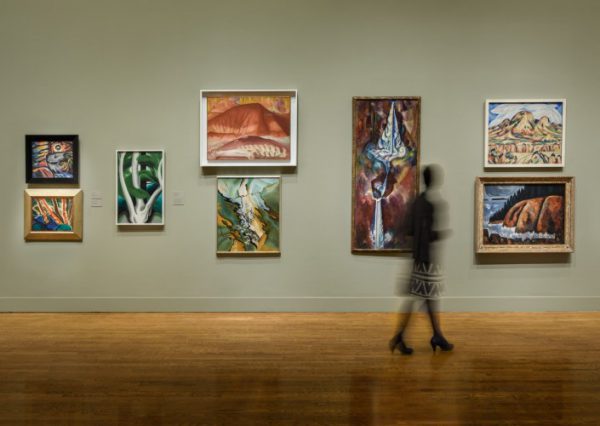

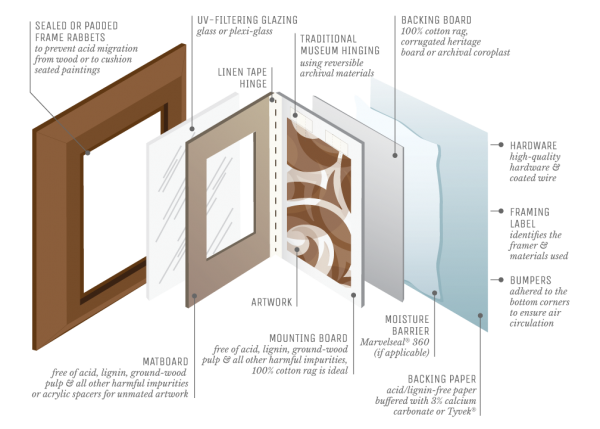
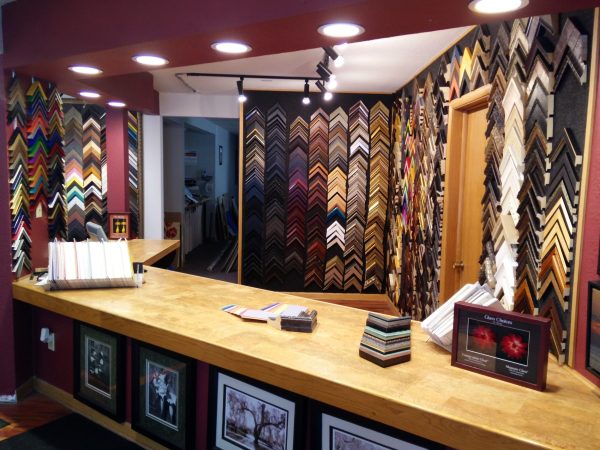
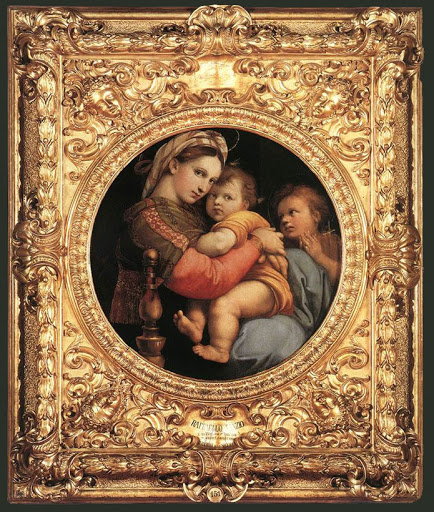


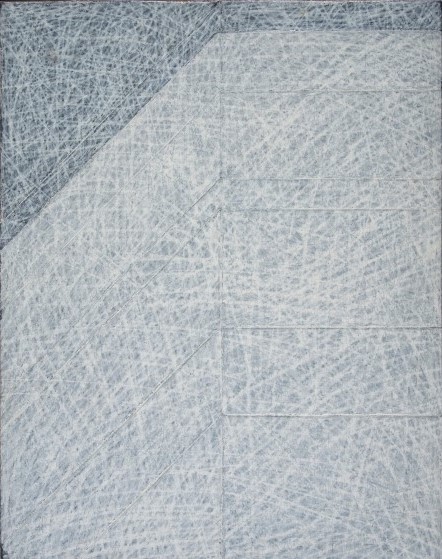
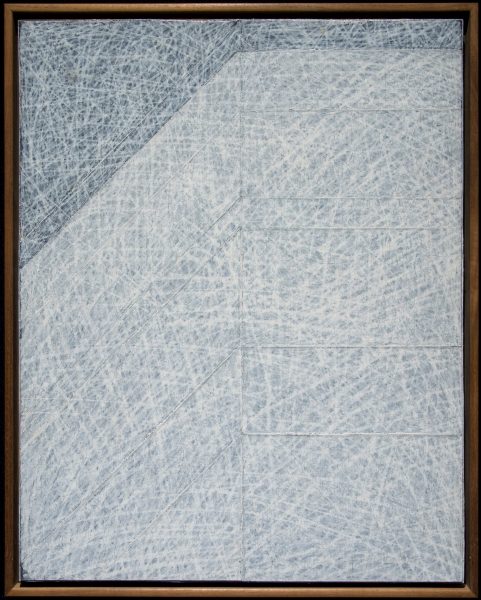

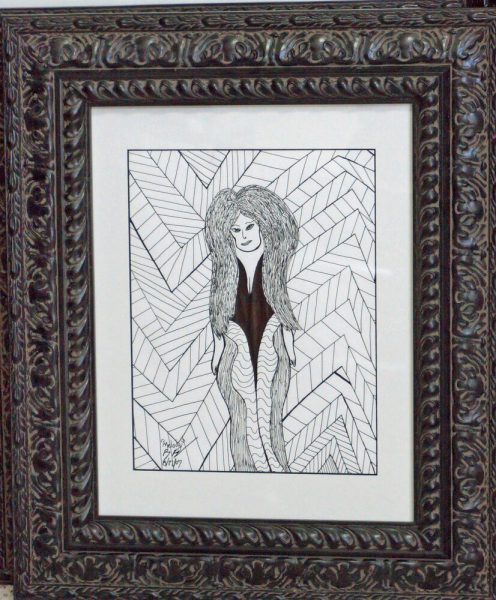
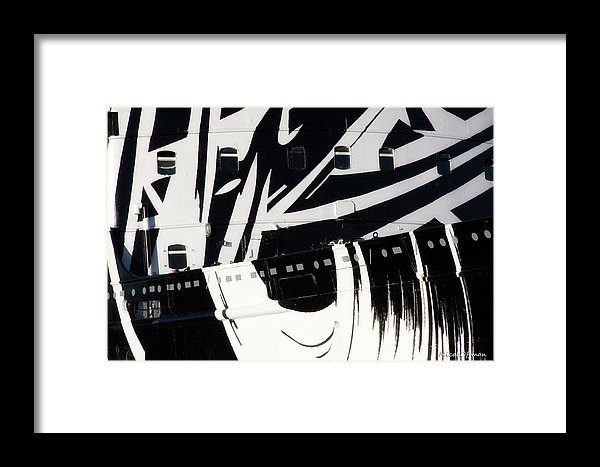

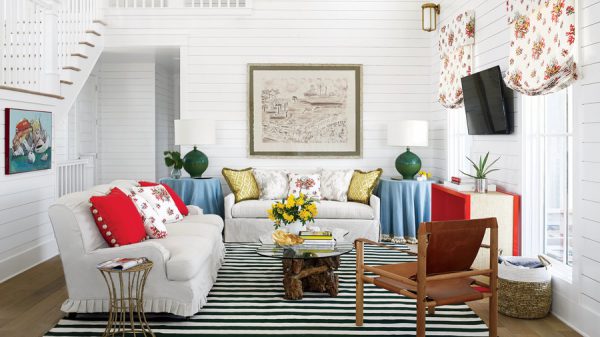
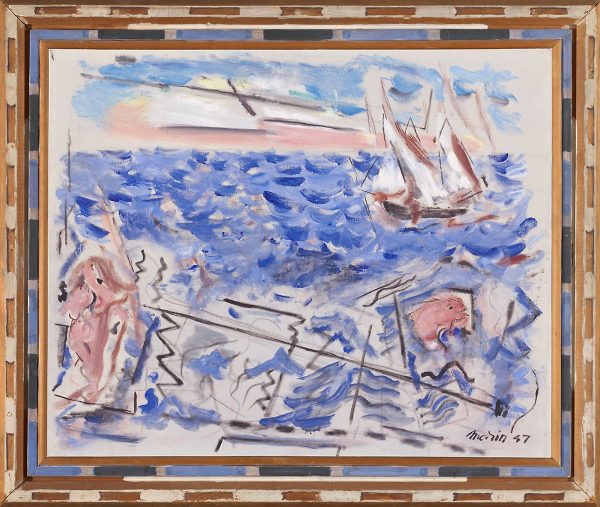
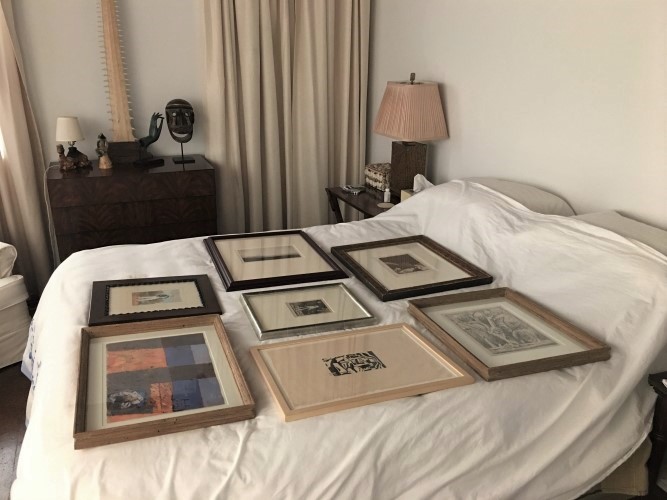
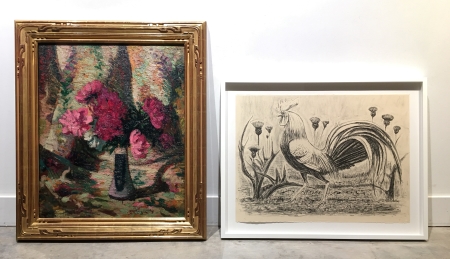
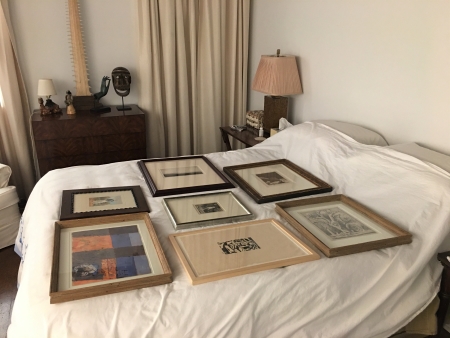
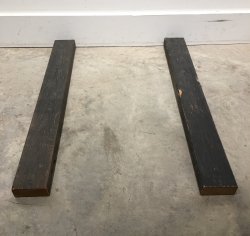
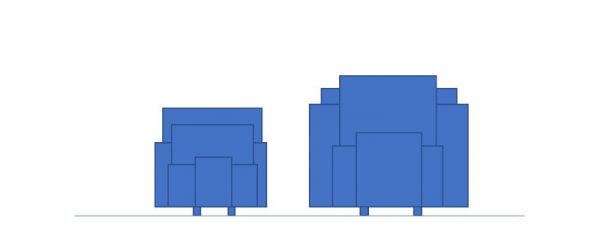
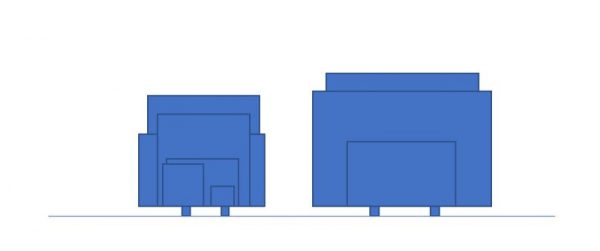
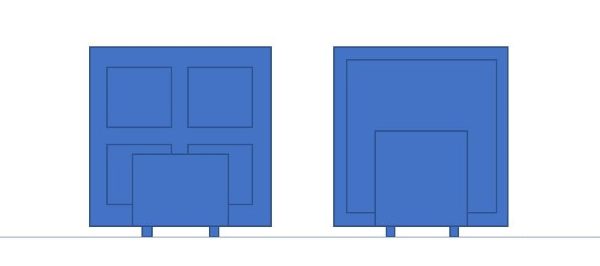
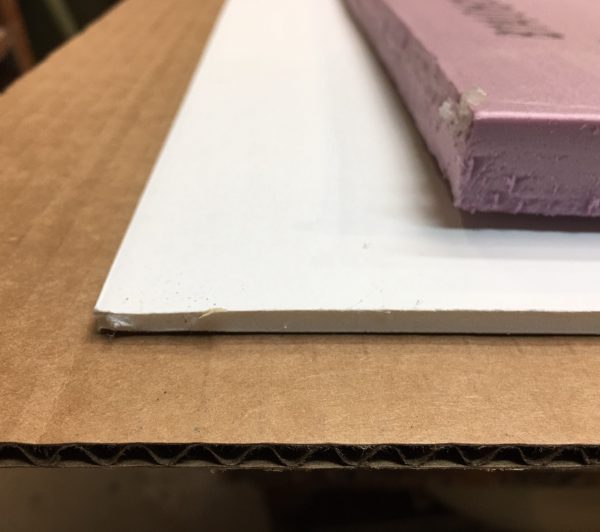
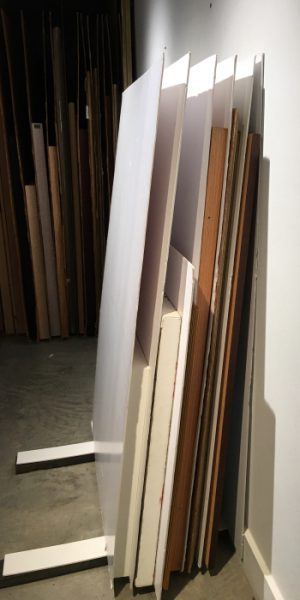
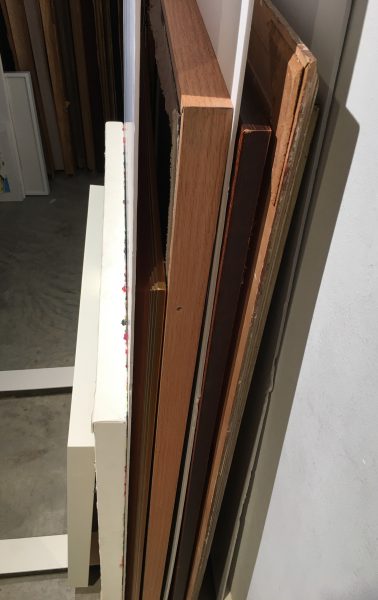
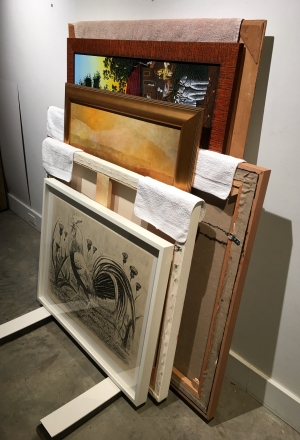
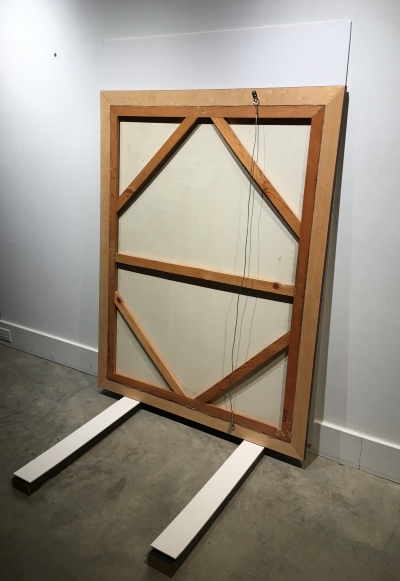
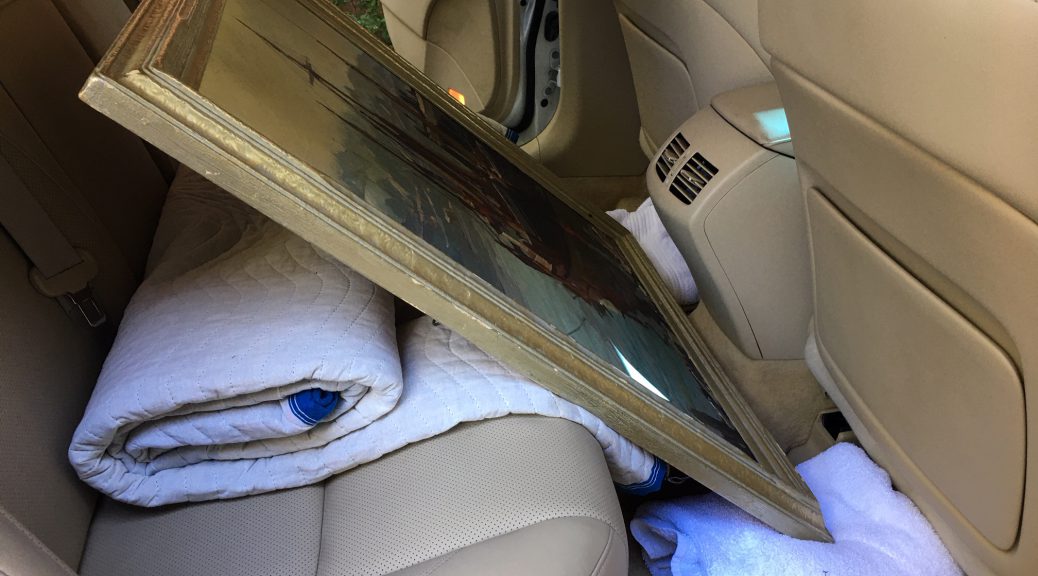
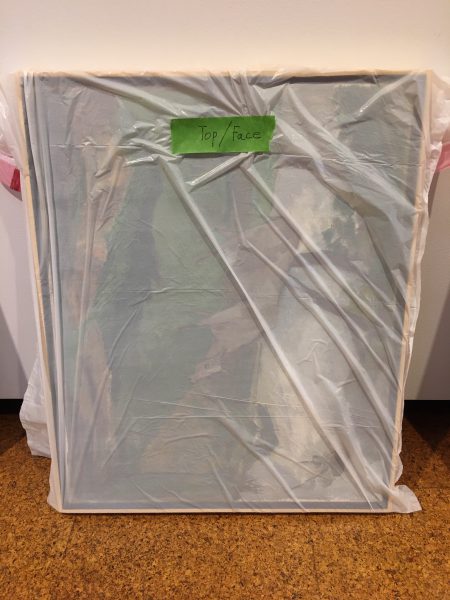
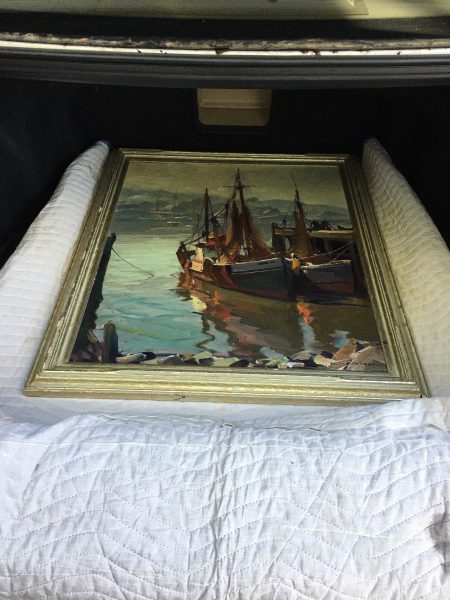
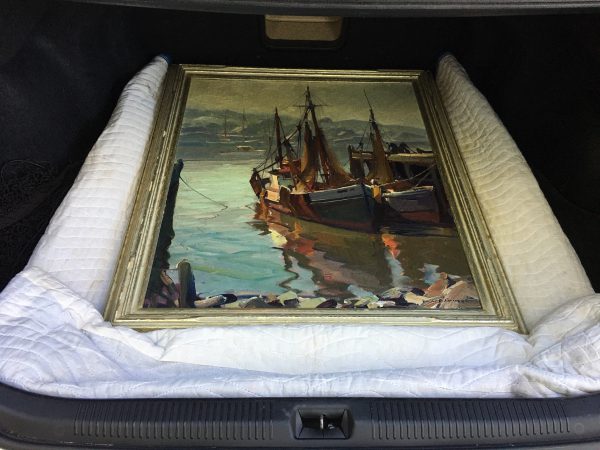
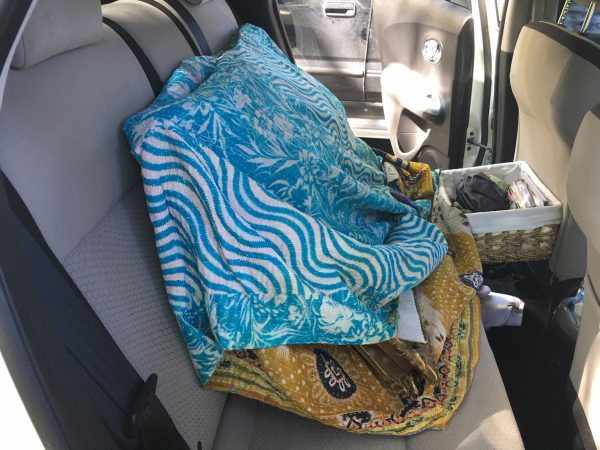
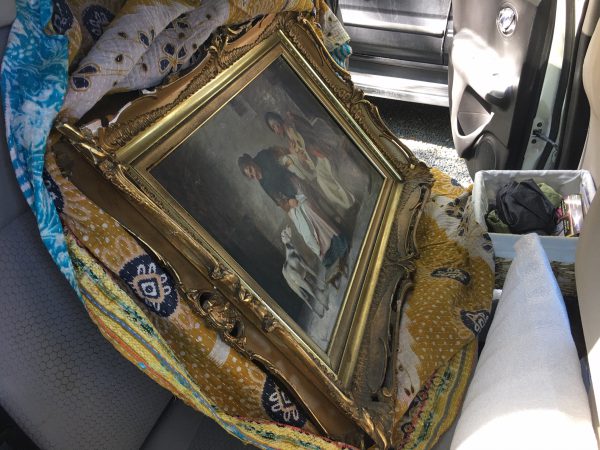

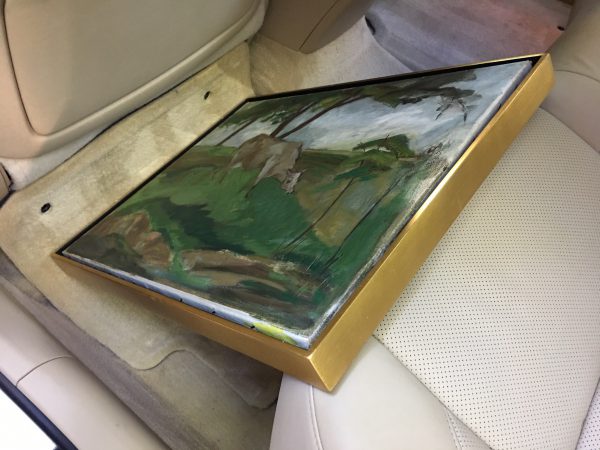

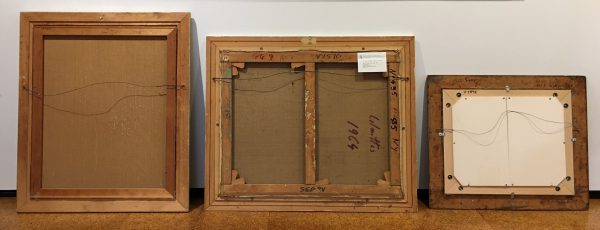
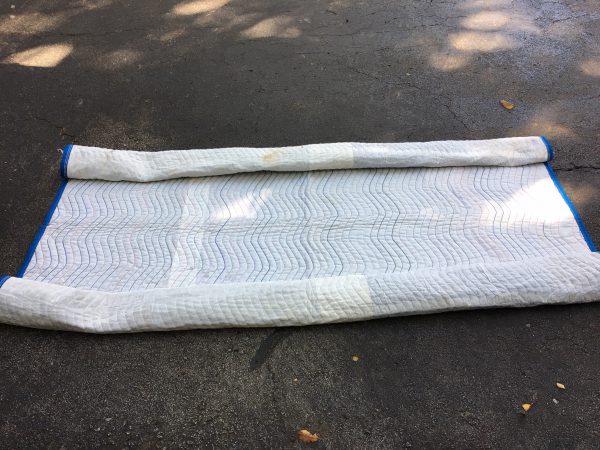
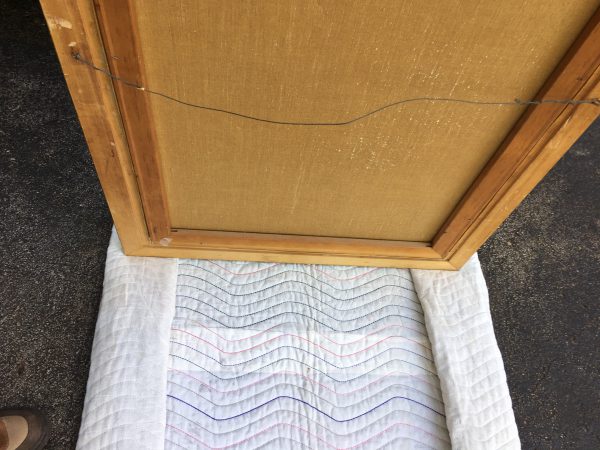
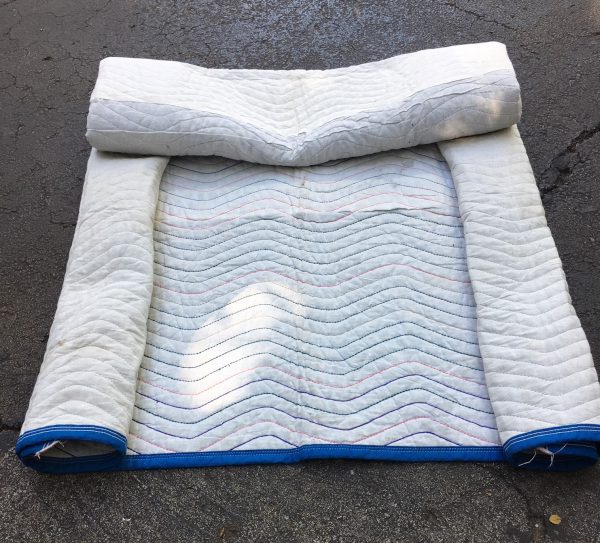


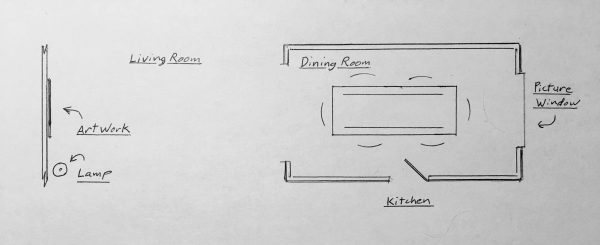
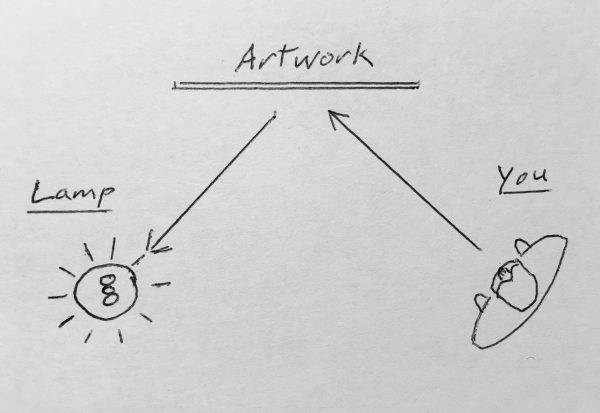
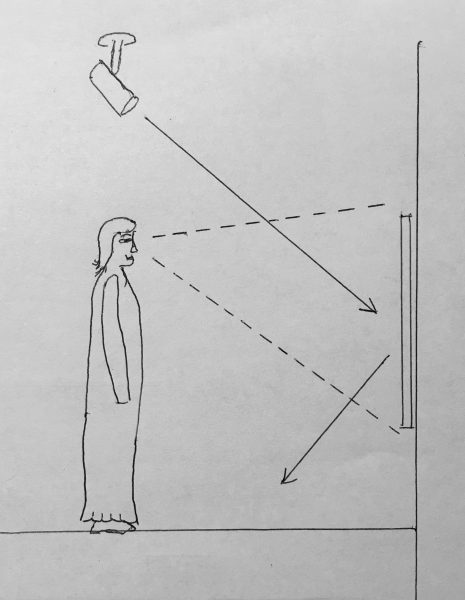

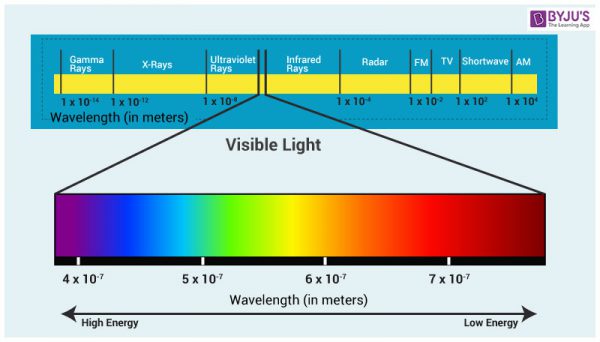
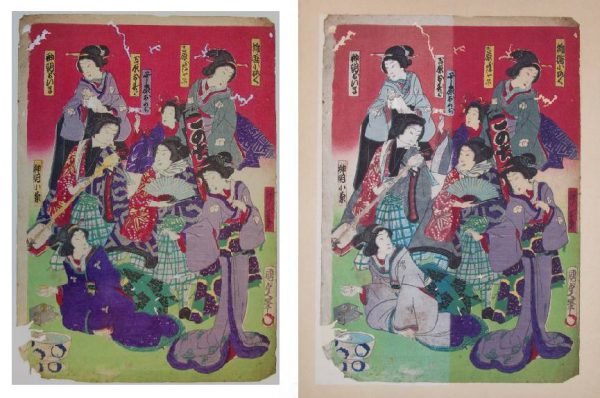
 window curtains are not an option or skylights let light in that cannot be blocked. They can incorporate a weighted rod at the top that can be draped over the top of the frame with the fabric hanging over the front of the artwork. This will allow quick access to works when you want to view them and they can remain hung indefinably without overexposure to light.